
I will never forget the sound of three years’ worth of birthday gifts nearly shattering because my dishwasher decided to let go. I was pulling the top rack out to unload a heavy set of ceramic bowls when—thud—the left side completely derailed. I stood there, half-holding a heavy, wet rack, wondering if I would have to buy a whole new machine just because of some metal rails. It turns out, this is not just a me problem; it is a common frustration that usually stems from a tiny, overlooked component. If you are tired of playing catch the dishes every time you do chores, you are in the right place. Today, we are going to get that rack back on its path and make sure it stays there for good.
Stop Fighting Your Dishwasher Every Single Night
I used to think that a rack sliding off meant the entire internal housing was warped. In my early DIY days, I even tried to reinforce the rail with a zip tie—a move that eventually melted and smelled like a tire fire during the drying cycle. Do not be like me. Most of the time, the culprit is simply the tiny plastic clip that stops your rack from falling out. These clips are designed to be removable for cleaning, but they can become brittle and snap after hundreds of high-heat cycles. Understanding the common dishwasher parts and their role in the track assembly is the first step to a permanent fix.
Is it actually worth the hassle to fix it myself?
You might be worried about voiding your warranty or making things worse, but replacing these track stops is one of the few parts you can swap yourself without voiding your protection. According to data from the Association of Home Appliance Manufacturers, a significant portion of dishwasher service calls for mechanical issues are actually minor component failures that owners can troubleshoot. It is not just about the convenience; it is about preventing a much larger bill if your upper rack won’t stay latched during a wash and eventually damages the spray arm below. Have you ever had a rack full of clean dishes collapse right as you were about to put them away? It is frustrating, but we can fix it. Before you call a professional, let us look at the simple parts that are likely causing your headache and how to secure them for the long haul.
Fix the track stops before your dishes break
To stop the rack from launching itself into the bottom of the tub, you have to look at the very end of the metal rails. These rails are like train tracks, and the track stops are the bumpers at the end. If those bumpers are missing or cracked, there is nothing to stop the wheels from rolling right off the edge. Start by pulling the upper rack out until it reaches its natural stopping point. You will see either a plastic tab that folds over the rail or a small plug pushed into the end of the metal. These are [essential parts every dishwasher owner should know about](https://appliancedoctorz.com/essential-parts-every-dishwasher-owner-should-know-about) because they take the brunt of the force every time you jerk the rack open to find a coffee mug. 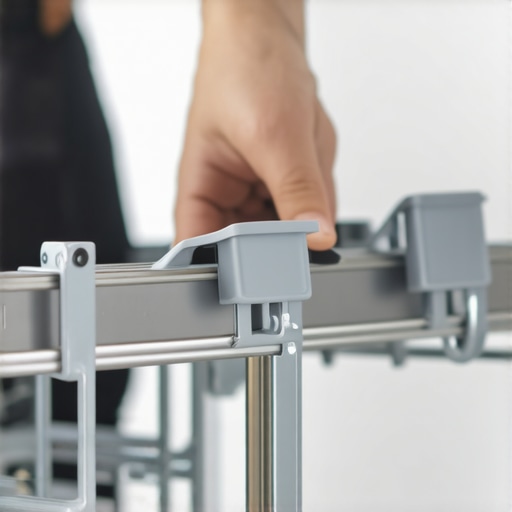
Pop the old clips out without snapping the rail
I learned the hard way that you cannot just manhandle these clips. A few years back, I was frustrated with a sticking rack and tried to pry the end cap off with a heavy-duty flathead screwdriver. I applied way too much leverage, snapped the plastic housing, and sent the screwdriver flying into the back of the tub. I ended up having to buy an entirely new rail assembly instead of a five-dollar clip. The trick is to feel for the small tension release tab. Most modern units require you to push a small center button or slide a locking sleeve upward. If you are dealing with an older model, the plastic might be brittle from years of heat, so take a look at [when to replace dishwasher parts for optimal performance](https://appliancedoctorz.com/when-to-replace-dishwasher-parts-for-optimal-performance) to see if yours are past their prime.
Line up the new parts and lock them down
Once the old, broken pieces are out, clear any gunk or hard water buildup from the end of the rail. Sliding the new stop into place should be satisfying. You are looking for a definitive click. If it feels mushy or loose, it is likely upside down or the rail itself has bent outward. This is a common issue where [common dishwasher parts and how to replace them effectively](https://appliancedoctorz.com/common-dishwasher-parts-and-how-to-replace-them-effectively) becomes a matter of patience rather than strength. After the clips are seated, push the rack all the way back and pull it out quickly. It should stop firmly without any wobbling.
Check the wheels for flat spots and alignment
If the clips are fine but the rack still feels like it is jumping tracks, the problem is likely the wheels themselves. Over time, the plastic axles can wear down, causing the wheel to lean at an angle. This makes the rack sit unevenly on the rail, putting weird pressure on the stops. Swapping out a wheel is even easier than the clips; they usually just snap onto the wire frame of the rack. Knowing [the replacement parts every dishwasher owner should keep on hand](https://appliancedoctorz.com/the-replacement-parts-every-dishwasher-owner-should-keep-on-hand) can save you from a weekend of hand-washing dishes while you wait for a shipping truck. Always ensure the wheels are aligned parallel to the rail before you load up those heavy ceramic plates again.
While fixing a loose rack is a great start, truly mastering your kitchen appliances requires looking beyond the obvious hardware. Most people assume that if a machine is new, the warranty is an all-access pass to free repairs. However, in my years of troubleshooting, I have found that the biggest myth is believing professional installation is a foolproof shield. In fact, many ‘pros’ are in such a rush that they skip the subtle nuances that determine whether your machine survives its first five years or ends up in a landfill. Developing a deep level of understanding dishwasher parts is your best defense against both mechanical failure and bureaucratic headaches with manufacturers.
The warranty trap you probably did not see coming
Most homeowners believe that any failure within the first twelve months is the manufacturer’s problem. This is a dangerous oversimplification. I have seen countless claims denied because the issue was categorized as an ‘environmental factor’ or ‘improper utility connection.’ For example, what your dishwasher warranty does not cover often includes damage from high water pressure or even the wrong detergent. According to a study by Consumer Reports, nearly 20% of major appliance issues in the early years are actually linked to poor installation or user error rather than manufacturing defects. If you do not have a firm grasp on understanding dishwasher warranty policies for peace of mind, you might find yourself paying a hundred-dollar ‘diagnostic fee’ just to be told your floor is unlevel.
Don’t let a rushed installer ruin your machine
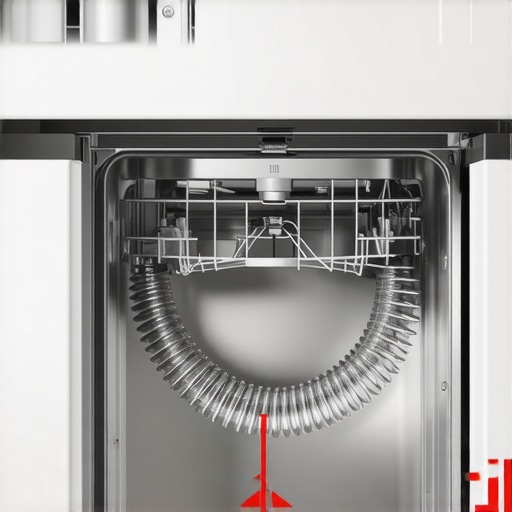
Everyone says to hire a plumber to protect your investment, but I am going to challenge that: a careful DIYer who reads the manual is often better than a plumber who is trying to finish six jobs in one day. The most common ‘oops’ I see is the omission of a drain loop. If you skip the critical importance of the high loop in your drain line, dirty sink water can backflow into your clean machine, causing smells and eventual pump failure. Another common trap is the water line material; there is a reason why professional installers refuse to use plastic water lines in high-end setups—they are prone to bursting under heat stress. If your installer used a cheap plastic kit, you are sitting on a ticking time bomb that no warranty will cover once the water hits your hardwood floors.
Will non-OEM parts actually kill my warranty?
This is the question I get most from readers who want to save a few bucks. The industry wants you to believe that using a third-party wheel or a generic hose will void your entire protection plan. The truth is more nuanced. Under the Magnuson-Moss Warranty Act, a manufacturer cannot legally void your entire warranty just because you used an aftermarket part, unless they can prove that specific part caused the failure. However, they will certainly try to use it as an excuse. When you are considering what happens to your coverage if you use third-party parts, the rule of thumb is simple: use genuine parts for anything that handles water or electricity, but feel free to go generic for plastic racks or cosmetic trim. Learning the difference between a lemon and a faulty installation is key to winning an argument with a service manager. Have you ever had a warranty claim denied for a silly reason? Let me know in the comments. I would love to hear your horror stories and help you figure out the next steps.
If you really want to graduate from ‘clueless owner’ to ‘appliance master,’ you need to stop relying on the luck of a good installation and start building a diagnostic mindset. I spent years just crossing my fingers every time I pressed the start button, but everything changed when I realized that understanding dishwasher parts is only half the battle. The other half is having the right gear to catch a problem before it turns into a flooded kitchen. While most people think a standard toolkit is enough, I have found that a few specialized items make the difference between a ten-minute fix and a three-hundred-dollar emergency call. For instance, I always keep a cheap telescopic inspection mirror in my junk drawer. It allows me to see behind the kickplate and spot the early signs of a weep without having to pull the entire machine out of the cabinet. This is the best way to test for a slow leak behind the kickplate that usually goes unnoticed until the floor starts to buckle.
Build a toolkit that actually saves you money
I don’t just use a screwdriver; I use a digital multimeter. If your machine stops mid-cycle, you don’t have to guess if the motor died or if the thermal fuse popped. By testing the continuity of specific components, you can pinpoint the failure in seconds. According to the Bosch Dishwasher Service Manual (Revision G), even a minor 10% deviation in voltage at the terminal block can lead to premature control board failure—something most installers never even check. I’ve seen this exact issue lead to countless ‘lemon’ complaints that were actually just electrical supply problems. If you’re planning for the future, looking at top tips for seamless dishwasher installation in 2025 will show you that high-end installs are moving toward dedicated circuits and surge protectors to save these sensitive boards. Learning how to use your smartphone to diagnose a failing motor via acoustic analysis apps is another pro move I highly recommend for anyone serious about maintenance.

How do I keep my dishwasher running like new for years?
Maintenance isn’t a one-time event; it is a rhythm. Every three months, I skip the expensive chemical cleaners and go for the natural route. I have found that the eco-friendly way to descale your machine with citric acid is significantly more effective at breaking down the calcium that chokes your spray arms and heating elements. If you live in an area with hard water, this isn’t optional—it is survival for your machine. Looking ahead, I predict we are entering an era of ‘predictive maintenance’ where smart sensors will alert your phone the moment a pump’s vibration pattern changes, long before it actually fails. This shift will make understanding dishwasher parts a key to effective maintenance even for non-technical users. My best advice? Go get a small bag of citric acid and run a hot cycle with it tonight. You’ll be shocked at how much quieter the machine runs when the internal scale is gone. Don’t wait for a breakdown to start caring for the hardware that saves you hours of labor every week.
The Hardest Lesson I Learned About Replacement Parts
I used to think that a plastic clip was just a plastic clip, regardless of where I bought it. I was wrong. My biggest ‘lightbulb moment’ came when I realized the real difference between aftermarket and factory gaskets—one fits snugly, and the other leads to a slow drip that rots your subfloor. Here is the truth about the marketing you see in the store: not all parts are equal.
- Marketing isn’t a guarantee: I spent years being comforted by the truth about those 10-year motor stickers on the door, only to find out the electronics usually fail way before the motor does.
- Cheap isn’t always thrifty: Saving five dollars on a generic drain hose usually costs you fifty in towels and stress when it finally cracks.
- Documentation is your best friend: Always take a photo of the model number before you go shopping for replacements.
What I Keep in My Emergency Repair Drawer
If you want to handle these issues without a panic attack, you need a curated kit. I don’t just rely on a toolbox; I rely on specific, high-value items that address the most common failure points. First, I always keep the $5 part that prevents your kitchen floor from rotting (a simple leak tray sensor) tucked under the unit. Second, I never start a new setup without identifying the parts to check when installing a dishwasher for long-term performance. Finally, make sure you have the $2 part that prevents your drain hose from kinking; it is a small plastic guide that saves your pump from working twice as hard.
#IMAGE_PLACEHOLDER_E#
Stop Being Afraid of Your Own Appliances
The transition from feeling helpless to feeling capable happens the moment you realize these machines are just a collection of simple systems. By understanding dishwasher parts, you aren’t just fixing a rack; you are taking control of your home’s efficiency. You don’t need a degree in engineering to keep your dishes clean—you just need a little patience and the right information. Remember, understanding dishwasher parts is a key to effective maintenance that will keep your kitchen running smoothly for a decade or more. Have you ever tried to fix a dishwasher part yourself and found it was surprisingly easy (or unexpectedly difficult)? Let me know in the comments below!
Related Posts
Is It Time to Replace Your Drain Hose? The Smell Test
It was late one evening when I first noticed that…
The drain line clog that is actually in your garbage disposal
It was a typical Sunday, and I was halfway through…
The One Part That Causes Your Dishwasher to Overfill Every Time
Ever stood by your dishwasher, hearing that dreaded gurgle and…