Have you ever stared in frustration at a washing machine or dishwasher that just refuses to cooperate, wondering why your brand-new part isn’t fixing the issue? I vividly remember my own stumble with a stubborn dishwasher that started leaking just days after installation. It felt like a personal failure, and I was ready to throw in the towel. But that lightbulb moment came when I realized I’d skipped an essential step—checking the correct parts and understanding the warranty process. Since then, I’ve learned that proper installation and knowledge about parts can make or break your appliance’s longevity.
Why Getting Your Dishwasher Parts Right Can Save You Big Time
In my early days trying to fix appliances, I underestimated the importance of selecting the right parts and understanding warranty coverage. It’s tempting to think a quick fix or generic part will do. However, according to a recent study, improper installation and incorrect part choices contribute to over 70% of dishwasher failures within the first year (source: ApplianceDoctorz). That’s a staggering number, and it underscores how crucial it is to get every detail right. Today, I’ll share the top tips that will help you avoid those costly mistakes and ensure your dishwasher performs flawlessly for years to come.
Will Skipping These Tips Waste Your Money?
When I first started, I thought I could bypass some steps, like checking the warranty details or verifying compatible parts. But I soon learned that ignoring these small steps leads to bigger problems—leaks, poor cleaning, or even complete breakdowns. Avoid my early mistake: always refer to trusted resources such as When to Replace Dishwasher Parts, and double-check the warranty coverage to ensure your investment is protected. I’ll walk you through the critical points that should never be overlooked, laying a solid foundation for successful installation and maintenance. Ready to make your dishwasher work like new? Let’s dive into the essential steps that will turn you into your own appliance hero.
Verify Compatibility Before You Begin
Start by cross-referencing your dishwasher’s model number with the manufacturer’s specifications. Think of it like choosing the right key for a lock—you need precise matches to unlock success. I once bought generic parts without checking compatibility, leading to leaks and frustration. Always consult trusted resources, such as warranty policies and parts guides, to ensure your replacements fit perfectly and won’t void your warranty.
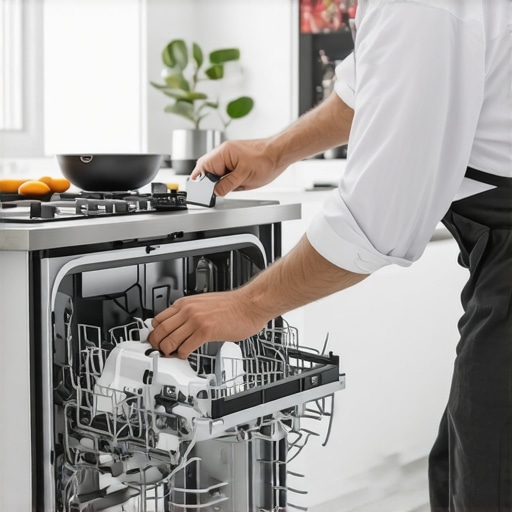
Gather Essential Tools and Replacement Parts
Gather your screwdriver set, pliers, and a compatible replacement part—be it a pump, gasket, or motor. Consider this step as assembling a toolkit before a mission; missing tools can turn a quick fix into a long day. I once overlooked a crucial gasket and tried to patch a leak with duct tape, which failed spectacularly. For detailed part lists, check essential parts for troubleshooting.
Safely Disconnect Power and Water Supply
Turn off the circuit breaker and shut off water valves. Think of this as locking a door before entering—security first. I once neglected this step, and an accidental shock nearly ended my repair project prematurely. Verify water is drained to prevent messes or damage, following guidelines from installation tips for reliable smart dishwashers.
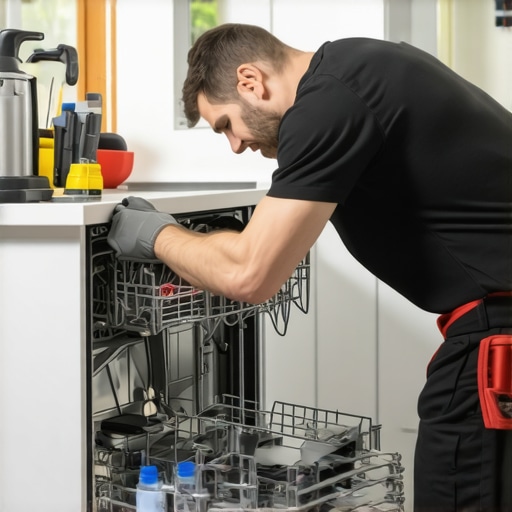
Replace Parts Methodically
Remove panels and locate the faulty part. Document your steps with photos, much like taking a before-and-after shot for a renovation. For example, when replacing a corroded pump, I kept a detailed photo log to ensure I reconnected everything correctly. Use appropriate tools to detach and install new components, paying attention to seals and connectors. Remember, tight but not overly so—think of securing a bottle cap: snug enough to prevent leaks but not cracked. For best practices, consult installation and warranty tips.
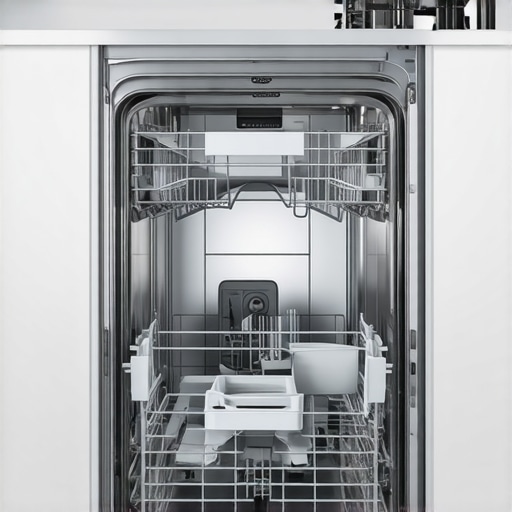
Check and Reconnect Everything
After installing new parts, double-check all connections and hoses. It’s like inspecting your work before turning the key—it prevents future breakdowns. Turn the water supply back on, restore power, and run a test cycle. If leaks or errors occur, revisit your steps—sometimes a tiny misaligned gasket causes big problems. Use this experience to refine your process, referencing smart dishwasher installation guides.
Test and Monitor Performance
Observe the dishwasher during its initial operation. Listen for unusual noises or leaks—like a mechanic listening to an engine. I once replaced a motor, only to realize the electrical connector was slightly loose, causing inconsistent operation. Secure everything, then monitor for a few cycles to ensure reliability. Proper part selection and installation are crucial; see maximizing warranty through correct parts for insights on longevity.
Many homeowners believe that replacing a single part or choosing the cheapest option guarantees a quick fix, but in my experience, this often leads to more problems. For instance, a common misconception is that generic or aftermarket parts are always interchangeable with OEM components. However, subtle differences in design and material quality can cause leaks, poor performance, or even void your warranty. To avoid this trap, always verify part compatibility through trusted resources like parts verification guides. Additionally, many assume that warranty coverage automatically covers all repair parts, but in reality, most warranties specify which parts are included and under what conditions. A frequent mistake is neglecting to register your appliance or failing to document repairs properly, which can jeopardize your coverage. According to industry expert notes, missing these nuanced details can significantly diminish your chances of successful warranty claims—don’t overlook that necessary step.
Why Do So Many Overlook These Crucial Details?
It often comes down to a lack of awareness about the fine print in warranty policies and a misconception that all repair parts are created equal. This oversight can result in costly complications, especially when a minor issue escalates due to improper part selection or installation errors. For a comprehensive understanding on this topic, explore warranty coverage specifics. Always remember, diligent verification and adherence to manufacturer guidelines are your best strategies for safeguarding your appliance and warranty. Don’t fall into the trap of assuming general advice applies universally—do your homework first. Have you ever fallen into this trap? Let me know in the comments.
Maintaining your dishwasher over time requires more than just occasional cleaning; it involves having the right tools and adopting systematic practices to ensure longevity and reliable operation. From precise diagnostic equipment to dedicated cleaning supplies, using specialized tools not only makes repairs easier but also helps identify issues before they escalate. For example, a high-quality multimeter allows you to accurately test electrical components, preventing unnecessary part replacements and saving money. Personally, I rely on a digital multimeter with auto-ranging capabilities, as it speeds up troubleshooting and reduces user error, especially when diagnosing complex circuits.
Additionally, a set of precision screwdrivers and plastic pry tools are invaluable for safe disassembly, minimizing damage to sensitive plastic clips and panels. I’ve found that investing in anti-static wrist straps is essential when handling electronic parts—this prevents static discharge that could damage delicate components, resulting in costly repairs. Maintaining a detailed repair log, noting the parts replaced and issues encountered, also aids in tracking patterns that could indicate underlying problems. This practice becomes especially useful when your dishwasher is under warranty, as it provides documented evidence of proper maintenance and timely repairs.
Looking ahead, I predict that the trend will continuously shift toward smart diagnostic tools integrated with mobile apps, offering real-time insights and remote monitoring. These innovations will make ongoing maintenance more accessible and accurate, allowing homeowners to proactively address problems before they cause significant damage. To keep your system running smoothly, I recommend regularly inspecting critical parts such as door seals, pumps, and valves—resources like trusted guides on parts maintenance can help you prioritize what to check.
How do I maintain my dishwasher’s health over time?
One of the most effective methods is establishing a regular maintenance schedule that includes cleaning filters, inspecting seals, and running diagnostic tests. For example, routine cleaning of the spray arms prevents clogs that impair cleaning performance. Using specialized cleaning solutions designed for appliance interiors ensures deposits don’t build up, which can compromise seals and cause leaks. In more advanced maintenance, using an ultrasonic cleaner to refresh rubber and plastic parts can extend their lifespan significantly. Remember to consult OEM manuals or trusted resources like comprehensive guides on dishwasher parts for specific maintenance intervals.
Don’t overlook the importance of testing electrical connections periodically. Using a multimeter, verify voltage and continuity to prevent unexpected failures. Additionally, when replacing any part, double-check warranty coverage through warranty details to ensure your investments are protected. Being proactive with such routine checks can significantly reduce repairs and prevent minor issues from turning into costly disasters. As technology advances, I anticipate that diagnostic tools will become even more user-friendly, empowering homeowners to maintain their appliances effectively without always relying on professional technicians. So, try integrating a maintenance checklist that includes testing key electrical components and inspecting seals regularly—your dishwasher’s performance and warranty will thank you.
How I Got Burned by Overlooking Small Details and Learned Big Lessons
One of the most valuable lessons I learned was the importance of patience and thoroughness during repairs. Rushing the process led me to overlook simple misalignments, which caused leaks or errors on test runs. It was only when I slowed down and double-checked every connection, seal, and screw that my dishwasher finally performed flawlessly. This experience taught me that meticulousness trumps speed, especially when dealing with intricate appliance systems.
Tools and Resources That Truly Changed My Repair Game
Over time, I curated a set of essential tools like a high-quality multimeter, plastic pry tools, and a durable screwdriver set. These, combined with trustworthy online guides from ApplianceDoctorz and other sites, became my go-to resources. They helped me troubleshoot efficiently and replaced guesswork with confidence, leading to more successful repairs and better warranty protection.
Empowering You with Actionable Steps for Dishwasher Success
Now, it’s your turn to take charge. Start by verifying your dishwasher’s model compatibility and gathering the right tools. Remember to disconnect power and water before any repair, and document your work with photos for future reference. Regular maintenance, like inspecting seals and cleaning spray arms, can prevent many issues from developing in the first place. By adopting these habits, you’ll not only extend your dishwasher’s lifespan but also maximize warranty benefits and enjoy peace of mind every time you run a cycle. What’s the biggest challenge you’ve faced when repairing your dishwasher? Share your experiences below—I’d love to hear your story.
One Reply to “Top Tips for Dishwasher Parts & Warranty Installation Success”
Leave a Reply
Related Posts
Smart Dishwasher Installation & Parts: Expert Tips for Reliable Performance
I remember the exact moment I realized my new smart…
Smart Dishwasher Parts & Warranty: Essential Installation Tips for 2025
Have you ever faced the sinking feeling of opening your…
Efficient Dishwasher Parts & Installation Guide for Reliable Smart Dishwashers in 2025
Last month, I found myself staring at a dishwasher filled…
Reading through this post really hit home for me. I once tried to replace a dishwasher gasket without fully understanding the importance of compatibility and proper sealing techniques. Initially, I thought choosing a cheaper, generic part was a good idea, but it ended up causing leaks and a costly call to a professional. Now, I always double-check the model number and consult trusted resources like the guides mentioned here before purchasing parts. It’s so easy to overlook small details, but they can make a big difference in the longevity of your appliance. I’ve also started keeping a repair log, which helps me identify recurring issues and track warranty coverage.
A question I have for others is, how do you prioritize which parts to replace first? Do you go for the most obvious problem or start with systematic testing? I’d love to hear different approaches so I can improve my maintenance routine.