Ever tighter screw, and suddenly the dishwasher leaks all over the kitchen floor. Yep, I’ve been there—I thought I had everything perfectly installed. Turns out, I forgot to tighten a crucial part, and the aftermath was a mess. That lightbulb moment made me realize something: when it comes to DIY installation, it’s often the simple, overlooked steps that lead to big problems down the road. Today, we’re diving into the four common parts in dishwasher installation that many DIY enthusiasts forget to tighten—parts that can make or break your appliance’s performance and warranty coverage.
Why Skipping Tiny Steps Can Save You Big Headaches
As a seasoned appliance enthusiast, I’ve learned the hard way that skipping over small tightening tasks can cause issues like leaks, poor performance, and even voided warranties. It’s tempting to rush through the installation, especially when you’re eager to get the job done. But neglecting to secure certain components properly can lead to water damage, costly repairs, and warranty denials. A report from the Appliance Repair Foundation highlights that many appliance failures stem from loose connections or improperly installed parts—simple errors that could have been easily avoided with thorough tightening routines.
I personally recall installing a dishwasher without double-checking the water inlet and drain hoses. Just a few days later, I faced a flooded kitchen and a costly repair. Afterward, I learned that those small parts often require extra attention. For example, the connections on the water supply line or mounting brackets need to be tightened snugly to prevent leaks and ensure longevity.
If you’re tackling this project, it’s crucial to be aware of these vital components. Overlooking them might seem insignificant, but as I discovered early on, it can be a recipe for frustration. To help you avoid my rookie mistakes, I’m sharing what I’ve learned about the parts most DIY installers tend to forget—yet are essential for your dishwasher’s optimal performance and warranty validity.
For more detailed guidance, you might want to visit helpful resources like [common dishwasher parts and their role in proper installation](https://appliancedoctorz.com/common-dishwasher-parts-and-their-role-in-proper-installation), which offers insights into what to check during your setup. Now, let’s explore which parts are often overlooked and how to ensure they’re secured correctly.
Double-Check Water Connections Right After Installation
Immediately after hooking up the dishwasher, tighten the water inlet hose and drain line securely using a wrench; a loose connection can cause leaks that may void your warranty. I learned this the hard way when a slight turn of the wrench prevented a flood in my kitchen. Ensuring these hoses are snug doesn’t take long but saves money and hassle later. For guidance on proper installation and maximizing your warranty coverage, visit this resource.
Secure Mounting Brackets Firmly for Stability
The dishwasher’s stability depends largely on the mounting brackets, which should be tightened with a screwdriver until snug. A loose bracket not only causes noise but can lead to improper sealing, risking leaks—potentially voiding warranty claims. I once forgot to tighten the brackets, and during a cycle, the dishwasher shifted, dislodging the door seal. After re-tightening, it operated quietly and efficiently. Properly secured brackets are vital; refer to this guide for detailed steps.
Inspect and Tighten the Hose Clamps
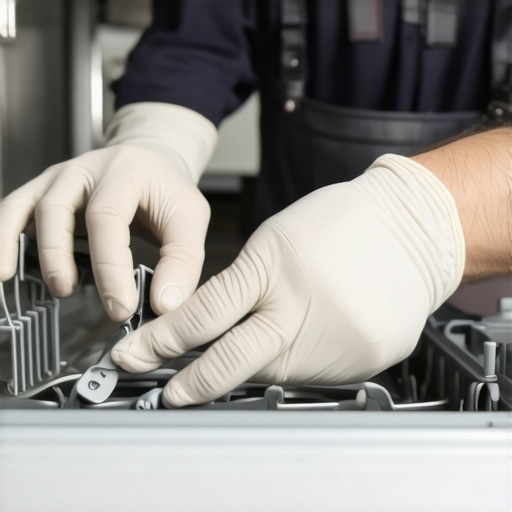
Tighten the clamps around the water hoses with pliers; loose clamps can cause water leaks and damage your flooring or cabinets. During my second installation, I used a flashlight to check each clamp’s tightness; it prevented an early leak and kept my warranty intact. Regularly inspect these clamps even after installation to ensure ongoing seal integrity. For expert tips on choosing reliable parts, see this article.
Secure the Drain Pump and Its Connections
this resource. Ensuring these core parts are properly tightened guarantees your dishwasher runs smoothly and preserves your warranty coverage.When it comes to installing or maintaining a dishwasher, many assume that following basic instructions is enough to ensure longevity and warranty coverage. However, the real challenge lies in understanding the intricacies and common misconceptions that can jeopardize your appliance’s performance. Let’s dig into some of these overlooked nuances that even experienced DIYers often miss, and how they can impact your warranty and overall satisfaction.Many believe that tightening a few hoses and securing brackets is all that’s needed for a successful dishwasher installation. While these are crucial steps, what escapes most is the importance of recognizing subtle details like proper torque specifications and the sequence of tightening components. For instance, applying excessive force when tightening water connections can damage thread seals, leading to leaks and warranty denial. Conversely, insufficient tightening leaves room for water damage down the line.
A common myth is that using generic parts won’t affect warranty coverage. In reality, manufacturers specify certain parts and brands to maintain product reliability and warranty validity. Using subpar or incompatible components may seem innocuous initially but can cause premature failure. For detailed guidance on selecting the right parts for your dishwasher, visit this resource.
Another trap many fall into involves neglecting their connections during routine inspections. Even after proper initial setup, vibrations, thermal expansion, and regular operation can loosen fittings or clamps unnoticed. This oversight often results in leaks, which some mistake for installation errors rather than maintenance issues. Regularly inspecting and tightening hose clamps and connections is vital—don’t wait for a water disaster to act.
What advanced mistakes could void your dishwasher warranty even if you think you’ve installed everything correctly?
The answer lies in understanding manufacturer-specific warranty conditions. Some warranties explicitly exclude coverage if certain maintenance steps aren’t followed, such as using recommended cleaning agents or not adhering to service intervals. A study by appliance repair experts emphasizes that neglecting these nuanced requirements can render warranties void, regardless of installation quality. To stay compliant, familiarize yourself with manufacturer guidelines on proper installation and maintenance.
Let’s be real—preventing these pitfalls demands attention to detail and a thorough understanding of your dishwasher’s components. Overlooking seemingly minor details, like tightening sequences or part compatibility, can cost you time and money. Remember, a well-installed dishwasher with correctly secured parts, according to manufacturer specifications, not only performs better but also preserves your warranty.
Have you ever fallen into this trap? Let me know in the comments. Ensuring you understand these nuanced aspects can make all the difference between a trouble-free operation and costly repairs.
Investing in Quality Tools for Reliable Maintenance
Maintaining your dishwasher over time requires more than just memory; it demands precision tools that allow you to tighten, inspect, and replace parts effectively. I swear by a high-quality adjustable wrench for water connections—its smooth gear action gives me confidence that the fittings are snug without risking thread damage. Additionally, a cordless ratchet with socket attachments simplifies removing mounting brackets, especially in tight spaces, saving me time during deep maintenance routines.
For inspecting seals and clamps, I rely on a flexible inspection mirror combined with a bright LED flashlight. This combo helps me spot minute leaks early on, preventing potential water damage and warranty issues. Regular use of a digital torque wrench ensures that fasteners are tightened to manufacturer specifications, which is critical because over-tightening can cause cracks that void warranties, as detailed in technical maintenance guidelines from appliance manufacturers.
Why a Good Diagnostic Software Can Be Worth Its Weight
When troubleshooting persistent issues or planning long-term maintenance, I highly recommend investing in diagnostic tools compatible with smart dishwashers. Modern models often support apps or software that provide real-time system status, error codes, and maintenance reminders. I’ve found that connecting via a professional-grade diagnostic device helps me identify faulty sensors or worn parts before they escalate into costly repairs.
In my experience, software that allows remote monitoring fosters proactive maintenance, extending the lifespan of the appliance. This approach aligns with emerging trends in smart home integrations, where predictive diagnostics are shaping maintenance routines. For 2025, I predict that these tools will become standard, making DIY maintenance even more accessible.
Ready to step up your maintenance game? Start by upgrading your toolkit with a precision torque wrench and a reliable inspection mirror. These investments pay off by preventing minor issues from becoming major repairs, which can jeopardize your warranty coverage. For detailed guidance on selecting the best tools, check out this resource on top tools for appliance maintenance.
How do I maintain my dishwasher over time?
Consistent inspection of hoses, clamps, and seals, combined with using the right tools for each task, ensures your dishwasher remains efficient and warranty-compliant. Regularly check connection points with a torque wrench, and keep a record of maintenance activities—it makes troubleshooting easier and supports warranty claims if needed. Adhering to factory-specified tightening sequences and using manufacturer-recommended parts prevent leaks, save money, and guarantee long-term performance. Remember, proactive care with precise tools is the best strategy to keep your dishwasher running smoothly for years to come.
What I Wish I Knew About Parts, Warranty, Installation, and Dishwasher Success
– One of the biggest revelations was realizing that even tiny overlooked details, like tightening that final water hose connection or ensuring the mounting brackets are secure, can make all the difference in preventing leaks or voiding warranty coverage. It’s easy to underestimate these small steps until a leak or fault occurs, teaching me that precision and patience are essential in every aspect of installation.
– I used to believe that once I installed my dishwasher correctly, I was set for years. But I discovered that regular inspections of clamps, seals, and connections are equally vital. Catching tiny issues early, before they escalate, has saved me from costly repairs and frustrations, emphasizing that maintenance is an ongoing process, not a one-time task.
– Understanding manufacturer specifications and using recommended parts has radically changed my approach. Going the extra mile to verify compatibility and quality ensures that my warranty remains intact and my dishwasher functions optimally. Trusting proven resources over generic advice has been a game-changer in my DIY journey.
My Must-Have Resources for Dishwater Mastery
– Common dishwasher parts guide: This helped me grasp each component’s role, making troubleshooting and assembly more manageable.
– Warranty-focused parts selection: Ensures I use the right parts that won’t jeopardize my warranty coverage.
– Installation checklist: A comprehensive tool that keeps me focused on critical steps at each phase of installation.
– Warranty policies and recommendations: Clarifies what is covered, helping me avoid preventable claim denials and ensuring peace of mind.
Keep the Momentum Going for Long-Term Dishwasher Health
Embarking on DIY dishwasher installation or maintenance can seem daunting, but armed with the right knowledge and tools, you’re well on your way to a leak-free, efficient performance. Remember, attention to detail, regular checks, and trusting expert resources not only extend your appliance’s lifespan but also protect your warranty coverage. Every tightening, inspection, and part choice is an investment in your kitchen’s future—so stay vigilant, stay informed, and enjoy the satisfaction of doing it right.
Have you ever overlooked a small step that later caused a big problem? Share your experience below—your story could help others avoid the same mistake!
2 Replies to “DIY Installation: 4 Parts You Usually Forget to Tighten”
Leave a Reply
Related Posts
![Why Your 2026 Dishwasher Needs a High-Loop Hose Kit [Update]](https://appliancedoctorz.com/wp-content/uploads/2026/02/Why-Your-2026-Dishwasher-Needs-a-High-Loop-Hose-Kit-Update.jpeg)
Why Your 2026 Dishwasher Needs a High-Loop Hose Kit [Update]
I remember the moment clearly — my dishwasher started leaking…
Replace This $12 Gasket to Avoid a 2026 Dishwasher Flood
Ever had that sinking feeling? You know, the moment when…
Expert Tips for Dishwasher Installation & Parts for Lasting Trust in 2025
My Journey to a Seamless Dishwasher Installation: Lessons LearnedWhen I…
Reading this post really resonated with me, especially the part about how overlooked small components can turn into big headaches down the line. I remember my first DIY dishwasher install; I was eager to finish so I didn’t double-check the hose clamps and mounting brackets. A week later, I noticed a slight leak under the sink, which turned out to be a loose connection. It made me realize how tiny details like tightening the drain pump connection or securing the mounting brackets properly can save a lot of trouble. I’ve also started using a digital torque wrench for better precision, which really helps ensure all fittings are snug but not over-tightened. Has anyone found particular tools or techniques effective in making these small but crucial steps easier? I’d love to hear other tips to prevent these common installation pitfalls and maintain the warranty’s integrity.
I totally agree with the importance of double-checking those small but vital components during dishwasher installation. I had a similar experience where I overlooked the hose clamps, and it resulted in a minor leak after a few cycles. Since then, I’ve invested in a good set of adjustable pliers and a digital torque wrench, which has made tightening these fittings much easier and more precise. I think standards like applying the correct torque are often overlooked because we tend to focus on the bigger tasks, but in reality, the small details make all the difference, especially for warranty purposes. Has anyone used a specific type of lubricant on threaded connections to help with tightening? I’m curious if that helps reduce wear or helps achieve the right tightness without overdoing it. Also, do you have any tips for keeping track of routine inspections after installation? I find that creating a maintenance checklist really helps prevent future leaks or issues.