Ever had your dishwasher suddenly sputter, stop, or just refuse to clean your dishes properly? I remember the frustrating moment when my machine wouldn’t spin or drain correctly, and I felt totally helpless. That lightbulb moment made me realize how crucial it is to peek inside and check for hidden obstructions, especially in the impeller. The truth is, a simple clog or obstruction can silently sabotage your dishwasher’s performance, wasting water, energy, and your patience. Today, I promise to guide you through easy, practical steps to identify and clear out those sneaky blockages in your impeller, so you can get your machine running like new again.
Why Your Dishwasher’s Impeller Might Be the Silent Killer
The impeller is like the heartbeat of your dishwasher’s water circulation system. It spins to distribute water evenly, ensuring your dishes come out spotless. But over time, bits of food, debris, or hard water deposits can get lodged, causing blockages that reduce efficiency or even break the impeller. Early detection is key; ignoring the warning signs can lead to costly repairs or the need for a full replacement. I learned this the hard way—an overlooked obstruction caused my dishwasher to leak and make strange noises, turning a simple maintenance task into a major headache. Knowing how to check for obstructions means you’re empowered to troubleshoot before things escalate. Want to see how you can do it yourself? Let’s dive into the steps.
The Skeptic’s Doubt: Is Checking the Impeller Really Worth It?
I admit, at first, I thought these checks were too complicated or unnecessary. My early mistake was assuming that if the dishwasher ran, everything was fine. But then I realized that small blockages can cause big problems over time—a clogged impeller impacts performance and can lead to expensive repairs. Not checking can be a false economy, especially since accessing and inspecting this part is more straightforward than you think. Plus, if you’re on a warranty, keeping your machine in good shape and being proactive with inspections can make all the difference. For more tips on protecting your investment, visit our guide on parts to check during installation.
End your worries today. In the next section, I’ll show you precisely how to perform a thorough, no-nonsense check of your impeller—so you can fix issues quickly and save money.
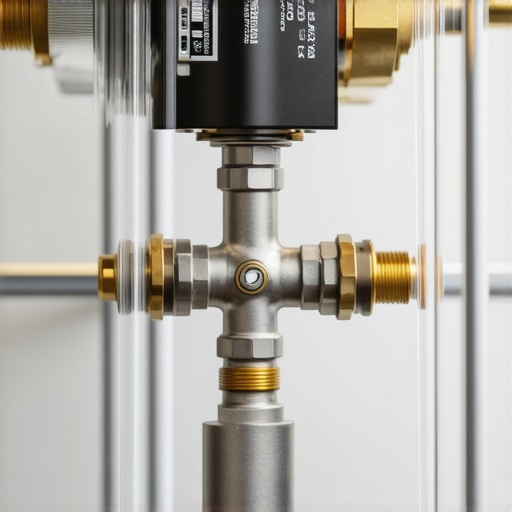
Locate the Impeller: Your Dishwasher’s Heartbeat
Start by unplugging your dishwasher and removing the lower access panel, usually found at the front bottom of the unit. Use a screwdriver to loosen the panel screws and gently set it aside. The impeller is a small, vane-like component located near the pump motor. Think of it as the paddlewheel in a coffee grinder, critical for moving water efficiently. Once exposed, inspect it visually for debris or damage. I once opened my dishwasher and found an old cereal piece lodged between the blades, which was enough to cause poor drainage. Clearing this blockage immediately restored proper water flow. Precision here is key—don’t force parts if they resist, as this could cause damage.When it comes to maintaining and installing dishwashers, many homeowners operate under misconceptions that can inadvertently cost them time, money, or even voided warranties. Let’s dig deeper into some often-overlooked nuances that can make a significant difference in your appliance’s longevity and performance.
One prevalent myth is that all parts labeled as “OEM” (Original Equipment Manufacturer) are automatically superior to aftermarket options. In reality, studies show that some high-quality aftermarket parts can match or even surpass OEM standards in durability and function, provided they are sourced from reputable suppliers. For example, the popular dishwasher parts list highlights components with proven performance, regardless of branding.
Another common mistake is assuming that warranties cover every repair or replacement. Many homeowners overlook the fine print, which often excludes damages caused by improper installation or use of non-approved parts. Missteps such as incorrectly installing inlet hoses or neglecting to perform regular maintenance can void warranty coverage. To prevent this, consult the detailed warranty guidelines and ensure your installation aligns with manufacturer instructions.
Speaking of installation, a subtle but critical aspect is the proper positioning of the dishwasher’s drain hose. Many think a simple downward loop suffices, but experts advise a high loop or air gap to prevent backflow and siphoning issues. Failing to do so can result in contaminated water re-entering the dishwasher, leading to sanitation problems and potential damage. For comprehensive steps, visit our installation guide.
What many overlook is that the choice of parts impacts warranty rights. Using incompatible parts or neglecting to select the right components during replacement can inadvertently void your coverage, even if the part itself is functional. This underscores the importance of understanding the correct parts for installation, ensuring they meet original specifications.
A lesser-known nuance involves water hardness levels, which influence the type of detergent and rinse aid needed, as well as the longevity of internal parts like seals and gaskets. Hard water can accelerate mineral buildup, causing subtle failures that are tricky to detect early. Regular descaling and using water softeners are recommended practices. For tips on maintenance, check out key parts to know.
Understanding these hidden complexities helps you become a more informed owner, capable of preventing common pitfalls. Have you ever fallen into this trap? Let me know in the comments. Remember, proper knowledge of parts, warranty limitations, and installation nuances can save you from costly repairs and extend the life of your dishwasher.
Maintaining your dishwasher isn’t just about fixing it when things go wrong; it’s about proactive care that ensures long-term performance and peace of mind. Having the right tools at your disposal makes all the difference, especially when performing routine inspections or tackling stubborn issues. One essential tool I personally rely on is a digital multimeter. It’s invaluable for testing electrical components like thermal fuses or control boards, enabling precise diagnostics without guesswork. For example, I use a multimeter to verify if a thermal fuse has blown, which is a common culprit in preventing your dishwasher from heating properly. Investing in a quality multimeter from a reputable brand, such as Fluke or Klein Tools, ensures accurate readings and durability.
Another preferred piece of equipment is a set of specialty screwdrivers, specifically those with magnetic tips. They help when removing panels or securing small screws behind tight spots, reducing the risk of stripping the heads. This precision saves time and preserves your appliance’s integrity. Additionally, I recommend a small, flexible inspection mirror. It’s perfect for peering into hard-to-see areas, like behind the pump or beneath the tub, where debris or mineral buildup might be hiding. Incorporating these tools into your maintenance routine streamlines troubleshooting and prevents minor issues from escalating.
How do I keep my dishwasher running smoothly over time?
Regularly check and replace worn parts using trustworthy sources. Familiarize yourself with the best practices for part replacement. Keep components like door seals, spray arms, and filters clean to prevent clogs and leaks. For delicate parts or complex repairs, consulting with professionals ensures safety and correctness. Additionally, installing a water softener can dramatically reduce mineral buildup, extending the lifespan of internal components, especially in areas with hard water. Recent research indicates that mineral deposits are among the leading causes of premature dishwasher failure, emphasizing the importance of preventive measures (see this study).
Looking ahead, I predict increasing integration of smart diagnostics in dishwashers, which will guide users through maintenance routines with app notifications—making proactive care even simpler. For now, I encourage you to try implementing a routine using the tools we’ve discussed. For example, regularly testing your thermal fuse with a multimeter can save you from unexpected breakdowns and costly repairs.
To get started with advanced diagnostics or to learn more about selecting the right parts for repairs, visit our comprehensive guide on part selection. Remember, consistent maintenance and the right tools are your best allies in keeping your dishwasher running like a champ for years to come.

The Surprising Truths I Learned About Parts, Warranty, and Proper Installation
One of the most valuable lessons I discovered was that not every malfunction is immediately obvious—sometimes, the sneakiest issues are lurking behind simple checks like inspecting the impeller. I used to dismiss detailed inspections as overkill, but now I understand that catching small obstructions early keeps repairs manageable and costs down. Additionally, I realized that even small mismatches in parts or improper installation can void warranties, a mistake I used to make unintentionally. The more I learned about the nuances of proper assembly and part compatibility, the better I could advise others on protecting their investments. Most importantly, I found that becoming comfortable with a few essential tools—like a multimeter and inspection mirror—transformed my approach from guesswork to confidence, making troubleshooting much more straightforward.
Related Posts

How to Reset a Dishwasher Control Board After a Power Spike
Ever had your dishwasher suddenly stop working right after a…
The $15 Pressure Switch That Fixes Overfilling Fast
Imagine standing in your kitchen, emptying the dishwasher, only to…
The $12 Hammer Arrestor That Stops Banging Pipes Forever
It was a quiet Sunday morning when suddenly — BAM!…