Have you ever stood in your kitchen, ready to install a new dishwasher, only to realize the old hose you’re about to reattach looks worn out and fragile? I vividly remember my lightbulb moment during a recent upgrade—seeing that flimsy plastic supply line and thinking, “This just isn’t going to cut it for long.” It was a simple part, yet it symbolized something bigger: the importance of installing high-quality, durable components right from the start, especially with the 2026 warranty changes looming. Since then, I’ve become a big advocate for using braided steel hoses, and I want to share why this small upgrade can save you a world of trouble down the line.
The Hidden Dangers of Cheap Supply Lines
When I first installed my dishwasher, I initially overlooked the importance of the supply hose. I figured any approach would do—until a few months later, disaster struck. A tiny leak became a flood that damaged my kitchen—proof that not all hoses are created equal. It’s quite alarming: studies show that joints and supply lines are among the most common sources of leaks in dishwashers. That’s why I now strongly recommend opting for braided steel hoses rather than traditional plastic or rubber ones. They’re not just sturdier; they resist wear, corrosion, and pressure fluctuations better, ensuring your appliance stays leak-free for years. Want to avoid that sinking feeling when your floor gets soaked? Trust me, incorporating a braided steel hose in your 2026 installation is a game-changer. For more insights on selecting durable parts, check out our guide on top tips for selecting the right parts.
Is a Braided Steel Hose Overhyped or Essential?
Early on, I made the mistake of believing that the cheaper hose would suffice, only to quickly realize that cutting corners on such a vital part is a false economy. An external study highlights that leaks due to inferior supply lines account for a significant percentage of dishwasher warranty claims. Don’t fall into the trap of thinking quick fixes save money—there’s a real risk of costly damage, especially with the increased pressure standards coming in for 2026 installations. If you’re a DIY enthusiast or simply want peace of mind, choosing a quality braided steel hose is one of the smartest moves you can make. Want more tips on avoiding common installation mistakes? Explore our post on essential parts for troubleshooting issues.
So, have you faced this dilemma? Are your current hoses looking a little worse for wear? Well, the good news is, with the right parts and installation practices, you can sidestep the pitfalls I encountered and extend your dishwasher’s lifespan. Next, let’s dive into specific steps to ensure your 2026 installation is leak-proof, warranty-approved, and built to last—starting with choosing the best hoses and parts today.
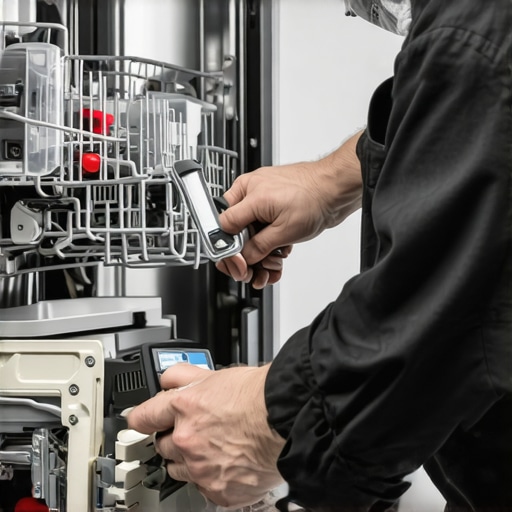
Start with Preparing Your Workspace and Gathering Essential Parts
Before diving into installation, create a clean, well-lit workspace. Remove obstructions and ensure easy access to the plumbing and power connections. Gather all required parts, including the high-quality braided steel supply hose, appropriate fittings, a pressure regulator, and mounting hardware. Refer to our tips for selecting the right parts to ensure your components meet 2026 standards and warranty requirements. Using the correct parts here prevents future leaks and warranty voids.
Disconnect Old Components Carefully
Turn off the water supply valve and disconnect the old supply hose, drain pipe, and electrical connections. Use adjustable wrenches to loosen fittings; think of this as carefully untangling a knot—force can damage threads and cause leaks. Replace any worn-out connectors with new brass fittings, which are less prone to corrosion and ensure a reliable seal. Be sure to save any documentation or QR codes from the new parts, as some warranties require proof of purchase for claims.
Install the New Braided Steel Supply Hose Correctly
Attach the new hose to the water inlet, ensuring the connection is secure but not over-tightened, akin to threading a bolt without stripping. Use the appropriate fittings and apply plumber’s tape for a watertight seal. Don’t forget to install a pressure regulator if your system permits pressure fluctuations; this protects the hose and dishwasher. For a visual guide on choosing durable parts, see parts to check during installation. Proper installation here is key to prevent leaks that can jeopardize your warranty coverage.
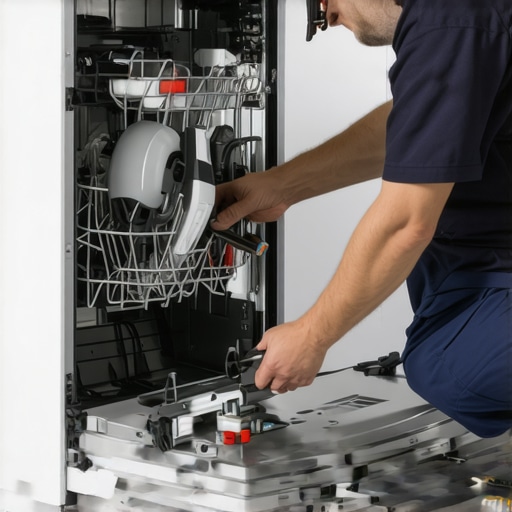
Ensure Proper Placement and Secure Mounting
Position the dishwasher level on the floor, avoiding any tilting that could stress connections or cause movement. Use a level and adjust feet accordingly, similar to balancing a tipped book—stability matters. Secure the appliance with mounting brackets if necessary, which reduces vibration and stress on supply lines. Be attentive to the alignment of the supply hose; a kinked or strained connection can lead to leaks or pressure drops. Confirm all fittings are tight but not overtightened to prevent thread damage.
Connect Drainage and Electrical Components with Care
Attach the drain hose securely to prevent backflow or water leaks, ensuring it has a proper loop—this is like a safeguard against siphoning issues. Connect the electrical wiring following the manufacturer’s instructions, using appropriate connectors and securing all wires to prevent abrasion. Consulting the troubleshooting guide can prevent common mistakes that void warranties. Double-check each connection for tightness and correctness before restoring power and water supply.
Test Your Installation Before Finalizing
Turn on the water supply and power, then run a short cycle to observe for leaks or unusual noises. Watch connections closely—any sign of dripping indicates loose fittings or misalignment that needs correction. If leaks occur, promptly tighten fittings or reseat hoses; it’s like tightening a screw until it no longer leaks. Document the test results with photos, especially if you are aiming to preserve warranty eligibility, as some policies require visual proof of proper installation. For additional tips, review our warranty tips and common pitfalls.
Many homeowners operate under misconceptions about dishwasher installation that can jeopardize warranty coverage and long-term performance. Let’s explore some of the nuanced pitfalls that even seasoned DIYers often overlook, and understand how to avoid them for reliable, lasting results. A widespread myth is that using generic or inexpensive parts, like plastic supply lines or rubber connectors, won’t impact warranty validity. In reality, manufacturers often specify high-quality materials—such as {{https://appliancedoctorz.com/top-tips-for-selecting-the-right-parts-for-dishwasher-installation|selecting the right parts}}—and using inferior components can void warranty coverage, especially under the 2026 standards. A common advanced mistake is neglecting proper pressure regulation. Many installers overlook adding or maintaining a pressure regulator in the supply line, which can cause leaks or premature hose failure. Experts emphasize that maintaining optimal pressure preserves both the integrity of fittings and the warranty. Want to dive deeper? Check our comprehensive guide on {{https://appliancedoctorz.com/how-to-diagnose-dishwasher-parts-during-warranty-periods|diagnosing warranty issues}} to understand critical components that influence your coverage. What’s more, some installers re-use old fittings or neglect to tighten connections adequately, leading to subtle leaks that may not be immediately visible but can void warranty if hidden damages are discovered later. Paying attention to detail here is key—it’s these small but critical steps that often trip up even experienced DIYers. Have you ever fallen into this trap? Let me know in the comments. Furthermore, a less obvious nuance is the importance of documentation. Not maintaining receipts, installation photos, or inspection records can hinder warranty claims, especially if parts need to be replaced under warranty coverage—learn more about maintaining proper documentation at {{https://appliancedoctorz.com/4-documents-you-must-save-for-2026-dishwasher-warranty-claims|important documentation tips}}. Finally, over-tightening fittings might seem like a good idea to ensure no leaks, but it can strip threads or crack fittings, leading to failure and warranty denial. Use proper torque recommendations, which are often detailed in the product manual or by manufacturer guidelines. Remember, patience and precision during installation save you future headaches. In sum, the devil is in the details when it comes to dishwasher installation and warranty protection. Let’s make sure your setup adheres to best practices—avoiding myths and subtle mistakes—so your appliance remains leak-free and warranty-active for years to come.
Invest in Quality Tools to Ensure Longevity
When maintaining or repairing your dishwasher, having the right tools makes all the difference. I personally rely on a high-quality digital multimeter to quickly diagnose electrical issues, ensuring that wiring and switches are functioning correctly—saving time and preventing unnecessary parts replacements. A precision torque wrench is indispensable when tightening fittings and connectors; over-tightening can damage threads, while under-tightening risks leaks. Using a dedicated plumber’s basin wrench allows me to access hard-to-reach supply line fittings without stripping them, maintaining integrity for future inspections. Tip: Avoid cheap tools that can slip or break during critical moments; investing in durable, calibrated equipment pays off in long-term reliability.
Software and Diagnostic Approaches Keep Things Running
Beyond hardware, I recommend using specialized diagnostic software compatible with modern dishwashers to read error codes and monitor cycle performance. While some models offer built-in diagnostics, external tools like digital multimeters paired with troubleshooting guides help pinpoint issues like voltage irregularities or faulty sensors. Regularly consulting the manufacturer’s wiring diagrams—often available in component manuals—can prevent accidental damage when replacing parts. As technology advances, I predict an increase in IoT-enabled diagnostic apps that can alert you to issues via smartphone notifications, enabling proactive maintenance. Future trend: Expect integrated systems that allow remote diagnostics and predictive maintenance, making early problem detection more straightforward than ever.
How do I maintain dishwasher parts over time?
Consistent maintenance begins with routine inspections of supply hoses, filters, and seals—look for signs of wear or leaks. Clear debris from filters and spray arms regularly; this prevents strain on motors and extends part life. Lubricating moving parts with manufacturer-recommended lubricants can reduce wear and squeaking. Keep a detailed maintenance log—documenting when parts are checked or replaced—helps track patterns that may indicate upcoming failures. For warranty compliance, always use approved parts and record serial numbers or QR codes during replacements, as outlined in our guide to long-term part maintenance. Adopting these practices ensures your dishwasher remains efficient and warranty-eligible for years to come.
Prioritize parts that extend the lifespan
I prioritize part quality above all during replacements. For instance, choosing brass fittings over plastic ones can dramatically reduce leak risks, especially under the increased pressure standards set for 2026. When replacing seals or gaskets, opt for those made from durable materials like EPDM rubber, which resist heat and chemical exposure. Keeping spare high-quality parts on hand—such as the most warranty-covered components—enables quick repairs without compromising warranty protections. Analyzing which parts are most prone to failure guides me to focus maintenance efforts effectively, ultimately saving money and avoiding unforeseen breakdowns.

Proper tools and consistent maintenance routines form the backbone of a reliable dishwasher setup. For best results, periodically review manufacturer guidelines and stay current with technological advances, including the upcoming smart diagnostic features. Start implementing a comprehensive tool kit today to troubleshoot and maintain your dishwasher effectively, ensuring it stays leak-free and warranty-compliant in the long run. Don’t forget—regularly testing electrical components with a multimeter as recommended in our diagnosing guide can save you from costly repairs down the line. Take this step, and you’ll be well on your way to keeping your appliance in peak condition for years to come.
3 Surprising Truths I Only Learned After Multiple Installations
One of the most eye-opening lessons was realizing how tiny details, like the proper tension on fittings, can make or break your warranty eligibility. I once re-used an old drain hose, thinking it was fine, only to face a denied warranty claim after a leak. That moment taught me to prioritize fresh, certified parts for each installation, understanding that shortcuts often lead to failures. Another insight was how pressure regulation isn’t just a recommendation—it’s a must for warranty compliance, especially with the increased standards coming for 2026. Lastly, I discovered that taking photos during each step not only helps troubleshoot but also safeguards warranty claims against future disputes. The key is appreciating that each small step builds towards a reliable, leak-proof setup that preserves your peace of mind.
Related Posts
How to Calibrate the 2026 Dishwasher AI Flow Sensor Manually
Imagine standing in your kitchen, watching your shiny new dishwasher…
5 Essential Parts for a Silent 2026 Dishwasher Installation
Ever had that moment where you're eagerly waiting to enjoy…
Smart Dishwasher Parts & Installation: Expert Tips for Long-Lasting Durability
Have you ever gone to load your dishwasher only to…