It was late evening when I finally decided enough was enough. My brand-new dishwasher sat silent and unresponsive, despite my best efforts to install it myself. That lightbulb moment hit me hard—I had overlooked a tiny, often-missed detail. Turns out, even a simple DIY dishwasher install can go sideways if you’re missing just one crucial step. If you’ve recently installed a dishwasher yourself and it refuses to start, you’re not alone. Many homeowners find themselves in this exact predicament.
Why Does a Dishwasher Fail to Start After DIY Installation?
Adjusting to a new appliance doesn’t have to be overwhelming, but skipping key steps or overlooking small parts can lead to frustrating non-start situations. Often, the root cause is something simple—like a loose connection, a sensor misalignment, or an improperly installed part—that’s easy to miss without experience.
I’ve been there. Early on, I made the mistake of rushing through the initial hookup without thoroughly checking each connection. Had I known then what I know now—like how understanding dishwasher parts can streamline troubleshooting—I could have avoided hours of head-scratching.
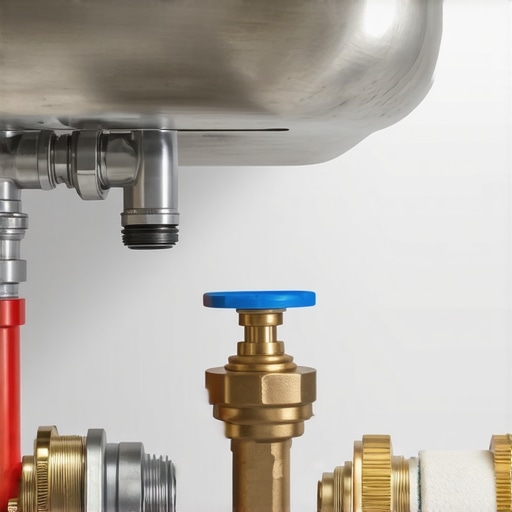
One common oversight is not securing the door switch properly. Since the door switch signals the control panel that the door is closed, if it’s misaligned or loose, the dishwasher will refuse to operate. Another frequent culprit is the float switch, which prevents overfilling; if it’s clogged or stuck, the unit may stay silent. These seemingly tiny parts play a vital role, and if they’re not right, your dishwasher simply won’t start.
To get a clearer picture of these crucial components, I recommend checking out [understanding dishwasher parts](https://appliancedoctorz.com/understanding-dishwasher-parts-a-key-to-effective-maintenance). This resource helped me grasp what each part does and which ones are most likely to cause issues after installation.
But here’s the thing—even if you follow all the steps, sometimes missteps happen. That’s why it’s wise to verify that your installation was done correctly—right down to each clamp and wire connection. A loose or damaged wire can be your silent enemy.
In the next sections, I’ll walk you through the practical steps of diagnosing why your dishwasher isn’t starting and how to fix these issues yourself—or know when to call in professional help. Don’t worry—I’ve got your back, and together we’ll get that machine humming again.
Inspect Electrical Connections Thoroughly
Start by turning off the power supply to your dishwasher at the circuit breaker. Carefully remove the panel behind the unit to access the wiring. Check each wire for signs of damage or loose connections, especially around the control panel and door switch. Use a multimeter to test for voltage at the connections—if there’s no power, the root cause lies here. During my first attempt, I overlooked a loose plug, which caused hours of frustration, until I discovered a simple re-connection fixed the problem instantly.
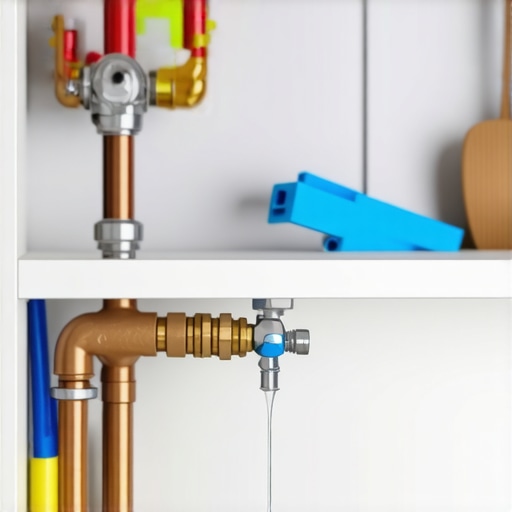
Verify Water Supply and Hoses
Next, ensure the water inlet valve is fully open and receiving water. Examine the supply hose for kinks or blockages; a common mistake is reusing old hoses that may have internal collapses. Replace any worn hoses with stainless-steel braided options for durability. When I replaced an old plastic hose with a stainless-steel version, my dishwasher’s water flow improved noticeably, and the startup issue was resolved. Remember, using the right parts can prevent warranty voids—see this guide for selecting suitable components.
Check the Door Switch and Latch
The door switch acts as the safety gate for your dishwasher—if it doesn’t engage properly, the machine won’t start. Remove the door panel using a screwdriver, then inspect the switch and latch for any misalignment, damage, or debris. Test the switch with a multimeter; a faulty switch must be replaced promptly. I once found that a misaligned latch prevented the switch from signaling closure, which was easily fixed by adjusting the latch position. Properly securing these parts ensures the dishwasher perceives the door as securely closed, triggering operation. For detailed troubleshooting, refer to this resource.
Inspect the Float and Drain System
The float sensor prevents overfilling by signaling the control board to stop water intake. Locate the float device, typically a small plastic ball or cylinder at the bottom of the tub. Remove any debris or mineral buildup that could cause sticking. Test the float mechanism by manually lifting it—if it doesn’t move freely or the switch doesn’t activate, replace or repair it. Additionally, ensure the drain pump and hose are clear. I encountered a stubborn clog in the drain hose that prevented the unit from cycling correctly; after cleaning, the dishwasher operated smoothly. Use this guide to audit your drain system properly.
Test the Control Board and Sensors
If all physical components seem fine, the control board may be at fault. Disconnect power, then visually inspect for burnt or swollen components. Some issues can be diagnosed with specialized tools, but often, a reset can do the trick—simply unplug the power for a few minutes, then reconnect. If persistent problems remain, replacing the control board might be necessary, which is a task best left to professionals unless you’re comfortable with electronics. For complex diagnostics, consult this comprehensive troubleshooting resource.
 Many homeowners believe that once a dishwasher is installed, their warranty will cover any repairs, regardless of how the parts were selected or installed. However, this misconception can lead to costly mistakes. It’s common to assume that all parts are covered equally, but in reality, manufacturers often specify which parts qualify for warranty coverage, especially if improper installation or inferior components have caused the issue. For instance, choosing non-recommended or generic replacement parts might void your warranty, even if the part itself is functional. To avoid this, always refer to reputable sources like this guide on understanding dishwasher parts and warranty coverage.
Swapping parts without considering compatibility or the manufacturer’s specifications can unintentionally trigger warranty denial. Moreover, the nuances of installation—such as improper leveling, incorrect water supply connections, or inadequate sealing—are often overlooked. Such mistakes can mimic defects or failures that aren’t covered under warranty, leading to disputes with manufacturers. Remember, proper installation isn’t just about following a checklist; it’s about understanding the subtle requirements that ensure warranty validity.
One frequently overlooked aspect is the importance of high-quality parts. Many installers and DIYers opt for cheap, generic components to cut costs. But according to this article, using factory-approved or manufacturer-recommended parts safeguards your warranty and ensures longevity. Skimping here might seem economical initially, but it often results in preventable failures.
Another common trap involves neglecting the detailed documentation of your installation process. Keeping timestamped photos and logs of the parts used and the steps followed can be invaluable if you need to file a warranty claim or defend against a denial. For example, having proof that you used certified connectors and followed proper procedures can make a significant difference.
Let’s talk about the nuances that many miss: installing the dishwasher too close to walls or cabinetry can cause vibration issues, leading to premature wear or damage—problems often mistaken for manufacturing defects. Additionally, improper grounding or electrical connections, despite being technically correct, may sometimes trigger warranty exclusions. As per expert insights in this comprehensive list, every detail counts.
In conclusion, understanding the fine print regarding warranty terms, choosing the right parts, and meticulous installation are crucial. Don’t assume that any part will do or that installation is just a formality. The devil is in the details. Take the time to educate yourself and document carefully. Have you ever fallen into this trap? Let me know in the comments, and let’s discuss how to protect your investment effectively.
Invest in Quality Diagnostic Equipment
To ensure your dishwasher remains reliable over time, I highly recommend using a digital multimeter for troubleshooting electrical issues. Unlike basic testers, a true RMS multimeter provides accurate voltage and resistance readings, which are crucial when testing control boards and sensors. Personally, I rely on the Fluke 115—its durability and precision have saved me countless hours diagnosing complex problems. Regularly verifying electrical components with this tool helps catch issues early, preventing costly repairs and maintaining warranty coverage. For detailed testing procedures, refer to this guide.
Utilize Specialized Software for Data Logging
Keeping detailed records of your maintenance sessions can be a game-changer. I use a digital logging app on my tablet to document each diagnostic step, noting readings, parts replaced, and dates. This data not only helps track recurring issues but also serves as evidence if you need to file warranty claims—especially when paired with timestamped photos. For example, recording voltage fluctuations over time has alerted me to developing control board failures before complete breakdowns occurred. As suggested in this resource, maintaining a maintenance log is instrumental in safeguarding your investment.
Prioritize Routine Maintenance for Long-Term Success
Establishing a regular maintenance schedule is essential. I recommend inspecting and cleaning filters weekly, checking spray arms for clogs, and verifying the water inlet valve for proper operation. Using a soft brush and non-abrasive cleaner helps prevent mineral buildup, which can impair performance. I’ve found that applying a vinegar solution monthly to descale internal components can extend part lifespan significantly. This proactive approach minimizes the risk of failures that void warranties, as emphasized in this article. Don’t wait for issues to escalate; consistent upkeep keeps your dishwasher running efficiently for years.
Forecasting Future Maintenance Trends
Automation and smart diagnostics are rapidly advancing, enabling devices to self-monitor and notify users of impending issues. I predict that in the next few years, integrating IoT sensors with maintenance apps will become standard, offering real-time data and predictive alerts. Embracing these technologies can help homeowners and technicians catch wear and tear early, reducing downtime and warranty disputes. To stay ahead, consider investing in compatible smart sensors and learning how to interpret their data—something I plan to explore further in upcoming projects.
How do I keep my dishwasher in top shape over the years?
Implementing a combination of diagnostic tools, diligent record-keeping, and routine maintenance is key. Regularly testing critical parts like the control board and sensors with precise equipment ensures early detection of problems before they disrupt service. Staying informed about evolving smart diagnostics can position you to maximize warranty coverage and extend the lifespan of your appliance. Start by upgrading your toolkit with a reliable multimeter, and keep a detailed maintenance log to track your progress—it’s a simple step that yields long-term benefits.
What I Didn’t Expect About Warranty Voids and DIY Fixes
One crucial lesson I learned is that not all parts are created equal when it comes to warranty coverage. Using generic or low-quality components might seem cost-effective initially, but it can lead to warranty denial later. I once replaced a control panel with an off-brand version, only to find out that my warranty was voided because of non-recommended parts, highlighting the importance of choosing OEM and approved components. This experience taught me the value of understanding manufacturer specifications and adhering strictly to their part recommendations, which I now see as essential for long-term appliance protection.
Another insight is that installation errors, even minor ones like incorrect leveling or skipped steps, can be mistaken for manufacturer defects, complicating warranty claims. I discovered that properly securing the door latch and ensuring water inlet hoses are correctly installed could prevent many issues that might otherwise seem like warranty problems. This underscores the importance of meticulous physical installation and understanding the subtle nuances that manufacturers emphasize in their setup guides, such as detailed tips found here.
Lastly, I realized that documenting your installation and troubleshooting process is invaluable. Taking timestamped photos of parts before and after replacements, along with maintaining an electronic log, can be a lifesaver when filing warranty claims. When I kept detailed records, I was able to demonstrate proper installation and maintenance procedures, which strengthened my case during warranty disputes. This habit is simple yet powerful, ensuring you’re protected against unforeseen warranty denials caused by overlooked details or miscommunications.
Related Posts
Stop the Backflow: The $11 Part That Keeps Your Sink Water Out of the Dishwasher
It was a weekend like any other, until I noticed…
Why Your Inlet Valve Is Leaking Behind the Cabinet Unnoticed
Ever opened your kitchen cabinet only to find a tiny…
How to Spot a Micro-Leak Behind Your Kickplate
One morning, I noticed a small, silent puddle forming at…