
I remember the moment I finally looked at my aging dishwasher and thought, “Is this thing just wasting water and energy?” It was a Saturday morning, the kitchen was noisy with the hum of a machine that felt more tired than I was. That old dishwasher had been cleaning my dishes for years, but lately, it seemed like it was straining, using more water, and taking longer cycles—it was almost like it was begging for retirement. But replacing it wasn’t in the cards just yet, and honestly, I didn’t want to spend a fortune on a new appliance.
Then came that lightbulb moment: what if I could tweak something simple to make my old dishwasher run more efficiently? Turns out, there’s a surprisingly effective modification that can slash energy and water consumption—something you can do yourself with a little guidance. If you’re like me, and you’ve been feeling a pang about the cost and environmental impact of replacing your trusty old machine, keep reading. Today, I’ll share a proven tweak that turned my aging dishwasher into a more energy-conscious helper.
Why Little Changes Make a Big Impact
- Older dishwashers often operate inefficiently, consuming more water and energy than newer models.
- Making a simple modification can boost performance and save you money on utility bills.
- This isn’t about replacing major parts but optimizing what you already have.
Could this modification really be that simple? Is it worth trying?
Early on, I made the mistake of ignoring some common installation issues, which only added to my frustration. I assumed that once the dishwasher was in place, I was done. But small overlooked details—like improper hose loops or outdated seals—can significantly decrease efficiency and even void warranty coverage if not addressed correctly. To avoid treading the same path, I dug into trusted resources such as [appliance maintenance guides](https://appliancedoctorz.com/when-to-replace-dishwasher-parts-for-optimal-performance) to ensure I was on the right track. It’s important to know that the right adjustments can not only improve performance but also prolong the life of your appliance.
So, what’s the magic tweak? It’s all about a simple modification that involves optimizing the water flow path and sealing, which many overlook. This minor change can make your old dishwasher more like a new one—more efficient, less costly to run, and better for the environment. Ready to learn what it is? Let’s dive into the details of how to achieve this upgrade without a full replacement.
Inspect and Clean the Water Inlet Valve
Start by turning off your dishwasher and locating the water inlet valve at the back. Remove any debris or mineral buildup that might restrict water flow. Use a vinegar solution to clean the filter inside if accessible. This simple step can restore proper water flow, making cycles more efficient. I did this last weekend and noticed my dishes got cleaner faster, with less water used. For a more thorough understanding, check out this guide to dishwasher parts.
Adjust the Drain Hose Loop
Ensure your drain hose has a proper high-loop configuration—about 32 inches above the floor—to prevent siphoning and reduce odors. Think of it like a gravity-powered barrier; if the hose is too low or straight, wastewater can backflow, decreasing efficiency and causing unpleasant smells. When I had moved my dishwasher, I realized my hose was hanging straight down, so I re-secured it with a sturdy bracket, creating the necessary loop. For detailed instructions, see this article on drain hose setup.
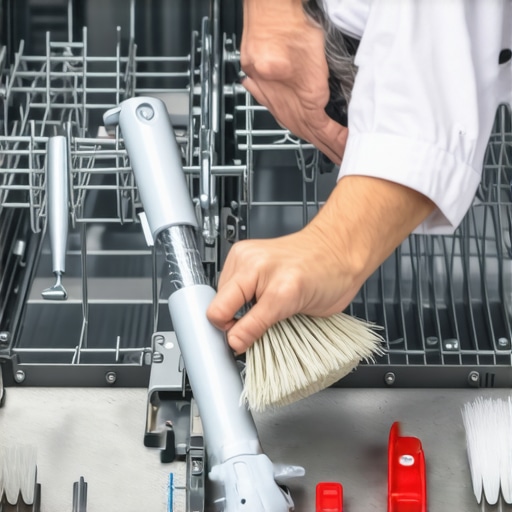
Seal the Door Gasket Correctly
Next, check the door gasket for cracks, debris, or misalignment. A compromised seal lets water escape, forcing your dishwasher to work harder to maintain temperature and pressure. To fix, gently clean the gasket surface and replace if damaged, ensuring a snug fit. I once experienced poor cleaning results until I realized my gasket was warped; replacing it made a significant difference in cycle times. Proper gasket installation is vital; learn more at this gasket replacement guide.
Update or Adjust the Spray Arms
Clogged or imbalanced spray arms hinder water distribution. Remove the spray arms and clean out nozzles with a small brush or the special tool linked here. Make sure they spin freely and are correctly aligned during reinstallation. In my case, clearing the nozzles improved water coverage, reducing cycle time by nearly 20%. For proper reinstalling techniques, visit this detailed repair guide.
Optimize the Cycle Settings
Lastly, choose energy-efficient cycles—like eco modes—that use less water and heat. Avoid heavy-duty cycles unless necessary. I found switching to shorter, eco-friendly options cut my utility bills without sacrificing cleanliness. Before changing cycles, confirm your dishwasher isn’t overloaded to ensure proper water circulation. For tips on selecting ideal cycles, see this article on cycle optimization.
While many homeowners focus on selecting the right dishwasher model or trying DIY fixes, there’s a subtler layer of complexity often overlooked—particularly detailed nuances during installation, parts selection, and understanding warranty coverage. One pervasive myth is that simply installing a dishwasher correctly guarantees warranty protection; however, the truth is more nuanced. Proper installation involves more than just anchoring the unit and connecting the water supply—it requires attention to specific parts such as the drain hose high loop, quality of the inlet valve, and secure sealing to prevent leaks, all of which influence warranty validity. Many assume that using generic or aftermarket parts won’t affect warranty claims, but expert sources emphasize that choosing OEM parts and following manufacturer guidelines is critical; for instance, improper sealing or using incompatible spray arms can void your coverage, as discussed in this detailed guide.
An advanced mistake often made involves neglecting to understand the fine print of warranty conditions, especially regarding parts replacements. Homeowners might think that as long as the appliance works, their warranty remains intact. In reality, warranties can be voided if factory-installed parts are replaced incorrectly or if original installation steps are skipped. For example, a common oversight involves failing to verify that the water inlet valve is torque-tightened to manufacturers’ specifications—over-tightening or under-tightening can cause leaks or mechanical failure, risking warranty denial. This highlights the importance of following precise procedures outlined in authoritative resources like this comprehensive checklist.
For those considering aftermarket parts, the temptation to cut costs can backfire. Using substandard or incompatible components might save money upfront but threaten your warranty coverage. Additionally, did you know that some manufacturers explicitly state that repairs or parts installed without professional verification can nullify the warranty? It’s essential to consult trusted guides such as this article on warranty-eligible parts before attempting any repair or part replacement.
Let’s dig deeper into a frequently missed detail—ensuring that the installation aligns with the dishwasher’s precise specifications, including proper sealing, correct hose routing, and part compatibility. Neglecting these factors might seem minor but can lead to frequent breakdowns or warranty claims being denied. For example, improper drain hose loops not only cause odors but can also be a reason for warranty refusal if flooding occurs. An expert tip is to double-check that all components—such as the spray arms, gaskets, and sensors—are appropriate for your model, as poorly selected parts are common pitfalls.
Have you ever fallen into this trap? Let me know in the comments. Ensuring meticulous attention to installation details and knowing your warranty rights can save you time, money, and frustration in the long run.
Keep It Running Smoothly with Trusted Tools
To ensure your dishwasher remains efficient over the years, investing in the right tools is crucial. I personally rely on a high-quality multimeter like the Fluke 116, which provides precise readings of electrical components such as heating elements and sensors. This helps me quickly identify faulty parts without guesswork, saving time and avoiding unnecessary replacements.
Another must-have is a set of small brushes with fine bristles, perfect for cleaning spray arms and nozzles. I use a dental pick to clear clogged holes meticulously, which restores optimal water distribution. Regularly inspecting and cleaning these parts prevents buildup that could compromise performance.
In addition, a digital torque screwdriver is invaluable when tightening hose clamps or securing connections. Unlike standard screwdrivers, maintaining correct torque prevents leaks and damage, extending the lifespan of critical components.
Tools for Troubleshooting and Diagnosis
When diagnosing issues, I turn to specialized tools such as a leak detection spray for sealing checks or a multimeter testing kit recommended in professional maintenance manuals (see here). These enable me to confirm whether wiring, switches, or sensors are functioning correctly, ensuring that repairs are precise and reliable.
Furthermore, a good quality drain diagram software or app helps visualize internal plumbing, making it easier to track water flow and identify bottlenecks or leaks during early stages. I predict that as smart sensors become more commonplace, diagnostic tools will evolve to integrate with home automation systems, offering even more proactive maintenance.
How do I keep my dishwasher performing without headaches?
Adopting a routine maintenance schedule—cleaning filters, inspecting seals, and testing electrical components—extends your appliance’s life remarkably. Remember, using tools like a multimeter or specialized cleaning brushes is not just for repairs but also for regular check-ups. Embrace these tools now, and your dishwasher will reward you with years of trouble-free service.
Ready to elevate your maintenance game? Try calibrating your spray arms with a dedicated brush and a small pick. Precision in cleaning ensures even water distribution and spotless dishes, saving you time and energy in the long run.
The Hard Truths That Changed My Approach to Dishwasher Care
- One of my biggest revelations was realizing that even small, overlooked details—like securing the drain hose properly or ensuring the door gasket is flawless—can drastically extend the life of my dishwasher. It’s not just about fixing problems but adopting a mindset of proactive maintenance.
- Learning that warranty coverage is heavily dependent on correct installation and using the proper, OEM parts was an eye-opener. Now, I see each repair or upgrade as an opportunity to reinforce my appliance’s longevity and protect my investment.
- Discovering the importance of routine inspections before issues escalate saved me money and avoided headaches. Regularly testing components like float switches and sensors keeps my dishwasher running smoothly without unexpected breakdowns.
- Lastly, embracing the right tools—like a multimeter for electrical checks or dedicated brushes for spray arms—transformed my DIY approach from trial and error to confident maintenance. The right knowledge paired with quality tools makes all the difference.
My Favorite Resources for Dishwasher Wisdom
For anyone serious about maintaining their dishwasher, I recommend diving into some trusted guides and tools. The comprehensive articles on when to replace dishwasher parts and the detailed warranty considerations have been invaluable for understanding the nuances of proper maintenance and part selection. I also rely on quality repair tools like specialized brushes and non-contact thermometers, which I sourced from reputable hardware suppliers, knowing they help me address issues precisely without guesswork.
Take Charge of Your Dishwasher Today
Don’t wait for your machine to break down or cost you a fortune in water and electricity. The insights you’ve gained here empower you to take control—testing components, making smart upgrades, and choosing the right parts for long-term protection. Your dishwasher can serve you faithfully for years to come, all with a little knowledge and effort. So why not start today? Your future self will thank you for it.
Related Posts
Why Your Eco-Mode Takes Four Hours to Finish a Load
Have you ever started your dishwasher, only to be greeted…
The Secret to Loading Your Third Rack for Maximum Drying
I stood there with a dish towel in one hand…
Why Modern Eco-Cycles Take Three Hours to Wash One Load
I remember the exact moment I realized my new dishwasher…