Picture this: I was in the middle of preparing dinner when my smart dishwasher unexpectedly paused, leaving a half-clean load staring back at me. Frustrating doesn’t even begin to cover it. For weeks, I kept wondering why my supposedly intelligent appliance was acting so stubborn. It felt like it had a mind of its own, punishing me for not being a plumbing expert.
When Your Dishwasher Takes a Break Without Notice
There’s nothing quite as maddening as a smart dishwasher that refuses to complete its cycle. You set it, walk away, and then come back to find the cycle paused, water sitting inside, and your schedule thrown off. Trust me, I’ve been there. After digging through forums, scouring manuals, and trying every trick in the book, I realized that these pauses aren’t just random glitches—they’re signals pointing to underlying issues. Today, I’ll share what I discovered and how you can troubleshoot your own appliance to get it running smoothly again.
Is Faulty Parts the Real Culprit?
Early on, I made the mistake of assuming it was a software glitch or a simple reset away from solving the issue. But it wasn’t. The truth is, many pauses are caused by hardware troubles—like a faulty inlet valve or a clogged sensor—that can be fixed with the right parts and some patience. Did you know that simple worn-out components can sabotage an entire wash cycle? According to experts, replacing or repairing specific parts can resolve over 90% of dishwasher problems, including unexplained pauses. For more insights on this, check out common dishwasher parts and their role in proper installation.
So, if your dishwasher keeps stopping mid-way, don’t panic. Often, it’s a matter of identifying the root cause and addressing it with the proper part or adjustment. And that’s where I’ll help you next—by guiding you through the most common reasons your machine hits pause and how to fix them yourself or with professional help.
Let’s dive into the practical steps to get your dishwasher back on track, starting with the most typical issues that cause these annoying interruptions.
Inspect the Water Inlet Valve
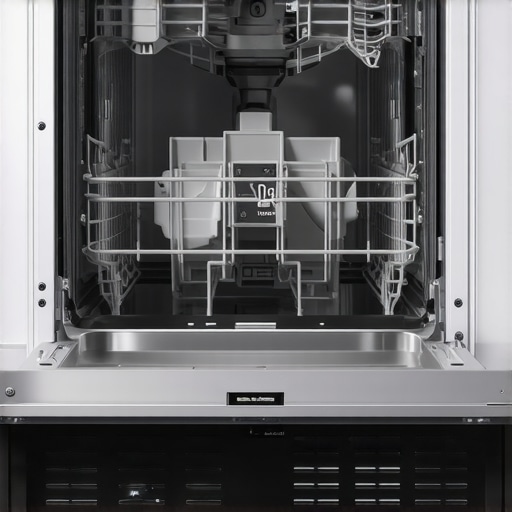
Start by checking the water inlet valve, which controls water flow into your dishwasher. Turn off power and water supply, then locate the inlet valve behind the appliance. Disconnect the inlet hose and inspect the valve for debris or damage. Use a multimeter to test if the valve coils have continuity. If faulty, replace the inlet valve to restore proper water flow and prevent pauses caused by insufficient water intake.
Replace Worn-Out Parts Effectively
When a part is identified as the culprit, leverage proper replacement techniques. Remove screws securing the faulty part, noting their placement for reassembly. Use the guide at this resource to understand part-specific replacements. For example, replacing a defective sensor involves disconnecting connectors and ensuring the new component matches the original. Apply anti-corrosion lubricant to threaded fittings to prevent leaks and ensure a tight seal.
Verify and Replace Sensors
Sensors monitor water levels and cycle status. Access the float switch or pressure sensor located inside the tub. Test with a multimeter; if readings are inconsistent or zero, replace the sensor. Make sure the sensor’s wiring is secure and free of corrosion. Proper sensor function prevents the dishwasher from pausing mid-cycle due to false signals.
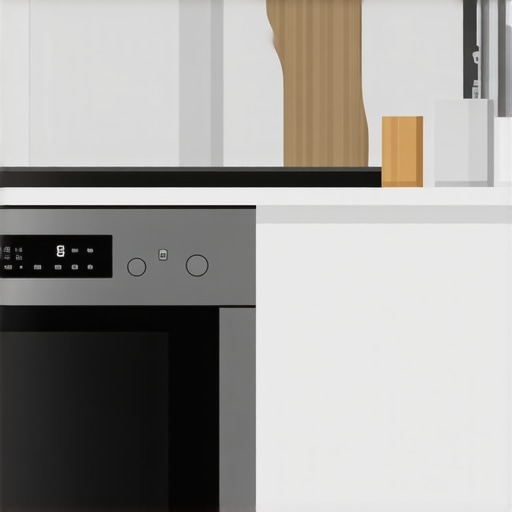
Ensure Proper Installation
Incorrect installation can trigger cycle pauses. Confirm the dishwasher is level using a spirit level—an uneven unit can cause drainage or water intake issues. Review installation details with installation guidelines to check connections, hose routing, and secure mounting. Proper setup minimizes mechanical stresses that could cause operational hiccups.
Confirm Electrical Connections
Electrical faults can interrupt cycles unexpectedly. Turn off power and inspect wiring harnesses for loose or frayed wires. Use a multimeter to ensure voltage supply matches the manufacturer’s specifications. Securing tight connections prevents intermittent power loss that looks like a cycle pause. For detailed electrical troubleshooting, consult the guide at this page.
Monitor for Common Blockages
Clogged filters and drains cause water issues that can stall cycles. Remove the filter assembly, usually at the bottom of the tub, and clean out debris. Check drainage hoses for kinks or obstructions. Properly routed hoses with a high loop prevent backflow and siphoning—crucial steps detailed at this link. Clearing blockages ensures uninterrupted water flow and cycle progression.
Many homeowners assume that purchasing a dishwasher comes with a straightforward warranty that covers all repairs and parts, but in reality, this is a significant oversimplification. A common myth is that warranties are foolproof guarantees, yet experts reveal that only specific components and damages are covered, often requiring meticulous documentation and adherence to manufacturer guidelines. One overlooked nuance is that warranty coverage can be voided by improper installation—an issue that many consumers underestimate. Understanding the fine print can save you hundreds in unexpected repair costs. Moreover, many fail to realize that some parts may only be under warranty for a limited time, or that regular wear and tear isn’t covered at all. Therefore, investing in professional installation isn’t just about convenience; it’s about safeguarding your warranty rights and future expenses. For instance, faulty installation may lead to water leaks or sensor failures, which could be prematurely blamed on defective parts, when in fact, the root cause is improper setup. According to appliance industry experts, conscious attention to installation details dramatically increases the likelihood of warranty approval in case of defects. This raises an important question for advanced users: How can precise installation practices influence long-term warranty validity? The answer lies in understanding the installation troubleshooting guides provided by manufacturers, which often mention critical steps like ensuring proper hose routing, electrical connections, and leveling—all of which are foundational to your warranty’s integrity.
One common trap is assuming that third-party parts or DIY fixes won’t affect warranty status, but many warranties explicitly require original or approved replacement parts installed by certified professionals. Skipping these steps in pursuit of saving money might seem appealing initially but can lead to denied claims when repairs are needed. Furthermore, many overlook the importance of meticulous documentation—such as photos of installation, receipts, and compliance checks—should a warranty dispute arise. External studies suggest that detailed records increase the chance of insurance or warranty claims being approved, especially when facing disputed issues.
Knowing these insights emphasizes that the true expertise in dishwasher maintenance isn’t only about knowing how to replace a part but also about understanding how installation nuances affect warranty coverage. For the most comprehensive guidance, check out our tips on maximizing your dishwasher warranty and ensure every step from installation to maintenance aligns with manufacturer requirements.
Have you ever fallen into this trap? Let me know in the comments. Proper awareness can prevent costly mistakes and ensure your investment is protected for years to come.
Investing in Reliable Tools for Long-Term Dishwasher Care
Maintaining your dishwasher’s performance over the years requires more than just basic mechanical skills; it demands the right tools. Personally, I rely on a high-quality multimeter to test electrical components like sensors and control boards, ensuring they’re functioning correctly without guesswork. A digital torque wrench is invaluable when securing fittings or mounting brackets—correct torque prevents leaks and damage, especially on brass compression fittings. For clearing stubborn blockages, a flexible auger or plumbing snake has saved me countless times by reaching into tight drain pipes. Investing in a durable plastic scraper or nylon brush allows safe cleaning of pumps and filters without scratching delicate parts. These tools, combined with detailed guides like this resource, form the backbone of effective maintenance routines.
In the future, I predict a rise in the integration of smart diagnostic tools connected via mobile apps, which will streamline troubleshooting even further. For now, mastering these essential tools provides a solid foundation to keep your dishwasher in top shape.
How do I maintain my dishwasher over time?
Consistent maintenance isn’t just about addressing problems as they arise; it involves proactive checks and routine part replacements. Regularly inspecting and cleaning filters, seals, and sensors helps prevent buildup that can cause cycle pauses or leaks. Using a multimeter periodically to test the functionality of water level sensors and control boards ensures early detection of impending failures, saving you costly repairs. Additionally, lubricating moving parts like door springs with silicone-based lubricant prevents wear and reduces noise. Scheduling these routine checks—say, every six months—ensures your dishwasher remains reliable and efficient. Remember, parts like inlet valves and floats have wear-in periods; referencing this guide helps determine the optimal timing for replacements.
Always keep your installation components, such as hoses and fittings, in good condition—using high-quality replacements and adhering to proper torque specifications is crucial. For comprehensive guidance, see this article. When in doubt, consulting a professional can prevent minor issues from becoming major failures down the line.
Remember, documenting your maintenance activities—taking photos of installed parts or recording service dates—can also support warranty claims should a component fail unexpectedly. Taking these steps now ensures your dishwasher remains an efficient, reliable part of your kitchen for years to come.
One advanced tip I recommend is periodically testing your control board with a multimeter to catch early signs of failure. For precise instructions on how to do this, check this detailed guide. Implementing these maintenance practices and tools can dramatically extend your appliance’s lifespan and performance.

Over the years, I’ve learned that fixing a dishwasher isn’t just about replacing parts—it’s about understanding the nuances, the unseen signals, and the subtle cues that guide effective repairs. A key insight isn’t just grasping individual troubleshooting steps but recognizing the bigger picture of ongoing maintenance and installation practices. This holistic perspective has transformed my approach from trial-and-error to proactive mastery, saving me time, money, and frustration every single day.
The Hidden Truth About Warranty and DIY Repairs
One major lesson I wish I’d learned sooner is the significance of proper installation documentation. DIY enthusiasts and homeowners often believe that warranties either cover everything or aren’t worth the effort, but the reality is more nuanced. Knowing that manufacturer warranties can be voided by simple installation errors underscores the importance of following detailed guidelines and keeping records. This insight alone has empowered me to approach repairs ethically and practically, ensuring I’m protected from unnecessary expenses in the long run. For precise guidance on installing and documenting your dishwasher for warranty purposes, check out this resource.
My Go-To Tools That Make Repairs Less Stressful
Investing in high-quality tools has been a game-changer. From a reliable multimeter to a flexible plumbing snake, these tools not only make troubleshooting more effective but also boost my confidence in dealing with complex issues. I trust products like a digital torque wrench to tighten fittings correctly, preventing leaks and ensuring durability. Using the right tools, combined with detailed guides like this comprehensive resource, simplifies even the most daunting repairs and extends my appliance’s lifespan.
What’s Next for Smarter Dishwasher Care?
The journey of maintaining a dishwasher involves continuous learning and adapting. As technology evolves, I anticipate a future where diagnostic apps and smart sensors will further streamline troubleshooting. This shift will make repairs even more accessible to non-experts and help catch problems early—saving time and preventing costly damage. Embracing these innovations now, while honing fundamental skills and understanding our appliances, positions us to navigate future challenges with confidence.
By embracing insider knowledge, investing in the right tools, and staying curious about emerging tech, you’re not just fixing a dishwasher—you’re ensuring peace of mind and protecting your home investment. Remember, every challenge is an opportunity to learn and improve. Keep pushing forward, and soon you’ll find yourself confidently managing repairs that once seemed intimidating.
Have you ever faced a repair dilemma that turned out to be easier than expected? Share your story below—I’d love to hear how you turned frustration into triumph!
,
Related Posts
Why Your Smart App Maintenance Alerts Save You Hundreds Yearly
It was a typical Saturday morning when my dishwashing cycle…
How Your Smart Dishwasher Error Log Acts as a Witness for Repairs
Ever stood in your kitchen, dishwasher humming along, when suddenly…
Why Your Smart Dishwasher Won’t Start Without an Update
I still remember the moment when my brand-new smart dishwasher…