
There I was, sweat dripping off my nose and a cold cup of coffee sitting on the counter, staring at my brand-new dishwasher like it was a complex puzzle from another planet. I had spent three hours following a diy dishwasher installation step-by-step guide, and I was at the finish line. Or so I thought. I went to slide the top rack in, expecting that satisfying, smooth glide, but instead—*clunk*. It stopped dead. I pulled it out, tried again, and got the same metallic thud. My heart sank. I checked the rails, the spray arm, and the back wall, but everything looked perfect. It wasn’t until I grabbed a flashlight and peered into the narrow gap between the tub and the cabinet that I saw it: a tiny, silver screw head sticking out just a fraction of an inch too far. It was a classic rookie move, and it happens to the best of us.
The Tiny Screw That Can Ruin Your Saturday
If you are currently wrestling with a rack that feels like it’s hitting a brick wall, you aren’t alone. This specific headache usually stems from the side-mounting brackets. When we secure a dishwasher to the cabinetry, we often reach for whatever wood screws are closest to the toolbox. I made the mistake of using a standard #8 pan-head screw because I thought ‘bigger is stronger.’ In reality, that extra bit of metal on the screw head is exactly what’s catching on the plastic rollers of your top rack. This tiny oversight is actually one of the most common mistakes professional installers see, and it can lead to permanent damage if you keep forcing the rack shut. Today, I’m going to show you how to identify this clearance issue and why swapping that hardware is the only way to save your sanity and your machine’s interior.
Is a few millimeters really going to break my dishwasher?
It might seem trivial, but tolerances inside a modern dishwasher are incredibly tight. If that screw head is rubbing against the rack housing, it’s not just an annoyance; it’s a friction point that will eventually crack the plastic components or bend the metal rails. According to data from the National Association of Home Builders, improper installation of kitchen appliances is a leading cause of premature part failure and avoided warranty claims. If you used the wrong hardware, you might also find that the easiest way to install a side-mounting bracket kit is actually to start over with the low-profile screws that usually come in the box—but often get thrown away with the packaging. Have you ever finished a project only to realize the ‘leftover’ parts were actually essential? Let me know in the comments if you’ve ever had a ‘spare’ screw ruin your day. Let’s get into how to fix this without pulling the whole unit back out.
Ditch the Bulky Hardware
To fix the rack-sticking issue, you need to swap those thick-headed wood screws for low-profile, flat-head, or truss-head screws. Think of it like wearing oversized boots in a narrow hallway; no matter how careful you are, you’re going to scuff the walls. In a dishwasher, the ‘walls’ are your tub sides and the ‘boots’ are those protruding screw heads. I once tried to ‘speed run’ an installation for a friend and used a power drill to force a pan-head screw into the side cabinet. I stripped the head halfway in, leaving a jagged metal edge that sliced right into the plastic rack roller on the first use. I had to use locking pliers to back it out and start over. Always use hand tools for these delicate parts to check when installing a dishwasher for long-term performance. Ensure the screw sits absolutely flush against the mounting bracket so the rollers can glide past with zero resistance. 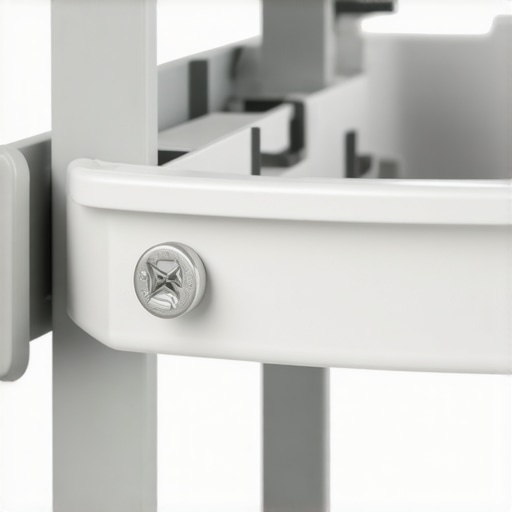
Why a Level Machine Stops the Drift
Even if your hardware is flush, the rack might still feel ‘heavy’ or prone to sticking if the unit isn’t perfectly plumb. If the dishwasher leans forward or to the side, gravity works against the ball bearings in the rails. This creates an uneven load on the common dishwasher parts and their role in proper installation, leading to the rack pulling to one side and jamming. Use a spirit level on the top edge of the tub—not the door—to check for accuracy. Adjust the leveling legs until the bubble is dead center. This is a critical step because why professional leveling prevents your door from leaking isn’t just about water; it’s about the structural integrity of the entire tub assembly. If the tub is torqued or twisted, the rack tracks will never stay parallel.
Protect Your Warranty from Rookie Errors
It is tempting to just ‘make it work’ with whatever is in the junk drawer, but using non-standard hardware or skipping the leveling process can come back to haunt you. Manufacturers are incredibly strict about installation requirements. If a service tech comes out because your rack housing cracked and they see a #10 construction screw gouging the plastic, they will likely deny your claim. Understanding the complete list of dishwasher parts covered by warranty is important, but remember that coverage usually hinges on the unit being installed according to the manual. By taking ten minutes to ensure your side-mounts are correct, you are maximizing your dishwashers warranty coverage today and preventing a costly out-of-pocket repair for a simple mechanical obstruction. If you lost the original low-profile screws, don’t wing it—hit the hardware store and find a #6 flat-head screw that sits deep in the bracket’s countersink.Beyond the physical hardware, there is a psychological trap many of us fall into: the ‘Eco-Mode’ obsession. We think we are doing the environment and our wallets a favor by running the lightest cycle possible every single night. In reality, why the heavy cycle is actually better for your machine health comes down to temperature. Modern detergents need sustained high heat to fully dissolve fats and proteins. If you only run cool, short cycles, that grease solidifies inside your drain lines like plaque in an artery. According to research by the Association of Home Appliance Manufacturers (AHAM), consistent low-temperature washing is a primary contributor to ‘biofilm’ buildup which eventually chokes the circulation motor. Have you ever noticed a funky smell even after a cleaning cycle? That is likely the trap you have fallen into. Let me know in the comments if your ‘Eco’ settings have ever left your dishes feeling greasy.
Can my home’s water pressure actually damage the inlet valve?
Most homeowners assume that if water comes out of the faucet, it is good enough for the dishwasher. However, if your PSI is too low, the valve stays open longer to fill the tub, leading to premature solenoid burnout. Conversely, high pressure can cause ‘water hammer,’ which vibrates the internal plumbing until a seal fails. This is where the difference between OEM and generic water inlet valves becomes a safety issue; cheaper valves often lack the internal dampening needed to handle pressure spikes. Always check your home’s pressure before finishing the install.  Another ‘hidden’ nuance that catches people off guard is the water chemistry itself. We spend so much time worrying about limescale that we ignore the opposite problem. Believe it or not, why soft water is ruining your dishwasher interior faster than hard water is a real concern for high-end stainless steel models. Soft water is ‘hungry’—it lacks minerals, so it aggressively leaches ions from your glassware (causing permanent cloudiness) and can even degrade certain rubber gaskets faster than hard water would. It is a delicate balance of top tips for selecting the right parts for dishwasher installation to ensure your machine is calibrated for your local utility’s output. Finally, let’s talk about the paperwork. You might be the world’s best DIYer, but why your warranty claim fails without an authorized receipt is a hard lesson to learn. If you bought your unit from a liquidator or an unverified third-party seller, many manufacturers will treat the warranty as void from day one. Even a small error like using the wrong sealant can be the mistake that voids your lifetime tub warranty. Protect your investment by keeping every scrap of paper and following the manual to the letter—not just the parts that seem easy.
Stop Guessing and Start Measuring
I used to be the guy who just plugged it in and hoped for the best. But after blowing a control board on a high-end European model because I didn’t realize my outlet was improperly grounded, I changed my ways. Now, I don’t touch a dishwasher without my Klein Tools MM400 digital multimeter. It’s not just for professional electricians; learning how to test your thermal fuse with a basic multimeter is a skill that saves you hundreds in service calls. When you are finalizing the wiring, check for continuity and proper voltage. It takes ten seconds but ensures essential parts every dishwasher owner should know about aren’t dead on arrival due to a power spike. Also, spend the extra few dollars on the most durable braided steel hoses for long-term safety. Don’t use the flimsy plastic ones that come in some ‘universal’ kits. I’ve seen those burst after just two years of heat cycles, and the resulting floor damage isn’t worth the initial savings. 
How do I maintain my dishwasher for the long haul?
Maintenance isn’t just about the occasional vinegar rinse—in fact, you should probably stop using vinegar in your high-end smart machine as the high acidity can actually degrade rubber seals and gaskets over time. True maintenance is physical and proactive. Every three months, I perform a manual inspection. I’ve found that the best way to clean the hidden filter under the spray arm is to scrub it gently with a soft toothbrush and warm soapy water to remove calcium deposits. If you let gunk build up, your circulation pump has to work harder, gets hotter, and eventually dies. According to technical bulletins from the International Association of Certified Home Inspectors (InterNACHI), a well-maintained dishwasher should last between 9 and 12 years, yet poor filtration and hard water buildup are the primary reasons units are retired early. Knowing when to replace dishwasher parts for optimal performance—like swapping out worn rack wheels before they snap or a pitted gasket—keeps the machine running quietly. I also highly recommend focusing on the cabinet protection, specifically the best way to tape your vapor barrier during installation to prevent steam from rotting the underside of your countertops. It’s these ‘boring’ details that define a successful long-term install versus a weekend project that ends in a leak. Looking toward the future, I suspect we are moving into an era of ‘predictive repair.’ With the $20 smart sensor that detects leaks before your kitchen floods, we are already seeing how IoT can save a kitchen. In five years, I bet every unit will have built-in AI diagnostics that can order their own replacement filters. For now, do yourself a favor: grab a multimeter and test your ground before you slide that unit in for good.
Lessons Bought with a Sledgehammer and a Flashlight
After years of tinkering with kitchen appliances, I have realized that the distance between a perfect wash and a flooded floor is often measured in millimeters. One of the most vital things I learned is that the ‘extra’ hardware included in the box isn’t a suggestion; it is the manufacturer’s way of preventing you from stripping the cabinet threads. I once spent an entire Saturday morning pulling a unit back out just because I thought my existing wood screws were ‘good enough.’ They weren’t, and it led to a jammed rack that cost me fifty dollars in replacement rollers. Seeking out expert advice on dishwasher installation troubleshooting early on would have saved me both the money and the frustration. Another lightbulb moment was realizing that noise isn’t always a mechanical failure. Often, a ‘thumping’ sound is just a drain hose vibrating against the cabinet because it wasn’t secured with a simple zip tie. These small, non-obvious details are what separate a DIY enthusiast from a pro. Finally, never underestimate the power of a dry run. Before you hook up the water, slide the machine into place and check the rack clearance one last time. If it catches now, it will definitely catch when it’s full of heavy ceramic plates.
The Gear I Grab Before Every Install
To ensure you aren’t just guessing, there are a few non-negotiable tools that have earned a permanent spot in my kit. First is a high-quality digital multimeter. You need it because the most reliable way to test a thermal fuse or a door latch is with a clear continuity reading, not a visual guess. Second, I always swap out the stock plastic fill lines for braided steel hoses. They are significantly more resistant to the thermal expansion that happens during a heavy cycle. I also keep a small container of food-grade silicone grease handy. A tiny dab on the rubber gaskets helps them seat perfectly without pinching, which is a major factor in how to diagnose dishwasher parts during warranty periods if you suspect a slow leak. I trust these tools because they have prevented catastrophic failures in my own home, and they turn a stressful afternoon into a manageable task. When you understand the most popular dishwasher parts and how they improve performance, you begin to see the machine as a precision instrument rather than just a box that splashes water.
Turn Your Kitchen Project into a Success Story
Taking the leap to handle your own appliance work is incredibly rewarding. While it can feel daunting to look at a mess of wires and hoses, remember that every master was once a beginner who just followed the manual. By sticking to a reliable diy dishwasher installation step-by-step guide, you are not just saving money on labor—you are gaining the deep knowledge required to maintain your home for years to come. Don’t be afraid to take it slow, measure twice, and double-check those side-mount screws. You’ve got the tools and the information; now it’s just about putting them to work. Have you ever found a mysterious ‘spare’ screw or part after finishing an installation? Let me know in the comments below!
Related Posts
The Proper Way to Secure Your Machine to Quartz Countertops
It was a morning like any other, but then I…
Why Your Drain Hose Needs a High Loop to Stop the Smell
I walked into my kitchen last Tuesday and thought a…
The Cabinet Steam Barrier Most DIYers Skip Until the Wood Rots
I remember the first time I encountered this problem—my DIY…