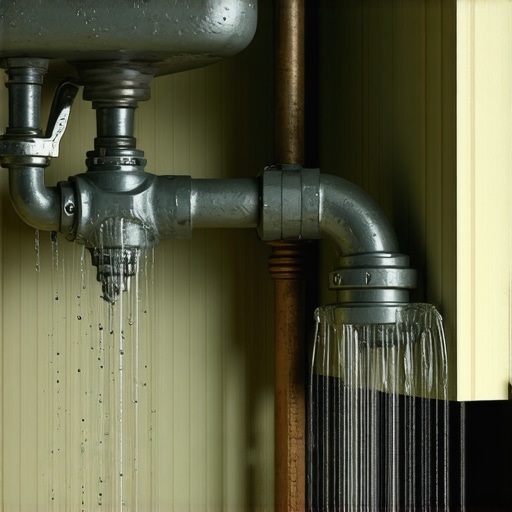
I’ll never forget the moment I watched a seemingly simple plumbing fix turn into a nightmare. I was replacing a worn-out compression fitting on my dishwasher’s water line, eager to complete the job, only to discover the fitting was now stuck, leaking, and frustratingly stripped. That lightbulb moment taught me a hard lesson: there’s a correct way—and a wrong way—to tighten those tiny nuts and ensure they hold firm without damaging the threads.
Why Properly Tightening Compression Fittings Matters More Than You Think
Over-tightening a compression fitting might seem like the easiest way to prevent leaks, but in reality, it often causes the exact problems you’re trying to avoid—stripped threads, cracks in the fitting, or even worse, leaks that slowly cause water damage. Fortunately, understanding the subtle art of tightening these fittings can save you a lot of headaches and expenses down the line.
Is the Hype About the Perfect Torque Just Overkill?
Early in my DIY journey, I thought tightening until I felt resistance was enough—until I stripped a fitting because I didn’t know about torque specifications. Research shows that using the correct torque prevents damage and ensures a reliable connection (source: https://appliancedoctorz.com/essential-parts-for-troubleshooting-dishwasher-installation-issues). The lesson? Follow specific guidelines rather than guesswork.
If you’re ready to stop risking leaks or damage from improper tightening, let’s dive into how to get it right every time. And trust me, a little patience and knowledge can make all the difference.
Have you ever struggled with a stubborn fitting or worried about over-tightening? You’re not alone, and the good news is, with a few straightforward tips, you’ll be able to tackle compression fittings confidently and safely.
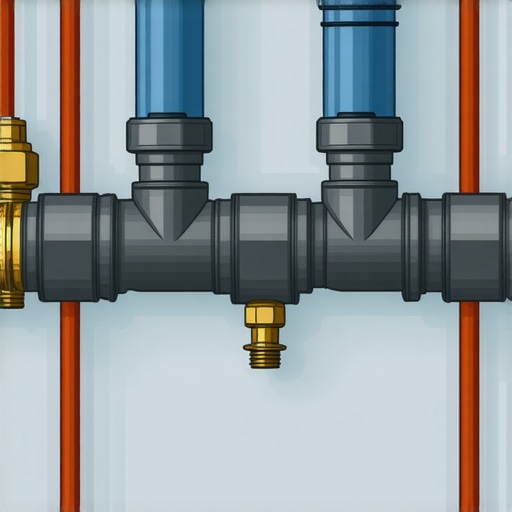
Prepare Your Tools and Parts
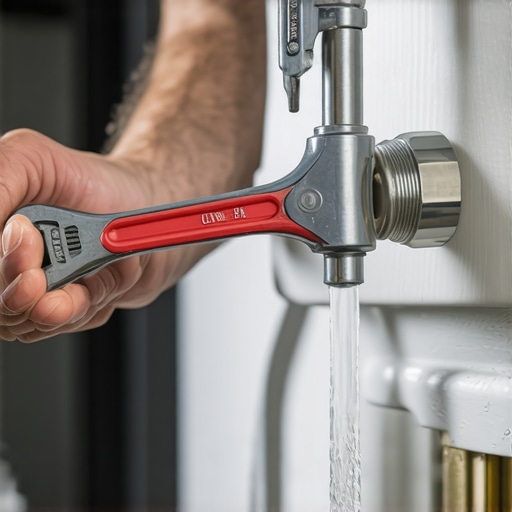
Before you start, gather the right tools: a adjustable wrench, a pair of pliers, and, if available, a torque wrench designed for small fittings. Ensure your compression nut, ferrule, and water supply line are compatible with your dishwasher model. Using mismatched parts or worn tools can compromise the seal and lead to leaks or damage.
Loosen and Inspect the Existing Fitting
Start by turning off the water supply and loosening the compression nut a few turns. Examine the ferrule (the small ring) and nut for any signs of cracking or deformation. If the ferrule is flattened or cracked, replace it as part of your repair. Proper inspection prevents reusing compromised parts that can cause leaks later.
Attach the New Fitting Carefully
Slide the ferrule onto the water supply line, then thread the compression nut onto the line. Hand-tighten the nut to ensure the ferrule seats evenly against the supply line. Imagine the ferrule as the gasket that seals the connection; its correct position is crucial for a leak-proof joint.
Hand-Tightening is Just the Start
Using your hand or pliers, tighten the compression nut until firm. Avoid using excessive force; this is where many make the mistake of overtightening, which can strip threads or crack the fitting. Remember, think of tightening as “snug but not squished”—like tightening a bottle cap just until resistance is felt.
Applying the Correct Torque
If you have a torque wrench suitable for small fittings, set it to the manufacturer’s recommended torque, typically between 20-30 inch-pounds. Be consistent; applying torque helps prevent damage while ensuring a tight seal. If in doubt, consult your dishwasher’s manual or a professional installer—this information can often be found on the manufacturer’s website or in the installation guide.
Verify the Connection
Once tightened, turn the water supply back on and observe the connection for leaks. Use a dry cloth to wipe around the fitting; if you notice drips, tighten slightly more, but stop before you feel resistance. Over-tightening now can cause cracks or damage, so proceed with caution. If leaks persist, inspect the ferrule’s placement or replace the sealing ring altogether.
Document Your Work
Keep notes or photos of your installation, especially if you aim to maintain your warranty or plan future repairs. Proper documentation includes part numbers, torque settings, and any anomalies discovered during installation. This practice will save time if issues arise later and help you verify that you followed best practices for long-term performance.
Applying these step-by-step procedures was my experience during a stubborn installation last year. I used a torque wrench, tightened gradually, and inspected meticulously. The result: a secure, leak-free water connection that has held up over months, saving me from future headaches or water damage. Precision, patience, and the right tools make all the difference—don’t rush the process.
When it comes to installing or repairing dishwashers, many homeowners operate under misconceptions that can sabotage their efforts and void warranties. One common myth is that all parts are interchangeable and that choosing the cheapest components will suffice, but experts know that using the right parts is critical for longevity and warranty compliance. For example, selecting the proper parts, such as hoses and gaskets, ensures that your dishwasher operates reliably without leaks or breakdowns. Another misconception involves warranties, with many assuming that once a part is replaced, their coverage automatically extends, but warranties often cover only specific components and conditions, making it vital to understand what is included. Visiting this resource can help maximize your warranty benefits by ensuring proper part installation and documentation. Installation mistakes also pave the way for future issues, especially if the water supply line or electrical connections aren’t secured correctly, risking leaks or electrical hazards. Proper installation is nuanced; for instance, checking critical parts prevents problems down the line. Many overlook that over-tightening fittings can strip threads, leading to leaks, or that inadequate leveling can cause water pooling or inefficient cleaning. An often-ignored detail is the importance of a proper high loop drain, which prevents backflow and siphoning, and is essential for compliance with plumbing codes. Failing to meet these nuanced requirements can void warranties and lead to costly repairs. The key is to approach each installation with care, using quality parts, following manufacturer guidelines, and understanding warranty intricacies. For example, this guide explains how installation quality impacts warranty eligibility.
Let’s dig deeper into this often-overlooked aspect. Many homeowners fall into traps because they assume that quick fixes or cheap parts suffice, but the truth is, detailed attention to parts, warranty terms, and proper installation practices can save you hundreds—and even thousands—of dollars in the long run. Don’t let misconceptions undermine your dishwasher’s performance. Have you ever fallen into this trap? Let me know in the comments.
Investing in the Right Tools for Long-Term Durability
Having the proper tools is essential for maintaining and troubleshooting your dishwasher effectively. My go-to instrument is a high-quality adjustable wrench with a smooth jaw surface. I prefer this because it allows for precise grip without damaging delicate fittings, which is crucial when tightening or loosening water connections. Additionally, I always keep a digital torque wrench calibrated for small fittings—this tool helps me tighten components to manufacturer-recommended specifications, preventing damage caused by over-tightening, as recommended in this guide. For electrical work, I rely on a multimeter, which allows me to test thermally sensitive components like heating elements and control boards with confidence.
Using Specialized Software for Maintenance Tracking
To keep track of maintenance schedules and monitor the lifecycle of crucial parts, I use dedicated appliance management software. These tools help set reminders for replacing filters, inspecting gaskets, or testing sensors—saving headaches during busy periods. I’ve found that documenting service dates and parts replaced is invaluable for warranty claims, which can be streamlined through digital records. For those interested, platforms like SmartAppliance Manager integrate with home automation, providing real-time alerts if potential issues are detected.
Planning for Future Repairs and Upgrades
Looking ahead, adopting a proactive maintenance routine ensures your dishwasher remains efficient over time. I recommend periodically inspecting critical components, especially the water inlet valves and door seals, as worn parts are common failure points. Keeping spare parts on hand—such as replacement gaskets, hoses, or electronic control modules—not only reduces downtime but also ensures that you use quality components that won’t void warranties or compromise safety.
Scaling Up: Preparing for Larger or More Complex Installations
As your household grows or your appliance setup becomes more integrated into your smart home system, investing in tools like a compact pneumatic crimper or a precision pipe cutter becomes invaluable. These tools make installing larger, more complex water lines or upgrading to durable materials like braided steel hoses much easier and safer. Future trends hint at increased automation and remote diagnostics; therefore, mastering these tools positions you ahead in maintaining high-performance, connected dishwashers.
How do I maintain my dishwasher over time to prevent costly repairs?
Regular inspections combined with strategic part replacements and calibration can dramatically extend your dishwasher’s lifespan. Familiarity with specific tools—especially a recommended parts for troubleshooting—enables quick fixes rather than reactive repairs. Remember, documentation helps track your maintenance history, essential for warranty validation and troubleshooting future issues. Experimenting with a professional-grade torque wrench to ensure fittings are tightened to exact specifications can prevent leaks and stored energy failures. Don’t overlook the importance of periodic testing and calibration—embrace these practices to keep your dishwasher running efficiently for years to come.
Three Lessons I Wish Somebody Told Me About Parts, Warranty, and Dishwasher Installation
- Patience Trumps Force: Rushing to tighten compression fittings often leads to stripped threads or cracks. Learning to tighten gradually and stop at just the right point saved my plumbing job and my wallet.
- The Power of Proper Documentation: Taking photos and keeping records of parts and torque settings became my armor when filing warranty claims or troubleshooting future issues. It’s a small habit with huge benefits.
- Misconceptions Can Cost You: Believing that cheap parts or over-tightening will do the trick almost always backfires. Using quality components and following manufacturer guidelines ensure your dishwasher remains leak-free and warranty-safe.
Tools That Changed My Dishwasher Maintenance Routine
From a calibrated torque wrench to high-quality adjustable wrenches, investing in the right tools revolutionized my ability to prevent leaks and ensure long-term reliability. I also rely on a digital multimeter for electrical inspections, helping me catch potential issues early and save on costly repairs.
Your Next Step: Taking Control of Dishwasher Success
By applying these insider lessons and equipping yourself with the proper tools, you empower yourself to maintain a leak-free, efficient dishwasher for years to come. Embrace patience, follow guidelines, and don’t shy away from ongoing learning. The journey from novice to expert starts with a single confident step—your dishwasher will thank you.
What’s been your biggest challenge with dishwasher installation or repair? Share your experience below—I’d love to hear how you’re taking charge of your appliance maintenance!
,
Related Posts
Stop the Banging: Installing a Water Hammer Arrestor
It was a quiet Saturday morning when I suddenly heard…
Why Reusing an Old Water Supply Line is a Recipe for a Flooded Kitchen
It was a morning like any other when I finally…
Stop Hand-Tightening Your Water Line: Use This Specific Tool
I remember the first time I installed a dishwasher and…