
It was one of those mornings where I was already running late, and as I hurried to empty the dishwasher, I noticed a strange smell wafting from the kitchen sink. That sinking feeling hit me — my pipes had backed up again. The culprit? Detergent pods. I had thought they were the modern miracle of cleaning convenience, but little did I know, they could be secretly sabotaging my plumbing.
Discovering the Hidden Culprit in My Plumbing
The moment I realized that the blocks in my pipes correlated with my use of certain detergent pods was a revelation. These small, colorful capsules promised spotless dishes and effortless cleaning, but behind the scenes, they could be causing significant clogs in your internal plumbing. It turns out, the waxy shells and certain additives in these pods don’t break down entirely in your pipes, especially if your plumbing isn’t optimized or if you’re using incompatible products.
In my case, I kept pushing the issue, hoping my pipes would clear on their own, but the problem only worsened. That’s when I decided to dig deeper. I found out that the composition of some detergent pods — particularly their insoluble components — can accumulate over time, leading to stubborn blockages and even damage to your dishwasher’s drainage system. A quick browse through [appliancedoctorz.com](https://appliancedoctorz.com/the-most-popular-dishwasher-parts-and-how-they-improve-performance) highlights how essential choosing the right parts (and products) can impact performance and longevity.
That lightbulb moment made me reevaluate my choices. I realized I was making a common mistake: assuming all detergents are created equal and ignoring how certain formulations interact with my plumbing. This oversight can cause more than just inconvenience; it could lead to costly repairs. So, today, I’m going to share what I’ve learned to help you avoid the same pitfalls.
Have you also faced unexpected pipe clogs or dishwasher drain problems after using detergent pods? If yes, you’re not alone. Let’s explore the real reasons behind these issues and how you can prevent them, starting with understanding what might be lurking in your detergent choices.
Prep Your Space with Precision
Before diving into the installation, clear your kitchen area and ensure your power and water supplies are turned off. Use a level to check that your mounting surface is flat — this prevents uneven vibrations. For detailed preparation tips, see this guide.
Check and Gather Essential Parts
Inspect all components listed in this resource to ensure nothing is missing or damaged. Having all parts ready prevents delays and avoids having to restart the process. Remember, using compatible parts is crucial for warranty coverage, as outlined in this article.
Connect Water Supply Securely
Attach the water inlet hose to your home’s water line using brass fittings—these resist corrosion better than plastic. Tighten connections with a adjustable wrench, but avoid over-tightening, which can cause cracks. Use a Teflon tape on threaded connections for a leak-proof seal, following recommendations from this expert advice. 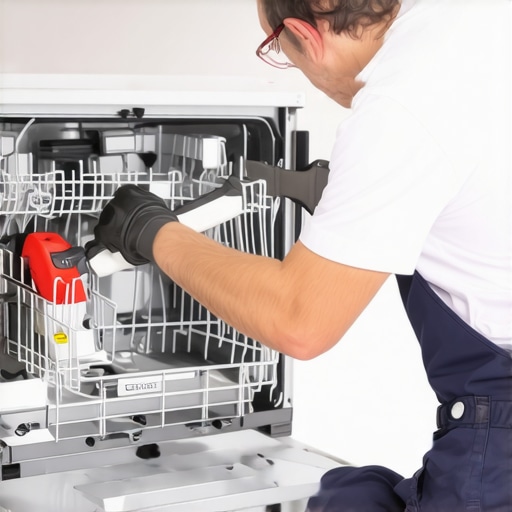
Assemble and Secure the Dishwasher
Position the dishwasher carefully, ensuring it is level from side to side and front to back. Use a spirit level and adjust the leveling legs accordingly. Secure the unit to the countertop or cabinetry with mounting brackets—use the correct hardware specified for your surface, as shown in this installation guide. This step prevents excessive vibration and movement during operation.
Connect Drainage with Care
Attach the drain hose, making sure it has a high loop to prevent backflow, following code standards like those explained in this detail. Use hose clamps to secure the connection tightly and prevent leaks. Avoid sagging hoses—this can cause drainage issues and water damage.
Final Checks and Testing
Before powering up, double-check all connections for tightness and correct placement. Turn on water and power supplies and run a short cycle to test for leaks or abnormal noises. Check the drain for proper flow; refer to this troubleshooting checklist for common issues. If everything runs smoothly, your installation is complete and ready for everyday use.
While many homeowners focus on the basic steps of installing a dishwasher, there’s a layer of nuance that often trips up even seasoned DIYers. One widespread misconception is that using generic or inexpensive parts during installation doesn’t impact your warranty or the appliance’s longevity. In reality, choosing incompatible or subpar parts—like mismatched spray arms or low-quality hoses—can void warranty coverage and lead to costly repairs down the line. To ensure your warranty remains valid, always verify compatibility with your specific model, and consider consulting detailed guides such as these essential parts. Moreover, many believe that all installation mistakes are immediately obvious—yet, some issues hide behind seemingly minor errors, such as improper hose routing or failing to secure the drain loop correctly, which can cause long-term drainage problems and damage. An often-overlooked nuance involves the materials used for connections; for example, plastic fittings are cheaper but less durable than brass counterparts, which resist corrosion and maintain seal integrity over time. Skipping this detail may save a few dollars upfront but can lead to leaks and warranty disputes later, as discussed in this article. For advanced DIY enthusiasts, understanding the role of each component during installation is critical. For instance, incorrect leveling can cause uneven water drainage, which not only hampers cleaning efficiency but also risks electrical issues if water pools. Proper leveling and secure mounting significantly extend your dishwasher’s lifespan. Don’t forget that even the most robust parts require inspection and timely replacement—neglecting worn-out spray arms or faulty inlet valves can lead to warranty voidance, so stay vigilant with regular maintenance. Have you ever fallen into this trap or overlooked a small detail that later caused trouble? Let me know in the comments. Ensuring precise installation practices combined with smart parts choices not only preserves your warranty but also guarantees optimal performance, saving you money and frustration in the long run.
Keeping It Working: Tools I Recommend for Longevity
Maintaining your dishwasher over time requires the right set of tools, not just to fix problems but to prevent them. I personally swear by a few specialized pieces of equipment that have saved me countless headaches and extended the life of my appliances. For example, a high-quality ultrasonic cleaner is invaluable for removing mineral deposits from spray arms and nozzles; I use mine weekly to keep everything running smoothly. Additionally, a digital multimeter allows for quick diagnostics of electrical components like control boards and switches—essential when troubleshooting error codes or intermittent issues. For plumbing connections, a PEX crimping tool ensures secure, leak-proof fittings, which is vital to protect your warranty and avoid water damage. I also recommend a dedicated set of plastisol or silicone-based lubricants; these keep seals and gaskets supple, preventing leaks over years of use. Investing in magnetic leak detectors is another game-changer; catching small leaks early can save hundreds on repairs. Looking ahead, I predict that smart diagnostic tools integrated with mobile apps will become standard, making maintenance even more straightforward for homeowners. Paired with the right tools, staying on top of your dishwasher’s health becomes a manageable, even enjoyable, task.
How do I maintain my dishwasher over time?
An effective maintenance routine includes regularly inspecting spray arms for calcium buildup, cleaning the filter assembly, and checking door seals for wear. Using equipment like a brushless ultrasonic cleaner and a multimeter can help diagnose and fix issues before they escalate. Also, replacing worn parts promptly—guided by insights from this resource—ensures your appliance operates at peak efficiency. Remember, combining proper tools with a proactive mindset is the best strategy to keep your dishwasher functioning like new for years to come.
Most Surprising Truths About DIY Dishwasher Work
One of the biggest lessons I learned was how crucial choosing quality, compatible parts is for maintaining your warranty and ensuring long-term performance. Using inexpensive or mismatched components might seem like a save at the moment, but it can void your warranty and lead to costly repairs down the line. Reading through this guide helped me understand the importance of selecting the right parts from the start.
Another insight was realizing how small installation mistakes — like improper hose routing or neglecting to secure the drain loop — can cause persistent drainage issues. These issues are often invisible until they cause larger problems, which made me appreciate the value of meticulous setup and knowledge about plumbing standards, as outlined in this article.
Lastly, I found out that materials matter more than most people think. Opting for brass fittings instead of plastic might incur a slight upfront cost, but it pays dividends in durability and warranty protection. Over time, these nuanced choices prove that paying attention to detail makes all the difference in both warranty validity and appliance longevity, as emphasized in this resource.
My Go-To Tools for Peace of Mind
Keeping my dishwasher running smoothly is easier with the right equipment. A quality ultrasonic cleaner allows me to remove calcium deposits from spray arms, which keeps water flow optimal, as explained in this guide. A digital multimeter is indispensable for diagnosing electrical issues quickly; it helps me avoid unnecessary replacements. For plumbing, I rely on a PEX crimping tool to ensure secure fittings, because leaks are the enemy of warranty claims. Using the correct lubricants like silicone sealant helps preserve gaskets and prevent leaks, extending the lifespan of my appliance. These tools have made troubleshooting not only feasible but satisfying, fostering confidence in DIY maintenance efforts.
Looking ahead, I believe that smart diagnostic apps will become a staple for homeowners, offering instant insights into appliance health and warranty status. Pairing these tech advances with good old-fashioned tools makes maintaining a dishwasher both manageable and even enjoyable.
Take Action and Keep Your Dishwasher Perfect
By recognizing that installation and parts choices are no small detail, you empower yourself to protect your warranty and ensure efficient operation for years to come. Small, deliberate steps now can save you from costly repairs and frustration later. So, start paying close attention to your setup, choose quality parts, and invest in the right tools — your dishwasher will thank you, and so will your wallet.
Have you ever faced challenges with installing or maintaining your dishwasher that caught you off guard? Share your story below, and let’s learn from each other’s experiences.
Related Posts
Why a Small Drip in the Back Can Rot Your Whole Floor
It was a morning like any other when I noticed…
Why Your Dishwasher Door Springs Snap After Only Two Years
I remember the exact moment when my dishwasher door suddenly…
How to Silent Your Noisy Dishwasher Without Replacing Parts
I remember the moment vividly—standing in my kitchen early one…