
I remember the moment vividly—my dishwasher was running, and suddenly, I heard a clunk followed by water splashing onto the floor. Turns out, my upper rack had popped loose mid-cycle, soaking everything. It was frustrating, messy, and made me question my DIY skills. That experience sparked my determination to understand what causes a stubborn upper rack latch and, more importantly, how to fix it without calling in the pros.
If you’ve ever struggled with a dishwasher that won’t keep the upper rack securely latched during a wash cycle, you’re not alone. Many homeowners find themselves facing this issue, often feeling helpless or thinking their machine is near the end of its lifespan. But here’s the truth: this problem is more common than you might think, and often, it’s a simple fix. Today, I promise to walk you through the core reasons behind this nagging problem and how to resolve it effectively, saving you time and a potentially costly repair.
Why Your Dishwasher’s Upper Rack Won’t Stay Latched
The latch mechanism plays a crucial role in ensuring your dishes come out clean and undamaged. When it fails, it can be due to several reasons—from worn-out parts to improper installation. One of the key mistakes I made early on was neglecting to inspect the latch assembly thoroughly before assuming it was broken. Instead, I thought I needed a new dishwasher! But a closer look revealed that fine-tuned adjustments and replacing a few specific parts could bring my machine back to life.
Interestingly, according to appliance repair experts, issues with latch mechanisms are among the most common causes of wash cycle disruptions. In fact, a faulty latch can also impact the dishwasher’s ability to lock the door properly, which might lead to leaks or error codes. You can learn more about essential parts every dishwasher owner should know about [here](https://appliancedoctorz.com/essential-parts-every-dishwasher-owner-should-know-about), so you can better understand what might be causing your problem.
Before jumping into solutions, consider whether the issue stems from broken latch tabs, misaligned hinges, or debris obstructing the latch. Sometimes, it’s as simple as cleaning out crevices or adjusting the door tension. But more often, replacing worn parts is necessary. The good news? Many parts are affordable, and with the right guidance, you can fix your dishwasher without a technician. Ready to diagnose and resolve your upper rack latching problems? Let’s dive into the specifics.
Remove the Dishwasher Door Panel Carefully
Begin by unplugging your dishwasher and turning off the water supply. Use a screwdriver to detach the screws securing the door panel. Carefully lift off the panel, similar to peeling a fruit, exposing the latch mechanism inside. This process prevents electrical hazards and allows access to internal parts.
Inspect the Latch and Hinge Components
Identify the latch assembly, which resembles a small clip or hook holding the rack in place. Check for broken, bent, or corroded parts. Use a flashlight to examine hinges for misalignment or debris obstructing movement. Remember, debris like hardened detergent or food particles can mimic broken parts, so clean these areas thoroughly.
Clean and Lubricate Moving Parts
If the latch appears intact but sticky, apply a small amount of silicone lubricant to hinges and moving parts. Avoid petroleum-based lubricants that can degrade plastic components. This mirrors how a smooth glide keeps your drawer functioning seamlessly. Clean away any accumulated grime with a soft cloth.
Adjust the Door Tension
An uneven door tension can prevent the latch from engaging properly. Using a screwdriver, gently tighten or loosen the tension screw situated near the hinge or latch assembly. Turn clockwise to tighten, resembling tightening a bolt to hold a wheel better, ensuring the door hangs evenly and the latch clicks securely.
Replace Worn or Damaged Parts
If visual inspection reveals broken latch tabs or hinges, order replacement parts from a trusted supplier. Consult the list of essential dishwasher parts to identify the correct components. When installing new parts, align them carefully, ensuring they engage smoothly and hold the rack securely during test runs.
Installing New Latch Components
Line up the replacement latch with existing mounting points, pressing gently until it clicks into place. Use a screwdriver to secure screws firmly, but avoid overtightening, which can strip threads or crack plastic. Think of this step as fitting puzzle pieces together—precision ensures long-term durability.
Test the Fix Before Reassembling
Reattach the door panel securely, reconnect power, and run a short cycle to observe latch functionality. Watch for the upper rack to engage and stay latched during operation. If it pops loose or doesn’t hold, revisit the previous steps, as misalignment or incomplete installation can cause persistent issues.
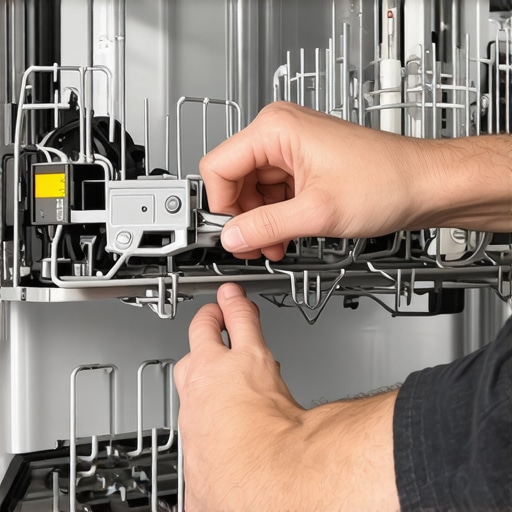
Image illustrating step-by-step latch replacement in a dishwasher, with focus on safety and correct alignment, helping visual learners grasp the process.
Many homeowners believe that replacing dishwasher parts is always a straightforward task, but in reality, there’s more to it than simply swapping out broken components. One common misconception is that all replacement parts are universally compatible; however, each dishwasher model has unique specifications, and choosing the wrong part can lead to further damage or voided warranties. According to appliance experts, verifying the exact part number and understanding the specifications is crucial before making a purchase, which you can explore in detail at this comprehensive guide.
Keeping Your Dishwasher in Top Shape with the Right Tools
Maintaining your dishwasher isn’t just about replacing parts—it’s about understanding the tools that make ongoing upkeep both efficient and effective. Personally, I rely on a set of specialized tools that have saved me time and prevented costly repairs. A quality multimeter, for example, helps me quickly diagnose electrical issues such as faulty control boards or defective wiring, ensuring that I don’t waste time guessing and potentially causing further damage.
Another indispensable tool is a plastic or rubber mallet, which I use to gently persuade stubborn components, like door hinges or spray arms, back into proper alignment without risking cracks or scratches. When working on water connections, a high-quality adjustable wrench allows me to tighten or loosen fittings with precision, reducing the risk of leaks. I also keep a set of precision screwdrivers on hand—particularly Phillips and flat-head varieties—to remove and reinstall panels, ensuring I don’t strip screw heads during disassembly.
Leveraging Software and Cleaning Procedures for Long-Term Results
In addition to hardware tools, understanding the role of cleaning and calibration software can extend the lifespan of your dishwasher. Regularly running a cleaning cycle with a high-quality descaler—supported by my smartphone’s reminders—helps prevent mineral buildup that can clog spray arms and filters. Apps like Aquanta or similar smart device integrations can remind you when to perform routine maintenance, turning a chore into a simple task.
Monitoring performance data through these apps can also help you spot early signs of wear, such as increased cycle times or moisture retention, so you can address small issues before they escalate. Predictive analytics are expected to become more prevalent, guiding users toward optimal maintenance routines based on real-time data.
How do I maintain my dishwasher over time?
Implement a consistent schedule for cleaning filters, inspecting seals, and checking water connections. Use the recommended tools for each task to avoid damage, and keep detailed records of maintenance to support warranty claims if needed. Remember, staying proactive with these practices not only prevents breakdowns but also improves cleaning performance and energy efficiency.
For a comprehensive approach, consult resources like this guide on essential dishwasher parts to understand which components require regular attention. Employing the right tools and maintaining a disciplined routine will ensure your dishwasher remains a reliable part of your kitchen for years to come.
Don’t overlook the importance of proper maintenance; try investing in a digital leak detector or a spray arm cleaning tool as advanced options. These can catch issues early, saving you money and hassle. Stay ahead of problems by integrating smart diagnostics into your routine—it’s an investment that pays off in peace of mind and appliance longevity.

Lessons I Wish I Had Learned Earlier About Dishwasher Repairs
One of the most valuable lessons I uncovered was the importance of patience and meticulous inspection before rushing to replace components. Rushing often leads to unnecessary expenses and frustration. I also realized that understanding the specific model’s parts and mechanisms makes a significant difference—what works for one dishwasher might not fit or function in another. Finally, I learned that preventive maintenance, like regular cleaning and gentle adjustments, can extend the life of your latch and prevent future issues more effectively than quick fixes.
Recommended Tools and Resources I Trust for Dishwasher Maintenance
I swear by a quality set of screwdriver bits, a multimeter for electrical checks, and a silicone lubricants for smooth operation. For detailed guidance, this comprehensive guide helped me identify the right parts for my model, avoiding costly mistakes. Also, reputable online tutorials from trusted appliance repair sites have been invaluable in building my confidence for DIY repairs.
Ignite Your Confidence: Take the Next Step Today
Dealing with a stubborn dishwasher latch doesn’t have to be intimidating. With the right knowledge, tools, and a bit of patience, you can troubleshoot and fix common issues effectively. Remember, mastery over small repairs not only saves money but also empowers you to keep your appliances running smoothly for years. So go ahead—inspect, adjust, replace, and celebrate your newfound skills. Your dishwasher will thank you, and you’ll experience the satisfaction of a job well done.
Have you ever hesitated to tackle dishwasher repairs yourself? Share your experiences or questions below—I’d love to hear your story!
Related Posts
Why Your Top Rack Keeps Sliding Off the Tracks
I will never forget the sound of three years' worth…
Why a Damp Subfloor Is the First Sign of a Slow Leak
It was a morning just like any other when I…
How to Manually Force a Drain Cycle During a Pump Failure
Ever had your dishwasher refuse to drain, leaving you staring…