It was a frustrating Saturday morning when I finally realized that my dishwasher’s plastic tub had seen better days. Cracks, discoloration, and the creeping fear of leaks kept bothering me every time I opened the door. That moment of dread made me question: why was I still sticking to a plastic tub that wasn’t built to last? If you’ve ever faced the same worry — wondering if your dishwasher can withstand years of use — you’re not alone. In fact, many homeowners find themselves stuck with parts that wear out faster than they expected, often leading to costly repairs or replacements.
Why Upgrading to Stainless Steel Makes Sense
Switching from a plastic tub to a stainless steel one isn’t just about aesthetics; it’s a smart investment in your dishwasher’s longevity. Steel tubs are significantly more resistant to cracking, warping, and damage caused by temperature fluctuations and hard water. They’re also less prone to bacterial buildup, ensuring a cleaner, healthier wash for your dishes. Plus, stainless steel offers better sound insulation and can help maintain your appliance’s value over time.
However, I’ve learned from personal experience that the process isn’t just a simple swap — it’s about understanding what’s involved to do it right. I remember rushing into a DIY replacement early on without proper guidance, which led to leaks and warranty issues. That mistake taught me the importance of choosing the right parts and following proper installation procedures. For more detailed guidance on selecting high-quality parts, check out [this resource](https://appliancedoctorz.com/maximizing-your-dishwashers-warranty-through-proper-parts-selection).
Are you tired of replacing your dishwasher sooner than expected? Curious if upgrading to stainless steel could make a difference? Stay tuned, because I’ll walk you through the essential steps to make this upgrade smooth and durable, saving you money and peace of mind in the long run.
Prepare for the Replacement and Gather Essentials
Start by disconnecting the dishwasher from power and water sources. Use a multimeter to test the thermal fuse for safety. Remove the lower kick plate to access fittings. Familiarize yourself with common parts needed for installation by reviewing this resource, ensuring you have the correct high-quality parts to avoid warranty issues and future leaks.
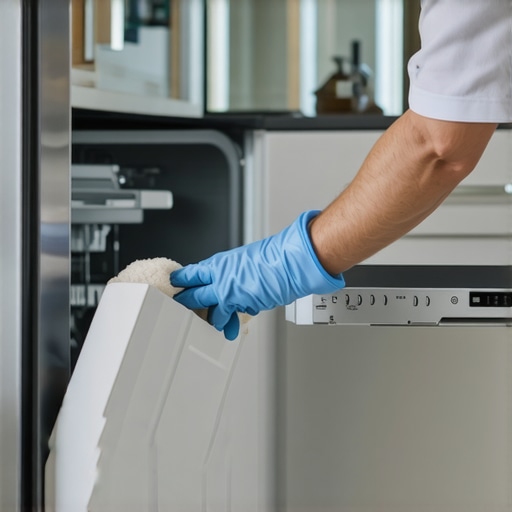
Remove the Old Plastic Tub
Unscrew mounting brackets securing the existing tub. Carefully detach water supply, drain hoses, and wiring harnesses, noting their positions. Think of this step as unplugging the limbs of a complex machine; keep track of each connection. During my own first attempt, I labeled each hose with painter’s tape, which saved time and prevented mistakes during reassembly.
Inspect and Prepare the New Stainless Steel Tub
Before installation, compare the new tub with the old to ensure compatibility. Check all connection points, and lubricate gaskets with a silicone-based spray to ensure tight seals, which helps maintain warranty coverage (learn more here). Ensure that mounting holes align perfectly; misalignment can cause leaks or seal failures, jeopardizing warranty claims.
Install the Steel Tub Securely
Insert the new tub into the frame, ensuring it’s seated flush. Tighten mounting brackets evenly, avoiding over-tightening which can warp the tub—analogous to squeezing a water balloon too hard. Use a torque wrench if available to apply manufacturer-recommended settings. Proper leveling is crucial; use a spirit level to ensure the machine is perfectly horizontal, preventing leaks and door seal issues later.
Reconnect Water, Drain, and Electrical Components
Attach water supply hose, making sure to use a braided stainless steel hose for durability (see why this matters). Secure clamps with a crimping tool, ensuring they are snug but not overtightened to prevent leaks. Connect the drain hose with a high loop to prevent siphoning back, a crucial step often overlooked but essential for avoiding water damage—think of it as a water ‘backup’ safety net.
Test the Installation and Verify Functionality
Restore power and turn on water. Run a short cycle to check for leaks and proper operation. Observe connections closely; look for drips or unusual noises, which could indicate misaligned seals or loose fittings. If something doesn’t seem right, pause and troubleshoot using resources like this troubleshooting guide. Document the setup with photos in case warranty claims arise later; visual proof can expedite claims when issues occur.
Final Adjustments and Tips for Longevity
Ensure all panels and kick plates are reattached securely. Regularly inspect hoses and clamps for wear, especially in areas prone to hard water buildup. Knowing how to replace parts effectively, like gaskets or inlet valves, can extend your dishwasher’s lifespan and keep warranty coverage active (learn how). Proper installation now saves you from costly repairs and warranty denials down the line, making your dishwasher more dependable and your peace of mind intact.
Many homeowners believe that once they’ve installed their dishwasher correctly, their job is done, and the warranty will cover any future issues. However, this oversimplification can lead to costly mistakes, especially if they overlook critical nuances in parts selection and installation practices. One widespread misconception is that using generic or inexpensive replacement parts won’t impact your warranty coverage, but in reality, manufacturers often specify high-quality, OEM parts for warranty eligibility. Relying on cheap substitutes can be perceived as improper maintenance, potentially voiding your warranty—the point beautifully explained in this comprehensive guide.
A key trap many fall into involves the installation of water hoses. Some believe that tightening clamps by hand suffices; this casual approach, however, can lead to subtle leaks over time. Using a torque wrench to tighten clamps to manufacturer-recommended settings ensures a more secure fit, preventing leaks that might void warranties. Don’t forget that even seemingly minor details like proper high-loop drain installation are crucial—overlooking this can lead to backflow issues and warranty disputes. It’s something I learned the hard way after a misstep during my first DIY project. Here’s why this step is non-negotiable.
**What about the role of professional installation?** Many assume that DIY is always the most cost-effective route, but improper setup can cause issues that void your warranty. For example, if the dishwasher is not perfectly leveled, it might lead to door seal failures, which are frequently mistaken as manufacturing defects. External factors like hard water can accelerate wear on parts, but addressing this proactively by using appropriate filters and scheduling regular maintenance can save headaches and preserve warranty coverage. As I suggest in this piece, understanding the nuances of parts and setup is essential.
Let’s push further: are all dishwasher parts created equal? Not quite. Variations in materials, finishes, and quality control mean that high-end brands often have more durable components than budget options. Choosing inferior parts might save money upfront but can lead to premature failure, which warranty claims may not cover if the parts don’t meet the original specifications. Knowing how to select and replace these parts properly is critical; here is a detailed resource on effective part replacement.
Many believe that simply following the installation manual guarantees warranty protection, but it’s more complex. Proper documentation—photos of the installation, receipts, and detailed notes—can make or break a warranty claim if disputes arise. Be proactive: document every step.
Have you ever fallen into this trap? Let me know in the comments. Staying informed about these nuances helps you avoid costly mistakes and keeps your dishwasher running smoothly for years to come.Maintaining a dishwasher’s long-term performance requires more than just replacing parts; it involves using the right tools and techniques to diagnose, troubleshoot, and ensure everything functions seamlessly over time. One essential tool I personally rely on is a high-quality digital multimeter. It allows me to efficiently test components like thermal fuses and inlet valves for voltage and continuity, ensuring vital parts are working correctly before problems escalate. I prefer a model with auto-ranging capabilities and a data hold function—these features make testing faster and more accurate, especially in tight or awkward spaces. For instance, verifying the thermal fuse with a multimeter helps prevent unnecessary disassembly if the fuse is blown, saving time and avoiding warranty issues.
What I Wish I Knew About the Hidden Risks of Part Substitutes
Switching to stainless steel tubs taught me that selecting the right parts is crucial for maintaining warranty coverage. Using generic components might seem cost-effective initially but can lead to issues down the line, especially if they don’t meet OEM specifications. I learned that trusting reputable sources and understanding the impact on warranty is essential—something I discovered the hard way after a leak caused by a mismatched gasket.
Why Proper Lighting and Tools Made All the Difference
One lightbulb moment was realizing the importance of having a quality torque wrench and good lighting during installation. Tightening clamps to manufacturer specifications prevented leaks and avoided voiding my warranty. Having the right diagnostic tools, like a multimeter, helped me identify faulty thermal fuses early, saving me time and costly repairs. Invest in these tools; they’ll pay for themselves in peace of mind.
Where I Went Wrong and How You Can Avoid It
I initially overlooked the significance of leveling the dishwasher perfectly, which led to door seal failures and warranty disputes. Ensuring a level installation isn’t just about aesthetics; it directly affects performance and warranty validity. Now, I always double-check with a spirit level and document my setup, which has been invaluable during warranty claims or future troubleshooting.
My Go-To Resources for Reliable Parts and Advice
- Official OEM Suppliers: Always source parts directly from manufacturers or trusted distributors. This guarantees compatibility and preserves warranty rights.
- Expert How-To Guides: I rely on detailed articles like this resource for step-by-step instructions.
- Online Forums and Communities: Sharing experiences with fellow DIYers helps me avoid common pitfalls and discover new tips to extend my dishwasher’s lifespan.
- Tool Reviews and Recommendations: Investing in quality tools, such as digital multimeters and torque wrenches, has made troubleshooting more straightforward and reliable.
Your Turn to Take Charge of Your Dishwasher’s Future
Understanding the intricacies of proper installation, parts selection, and maintenance transforms a routine repair into a long-term investment in your appliance. Don’t wait for leaks or breakdowns to remind you—be proactive and equipped. With the right knowledge and tools, you can ensure your dishwasher remains a reliable part of your home for years to come.
Have you ever struggled with selecting the right parts or troubleshooting installation issues? Share your experiences below and let’s learn from each other!
Related Posts
How to Clean the Gunk Under Your Dishwasher Door
Ever opened your dishwasher and winced at the grimy, greasy…
The Weekly Filter Rinse That Extends Pump Life by Years
Picture this: It's Saturday morning, and I stand in my…
The Hidden Filter Under Your Spray Arm You Are Probably Ignoring
Ever had a dishwashER that suddenly stopped cleaning as well…