I remember the moment vividly. I had just finished installing a new dishwasher, feeling pretty confident about my DIY skills. But then, days later, I noticed a small puddle beneath my appliance—nothing loud, just a slow drip that started to spread across my kitchen floor. That sinking feeling hit me hard. Turns out, I had reused an old brass compression nut without giving it a second thought, assuming it was still good to go. Little did I realize, that seemingly harmless decision could have cost me thousands in repairs—and nearly did.
Why Reusing Old Brass Compression Nuts Is a Risk You Shouldn’t Ignore
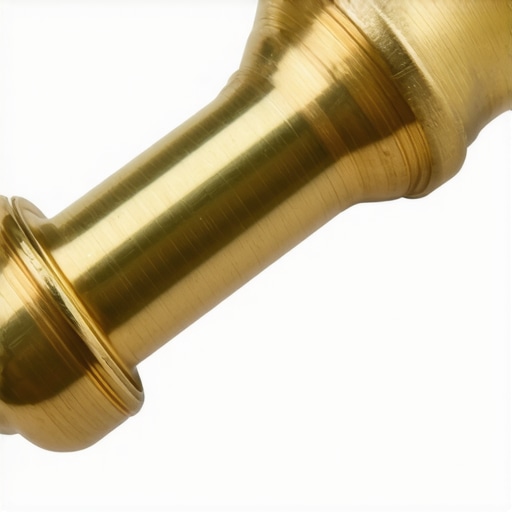
It’s tempting, isn’t it? To save a few bucks and reuse parts you believe are still functional. But when it comes to plumbing connections, especially with brass fittings, that shortcut can lead to serious leaks or even flooding. Brass compression nuts are designed to create a tight seal through compression. Over time, especially with repeated use, they can develop tiny cracks or weaken, making them unreliable for future connections. From personal experience, I learned the hard way that reusing an old brass nut without inspecting it carefully is a gamble—you might save a few dollars now, but it could cost a lot more later.
Is Reusing Old Parts Actually Worth the Risk?
Early on, I made the mistake of thinking that all fittings are created equal, and that if they look fine, they’ll perform fine. But the reality is, brass fittings, especially compression nuts, can develop microfractures or wear down the threading, compromising their integrity. Reusing them can lead to leaks that are often hidden behind cabinetry or in hard-to-see spots, making them difficult to detect until water damage occurs. Want proof? Studies show that repeated disassembly of brass fittings can cause microscopic fractures, increasing leak risks over time. It’s better to replace old nuts with new, high-quality ones to ensure a secure connection. Interested in more about choosing the right parts? You might find this guide helpful: [Maximizing Your Dishwashers Warranty Through Proper Parts Selection](https://appliancedoctorz.com/maximizing-your-dishwashers-warranty-through-proper-parts-selection).
Now, before you reach for that old brass nut in your toolbox, let’s explore how to spot potential issues and what steps you can take to prevent leaks in your next installation or repair. But first, have you ever faced a plumbing leak caused by a seemingly innocent reuse of parts? Share your story—I bet many homeowners have been there, myself included. Let’s dive into what you need to do to protect your home from water damage and unnecessary costs.
Secure the Water Supply First
Before starting any work, turn off the water supply to the dishwasher or fixture. Open the faucet to drain residual water and prevent spillage. This step is crucial to avoid water damage during the repair process.
Use the Correct Tools
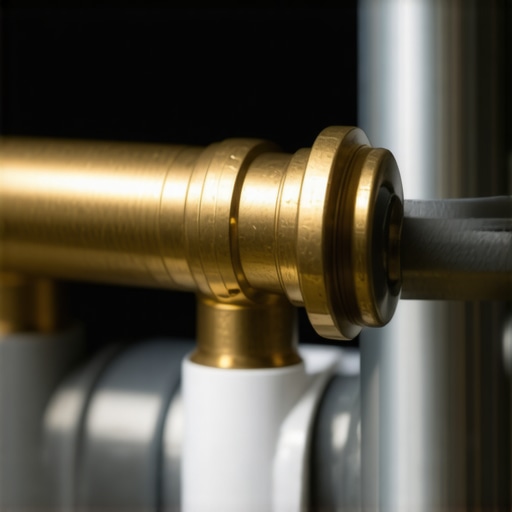
Gather a set of adjustable wrenches, pliers, and possibly a pipe thread sealant or Teflon tape. For brass compression nuts, a properly sized wrench ensures a firm grip without stripping the fitting, similar to using a socket ratchet for bicycle pedals—precision matters.
Disassemble the Old Fitting
Loosen the compression nut by turning counterclockwise. Carefully slide the nut back along the pipe, then remove the compression ring (ferrule). Use the wrench to gently remove the old brass nut if it’s stuck. Inspect for damage or cracks.
Examine and Prepare the Pipe
Check the pipe end for corrosion or deformation. Clean it with fine-grit sandpaper if necessary. Properly prepared pipe ends ensure a tight seal, much like sharpening a pencil before inserting into a sharpened hole—precision affects performance.
Install the New Brass Compression Nut
Sleeve the compression ring onto the pipe, then slide the new brass nut onto the pipe end. Hand-tighten the nut onto the fitting, ensuring it threads properly without cross-threading. Use the adjustable wrench to tighten further, turning about a ¼ turn past hand tight to create a secure, water-tight connection.
Avoid Over-tightening
Over-tightening can crush the compression ring or damage the pipe, leading to leaks. Think of tightening like tightening a bolt—firm but not excessive. A good rule is to tighten until snug, then give it an additional quarter turn.
Test the Connection
Turn the water supply back on slowly. Observe the connection for any leaks. If water seeps out, tighten the nut slightly. If leaks persist, disassemble, inspect the ring and pipe, and reassemble with a fresh compression ring if needed.
Document Your Work
Take pictures of the installation process. This documentation can support warranty claims or future repairs. Remember, proper part selection is key—use reliable parts like those recommended in this guide.
By following these detailed steps, you minimize the risk of leaks and ensure a reliable, long-lasting connection. Applying such methodical techniques also extends to other parts of dishwasher installation and maintenance, emphasizing the importance of precision and quality in every step.

Many homeowners operate under the assumption that a warranty will cover all repair costs or that installing a dishwasher is as simple as connecting water and power. However, there are nuanced pitfalls behind these beliefs that can jeopardize your appliance’s performance and your warranty’s validity. For example, everyone often assumes that all parts are interchangeable or that using generic components won’t void the warranty. In reality, manufacturers are strict about parts quality and proper installation procedures. Using subpar or incompatible parts, like old brass compression nuts, can lead to leaks and even void your warranty—so always prioritize quality and compatibility, as discussed in this guide.
A common myth is that warranty coverage is straightforward and that any repair or replacement will be free. But warranties often exclude certain parts or repair costs, especially when improper installation or use of non-approved parts is involved. Moreover, many overlook the importance of understanding warranty policies thoroughly—something experts advise consulting, as highlighted in this resource.
The mistake of neglecting proper installation steps can be costly. DIY enthusiasts sometimes skip critical checks, such as verifying proper water supply connections or ensuring the drain hose is correctly loopsed to prevent backflow. These omissions can cause premature failures, which might not be covered under warranty if deemed due to improper setup. For comprehensive guidance, see this detailed step-by-step guide.
In addition, many believe that parts like water inlet valves or door springs can be reused indefinitely, not recognizing that microfractures or wear can go unnoticed but compromise long-term performance. Experts caution against reusing old parts, especially brass compression nuts, as microcracks may lead to leaks over time, risking damage and warranty disputes. Studies even show that repeated disassembly of components increases failure risk, highlighting the importance of fresh, high-quality parts. You can explore key parts to keep on hand in this article.
One trap to avoid is the over-reliance on generic parts or shortcuts during installation. While they may seem cost-effective initially, they often lead to problems that are not covered by warranty, especially if quality standards aren’t met. Remember, a proper installation, using the right parts and following manufacturer guidelines, is the best way to ensure warranty coverage and long-lasting performance. Have you ever fallen into this trap? Let me know in the comments.
In conclusion, deep knowledge of your dishwasher’s parts, warranty conditions, and correct installation techniques isn’t just for pros—it’s essential for every homeowner committed to protecting their investment. For more insights, consider reviewing this complete list of warranty-covered parts or exploring these diagnostic tips to ensure your repairs qualify for warranty support.
Keeping It Working: Tools I Recommend for Maintenance
Maintaining your dishwasher’s reliability over years requires more than just basic care; it demands using the right tools that ensure precision and prevent damage. My go-to toolkit includes a high-precision digital torque wrench, which I use when tightening connections that are sensitive to overtightening, such as brass compression fittings. This tool allows me to apply just the right amount of force, based on manufacturer specifications, reducing the risk of leaks caused by over-tightening (see this guide).
Additionally, a quality basin wrench is invaluable for accessing tight spots behind dishwashers or plumbing fixtures. Its adjustable jaw and long handle give leverage and control where hand tools might struggle. For inspecting and cleaning components like spray arms or impellers, I rely on small, flexible boroscope cameras. These electronic inspection tools enable me to peer behind panels without disassembly, catching issues like obstructions or buildup early before they result in costly repairs.
In terms of software, I highly recommend using a diagnostic app connected via Wi-Fi to your dishwasher if your model supports it. These apps can interpret error codes, monitor cycle performance, and even suggest maintenance tasks, helping extend the appliance’s lifespan. Upgrading to a digital multimeter with temperature and continuity testing functions sometimes surprises homeowners with hidden electrical issues that impact long-term operation—things non-pros might overlook.
How do I maintain my dishwasher’s parts over time?
Regularly inspecting and replacing worn parts before they fail is crucial. For example, the rubber door gasket should be cleaned periodically with a gentle, non-abrasive cleaner, and replaced at the first signs of cracking or hardening. Using high-quality replacement parts like those listed in this resource ensures compatibility and durability. Remember, microfractures in old brass nuts can develop over time, increasing leak risks—opt for newer, manufacturer-approved parts for peace of mind.
As the industry trends toward smart diagnostics and IoT integration, I believe that future maintenance will shift even more towards automated systems that alert homeowners to component wear or impending failure, possibly preventing water damage altogether. Adoption of advanced sensors and predictive analytics will make routine maintenance more proactive and less reactive.
Don’t Skip the Step of Using Proper Tools in Maintenance
A mistake many DIY homeowners make is attempting repairs with generic tools that lack precision, such as cheap adjustable wrenches. This can strip threads or crack fittings, leading to leaks or costly replacements. For instance, using a properly calibrated wrench not only protects your parts but ensures your connections meet manufacturer torque specifications, which is key for warranty consistency. If you haven’t yet, try integrating a torque wrench into your maintenance routine—it might just save your next repair. Proper tool selection and maintenance are the backbone of long-lasting appliance performance and warranty protection.
The Hardest Lesson I Learned About warranty,installation,parts,dishwasher
One of the most eye-opening experiences was discovering how microfractures in reused brass nuts could quietly cause devastating leaks. This taught me that even seemingly insignificant details—like inspecting a part thoroughly—can be make-or-break for warranties and home safety.
Three Myths About warranty,installation,parts,dishwasher That Held Me Back
I used to believe that all parts are created equal and that a quick re-tightening could fix minor leaks. It turns out, relying on old, worn components without proper inspection often invalidates warranties and leads to costly repairs down the line. Replacing parts proactively changes the game.
What Experts Won’t Tell You About warranty,installation,parts,dishwasher
Many professionals emphasize the importance of torque specifications and quality parts, but few homeowners realize that improper installation or reusing worn parts can void warranties entirely. Knowledge is power—it’s worth investing in quality tools and parts to keep your dishwasher running smoothly and warranty intact.
My Essential Toolkit for Dishwasher Maintenance
I swear by a high-precision torque wrench for delicate connections—it’s crucial to tighten fittings just enough without risking damage. A flexible boroscope camera allows me to peek behind panels and spot issues early, saving time and money. For sealing and inspecting pipes, a quality set of adjustable wrenches and Teflon tape are indispensable. These tools help me maintain my dishwasher’s longevity while ensuring warranty compliance.
Moving Forward with Confidence
Taking the time to learn the nuances of proper installation, inspection, and part selection has transformed my approach from reactive to proactive. Regularly updating my toolkit and knowledge ensures that I not only protect my investment but also become more confident in handling future repairs. Remember, a well-maintained dishwasher with properly chosen parts can serve you reliably for years—it’s worth the effort.
What’s the one mistake you’ve made that taught you a valuable lesson about dishwasher maintenance or warranties? Share your story below—I’d love to hear how you turned challenges into learning opportunities.
Related Posts
The $8 Brass Elbow That Outlasts Any Plastic Alternative
I remember the first time I struggled with my dishwasher…
Why This $8 Brass Elbow Is Better Than Any Plastic Alternative
Have you ever stared at a tiny, seemingly insignificant connector…

The $15 Thermal Fuse That Prevents Major Electrical Damage
I remember the day I nearly flooded my kitchen because…