
The smell hit me before I even opened the dishwasher door. It was a Tuesday evening, and I was feeling pretty proud of my weekend DIY project—a brand-new, whisper-quiet machine I’d installed all by myself. But that pride vanished when a thick, swampy odor of rotten eggs and stagnant sink water wafted from the tub. I looked down, and my heart sank. There was a murky pool of gray water sitting right in the bottom of the basin, mocking me. I had followed the manual, or so I thought. I had connected the wires and the water line, but I had ignored the one thing my old neighbor, a retired plumber, always harped on: the high loop. My ‘clean’ dishes were basically bathing in whatever I’d rinsed down the sink earlier that day.
That Funky Smell Isn’t Just Your Leftovers
If you’ve ever noticed a pool of water at the bottom of your unit, you might be facing the same mistake I made. You probably need to know how to fix a dishwasher that will not drain without calling a plumber. The high loop is essentially a simple gravity trick. By securing the drain hose to the very top of the cabinet under your sink before it drops down into the garbage disposal, you create a physical barrier. Without it, every time you run your sink or the disposal, dirty water can slide right back down into your dishwasher. It’s gross, it’s unhygienic, and it can even void your protection plan if the backflow damages the internal pump. I learned the hard way that why your drain hose needs a high loop to stop the smell is actually the most critical step of the entire plumbing process. Properly routing the line is one of those common dishwasher parts and their role in proper installation steps that seems optional but is actually mandatory for your health. Have you ever opened your machine only to find a mysterious puddle of dirty water waiting for you?
Is a high loop actually worth the extra effort?
Some folks think this is just a way for installers to justify a higher labor fee, but the reality is grounded in strict safety standards. According to the International Association of Plumbing and Mechanical Officials (IAPMO), a high loop or an air gap is a requirement in most jurisdictions to prevent cross-contamination. It isn’t just about the smell; it’s about making sure your family isn’t eating off plates rinsed in sink-drainage bacteria. I used to think a few zip ties and a higher mounting point were ‘over-engineering,’ but after seeing the gunk that backflowed into my machine, I became a believer. Using the drain hose trick that stops sink water from backflowing is the simplest, cheapest insurance policy you can have for your kitchen floor and your health. Today, we’re going to break down exactly how to check your current setup and fix it in under five minutes with nothing more than a plastic strap and a single screw.
Look Under the Sink Before You Grab the Wrench
Before you start buying expensive replacement parts, you need to see what is actually happening when the water pumps out. Open your sink cabinet and trace the flexible corrugated hose coming from the dishwasher. If it just lies flat on the floor of the cabinet and then wanders up into the disposal, you have found your culprit. Think of your drain hose like a roller coaster; if the first hill is not high enough, the “car”—or in this case, the dirty sink water—is going to roll right back where it started. Following a diy dishwasher installation step-by-step guide is usually enough to avoid this, but if a pro rushed the job, they might have skipped the mounting bracket entirely.
How to Create the Perfect High Loop
You only need a few inches of clearance to make a massive difference in your kitchen hygiene. Pull the excess hose toward you and lift it as high as it will go inside the cabinet, ideally right against the underside of the countertop. You are creating a “peak” that gravity will not let water climb over. Use a plastic plumbing strap or a heavy-duty zip tie to secure the hose to the cabinet wall or a pre-existing screw. This is one of those essential parts for troubleshooting dishwasher installation issues that people overlook because it looks like a simple bit of plastic. If your hose is too short to reach the top, you might need to look into the correct hose length for a proper dishwasher installation to ensure there is enough slack for a proper loop.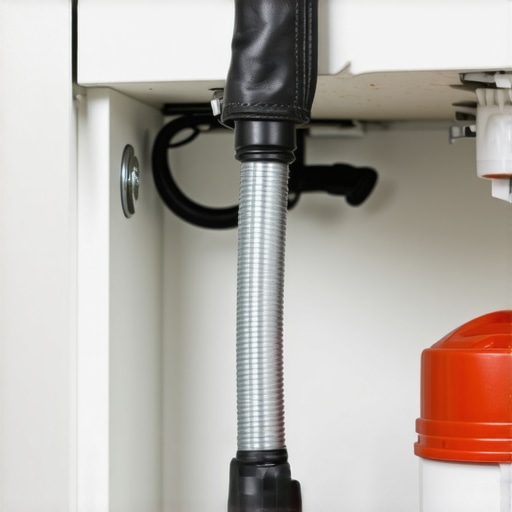
Don’t Let a Single Zip Tie Ruin Your Cabinet
I once tried to get clever and used a standard, thin office zip tie to hold my loop in place. It worked for about three weeks. Then, in the middle of a heavy-duty cycle, the heat from the water softened the plastic, the tie snapped, and the hose crashed down. I did not notice until the smell came back three days later. When I checked, I found a puddle of “disposal juice” sitting in the hose, slowly leaking into the base of the cabinet. Now, I always recommend using a perforated metal strap or a specialized 2-dollar part that prevents kinking and slipping. It is a tiny investment to protect your kitchen from structural rot.
Check Your Disposal Connection Carefully
While you are under there, take a second to look at where the hose actually meets the sink plumbing. Many times, the “clog” people think they have is actually a buildup of grease right at the entry point of the garbage disposal. This is the drain line clog that is actually in your disposal, not the dishwasher itself. If you are installing a brand new disposal, make sure you have knocked out the plastic “knockout plug” inside the nipple—if you forget that, no amount of looping will save your kitchen from a flood.
Why Proper Routing Protects Your Investment
This is not just about avoiding a stinky kitchen; it is about protecting your wallet. If you ever have a major pump failure, the first thing a technician looks at is the quality of the installation. If the hose is not looped, they might claim the pump failed due to “improper use” or “installation error,” which often leads to denied warranty claims. Knowing parts to check when installing a dishwasher ensures that when you do need help, you are not paying out of pocket for a mistake that takes five minutes to fix. Proper routing through your cabinets is the final piece of the puzzle for a machine that lasts a decade.
Why Your Warranty Might Be Worthless Before You Even Start
Most people assume that as long as they have a receipt, they are covered. However, after years of tinkering with these machines, I have realized that manufacturers are looking for any excuse to deny a claim. A common myth is that any ‘universal’ repair kit will do the trick. While these parts are cheaper, they are often the reason for denied warranty claims. If a technician finds a non-OEM (Original Equipment Manufacturer) part caused secondary damage, you are footing the entire bill. In my experience, maximizing your dishwashers warranty through proper parts selection is the only way to ensure long-term coverage. This is especially true for European models where tolerances are razor-thin. Using the wrong intake valve can lead to pressure spikes that the internal sensors aren’t calibrated for, leading to a cascade of errors.
Should you trust those universal hoses for your high-end machine?
The short answer is usually no. While a ‘one size fits all’ kit from a big-box store looks tempting, there is a significant problem with universal hoses for high-end European models like Miele or Bosch. These machines often require specific flow rates and have proprietary connectors that generic hoses can strain. According to the Association of Home Appliance Manufacturers (AHAM), improper installation—including the use of non-compliant hoses—is a leading cause of premature appliance failure and home water damage. If you are aiming for maximizing your dishwashers warranty coverage today, stick to the parts listed in your manual.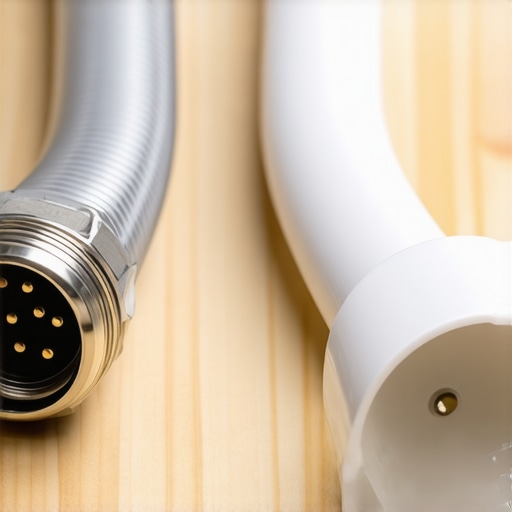
The Trap of the Ten-Year Motor Sticker
We have all seen those shiny stickers on the front of the door promising a decade of motor protection. Here is the ‘oops’ factor: that warranty usually only covers the part, not the labor. I have seen homeowners spend $250 on a service call just to get a ‘free’ $60 motor replaced. This is why how to diagnose dishwasher parts during warranty periods is a skill every homeowner needs. If you can prove the failure was a defect and not ‘wear and tear,’ you have much better leverage. Before you call for service, check the complete list of dishwasher parts covered by warranty so you aren’t surprised by the invoice.
Don’t Ignore the Secondary Sensors
Modern smart dishwashers are essentially computers that happen to wash plates. One of the most essential parts every dishwasher owner should know about is the turbidity sensor. It measures how dirty the water is. If you use too much detergent or the wrong type, this sensor gets filmed over, and the machine starts running 4-hour cycles because it thinks the dishes are still filthy. This isn’t a mechanical failure; it is an installation and maintenance oversight. Learning understanding dishwasher parts like these will save you from unnecessary repairs. Have you ever fallen into this trap where a simple sensor issue turned into a major headache? Let me know in the comments below, and let’s keep your kitchen running smoothly.
I realized early on that my basic toolbox was woefully inadequate for the precision required by modern appliances. If you are still trying to force a Phillips-head screwdriver into a star-shaped screw on a Bosch or Miele door, you are going to strip it, and you are going to be miserable. I keep a dedicated ‘kitchen roll’ now, featuring a high-quality set of Torx T15 and T20 drivers because they are non-negotiable for most European builds. Having the right gear is the first step toward selecting the right parts for dishwasher installation without a headache.
Stop Guessing and Start Measuring with a Multimeter
The single most important tool in my arsenal is a digital multimeter. Last summer, when my unit wouldn’t heat the water, I didn’t just start throwing parts at it. I used the meter to check the continuity of the heater. It took two minutes to confirm the element was dead, saving me hours of frustrating guesswork. If you are brave enough to try replacing a faulty heating element by yourself, this tool is your best friend. It transforms you from someone who ‘thinks’ they know what is wrong into someone who ‘knows’ for a fact. This level of precision is exactly what expert advice on dishwasher installation troubleshooting is all about—diagnosing the root cause before you spend a dime on a service call.

How can I keep my machine running like new for years?
The secret isn’t magic; it is a rigid monthly schedule. I have a recurring alert on my phone to check the coarse and fine filters. Neglecting the best way to clean the hidden filter under the spray arm is the number one reason machines start underperforming at the three-year mark. While you are down there, take a toothpick and clear the nozzles. It sounds tedious, but cleaning a clogged spray arm with a toothpick ensures the water pressure actually reaches your plates. According to the Association of Home Appliance Manufacturers (AHAM) DW-1-2020 standard, even a 10% reduction in water flow from debris can significantly degrade cleaning scores and increase energy consumption per cycle. Knowing when to replace dishwasher parts for optimal performance—like a worn-out spray arm bearing—will keep those AHAM-level results in your own kitchen.
Smart Sensors are the Future of Kitchen Efficiency
Looking ahead, I see the industry moving toward ‘predictive maintenance’ through the Internet of Things (IoT). We are already seeing machines that can detect a failing drain pump before it actually dies, sending a notification to your phone. While this sounds like a luxury, it will eventually be the standard for avoiding catastrophic floor damage. As water costs rise, we will see even more sensitive essential parts every dishwasher owner should know about, like ultrasonic sensors that can detect tiny leaks before they hit the subfloor. My advice? Don’t wait for a sensor to tell you there is a problem. Go pull out your bottom rack right now, remove that cylindrical filter, and give it a good scrub under hot water. You’ll be amazed at how much better your next load smells.
Three Hard Truths I Learned the Expensive Way
After years of fixing my own mistakes, I realized that the tiny details are where the real money is saved. First, never ignore a slight drip, thinking it is ‘just a little moisture.’ That tiny leak is often the first sign that you need expert advice on dishwasher installation troubleshooting before it ruins your subfloor. Second, ‘universal’ does not mean ‘perfect.’ I have seen many folks lose out on coverage because they did not realize what your dishwasher warranty doesn’t cover and how to avoid fees, especially when using third-party adapters that put stress on the valves. Finally, the difference between a machine that lasts twelve years and one that dies in four is almost always found in the first thirty minutes of the setup. It is vital to recognize the difference between a lemon and a faulty installation before you blame the manufacturer for a preventable leak.
The Toolkit That Turns Frustrated Homeowners into Pros
If you want to move beyond basic troubleshooting, you need more than just a pair of pliers. I swear by my digital multimeter for testing heating elements, but for physical security, nothing beats the most durable braided steel hoses for long-term safety. These hoses are much more resilient than the plastic lines that often come in the box. I also recommend keeping a digital copy of top tips for seamless dishwasher installation in 2025 on your phone for quick reference while you are under the sink. These resources, combined with a good set of Torx drivers and a reliable leak detector, are my secret weapons for a stress-free kitchen.
Stop Worrying and Start Washing Like a Pro
Taking care of your kitchen should not feel like a second job. By paying attention to how you route your lines and choosing the right components, you are doing more than just washing dishes—you are protecting your home. Remember that following top tips for selecting the right parts for dishwasher installation is a skill that pays for itself every time you avoid a two-hundred-dollar service call. You have the tools, the knowledge, and the high-loop trick now; go ahead and get that machine running perfectly. Have you ever discovered a ‘shortcut’ during an installation that ended up causing more trouble than it was worth? Let me know in the comments below!
Related Posts

How to Audit a Professional Installation Before the Technician Leaves
I vividly remember the day I watched a technician walk…
Why Professional Leveling Is Critical for Door Seal Integrity
It was a quiet Saturday morning when I first experienced…
Why Your Local Plumber Recommends Brass Over Plastic Fittings
It was a small leak under my kitchen sink that…