
Picture this: It’s Sunday night. You have just finished a massive family dinner, and the sink is overflowing with greasy plates. You press the Start button on your dishwasher, and… nothing. No lights. No beep. Just a cold, dead silence that feels like a punch to the gut. I have been there, standing in my kitchen with wet hands, convinced I was looking at a $800 replacement bill. My first instinct was to call a repairman, but then I remembered my trusty, slightly dusty multimeter sitting in the garage. I realized that more often than not, the culprit isn’t a fried brain center; it’s a tiny, inexpensive safety device that simply did its job too well.
Why a Dead Control Panel Doesn’t Mean Your Dishwasher is Junk
Most people assume that when the lights go out, the expensive control board has finally given up the ghost. But here is the secret: manufacturers build in a fail-safe called a thermal fuse. Its entire purpose is to melt and break the circuit if things get too hot, preventing a potential house fire. In my early DIY days, I actually replaced an entire motor because I did not know any better. Talk about an expensive mistake that I still kick myself for today. If you are currently staring at a lifeless machine, learning the most reliable way to test a thermal fuse should be your very first step before you even think about common dishwasher parts and how to replace them effectively.
Can a Cheap Tool Really Save My Dishwasher?
You might be looking at your basic multimeter and wondering if it is actually sophisticated enough for this. I used to think I needed professional-grade gear to get a real answer, but for a thermal fuse, a ten-dollar tool from the hardware store is more than enough. We are not doing complex calculus here; we are just checking if electricity can still flow from point A to point B. Have you ever felt that sinking feeling when a simple appliance stops working for no apparent reason? It is incredibly frustrating, but I promise you that checking for continuity is something anyone can do. According to data from the National Fire Protection Association, electrical failures are a leading cause of home fires, which is exactly why these fuses are so sensitive and prone to blowing. Before you get overwhelmed by how to diagnose dishwasher parts during warranty periods, let’s get that multimeter out and see if we can solve this mystery in the next ten minutes.
Kill the Power or Risk a Jolt
Before you even think about touching a screwdriver, you need to cut the electricity. This isn’t just about avoiding a shock; it is about protecting the sensitive electronics you are about to expose. Go to your breaker box and flip the switch. I once skipped this step because I was in a rush to fix a leak before a party, and a stray spark against the inner door frame fried the entire control board. What should have been a ten-minute fix turned into a week of waiting for shipping and a much higher bill. If you aren’t sure which breaker it is, turn the machine on and have someone watch for the lights to go out while you toggle the switches. Once the power is dead, you are ready to start diy dishwasher installation step-by-step guide procedures in reverse to get to the guts of the machine.
Peeling Back the Door Skin
To find the thermal fuse, you usually need to remove the inner door panel. This is where most people get intimidated, but it is really just a series of Torx or Phillips head screws around the perimeter. Keep a magnetic tray or a simple bowl nearby; those screws have a magical way of disappearing into the dark corners of your kitchen floor. Once the screws are out, the panel might drop suddenly, so keep one hand on it to support the weight. You are looking for a small plastic component, often white or clear, with two wires clipped to it, located near the top of the control assembly. This is one of those essential parts every dishwasher owner should know about because it is the gatekeeper of your machine’s life.
Does Your Multimeter Make a Sound?
Now comes the moment of truth. Set your multimeter to the continuity setting—it usually looks like a small sound wave icon. If your meter doesn’t have a beep function, set it to the lowest Ohms (Ω) setting. Touch the two probes together; you should hear a beep or see the screen jump to zero. This confirms the tool is working. Now, pull the wires off the thermal fuse (taking a photo first so you remember where they go) and touch a probe to each metal terminal on the fuse itself. If the meter beeps or shows a near-zero reading, the fuse is fine. If the screen stays at ‘1’ or ‘OL’, the fuse has blown and is physically preventing electricity from reaching the controls. 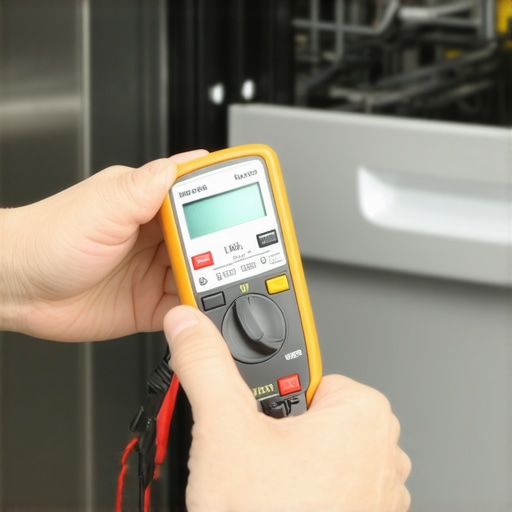
When the Fuse Isn’t the Problem
If the fuse tests fine, don’t panic. It means the issue lies deeper, perhaps with the control board itself or a door latch assembly. This is the point where you should check your paperwork. Knowing how to diagnose dishwasher parts during warranty periods can save you from voiding a contract by poking around too much. I remember a time when I spent three hours tearing down a motor only to realize the door latch was simply slightly misaligned, which is a common quirk after a move or a rough how to prepare your kitchen for dishwasher installation. Sometimes, a simple reset is all that is required. If the fuse is good, try to how to reset your dishwasher control board after a power cut by leaving the breaker off for at least ten minutes. You would be surprised how often ‘power cycling’ fixes a digital glitch that looks like a hardware failure.
Look for the Root Cause of the Heat
If the fuse actually was blown, don’t just replace it and call it a day. Fuses blow for a reason, usually because the machine overheated. Check for a clogged filter or a failing heating element. I once replaced three fuses in a single month before I realized that the best way to clean the hidden filter under the spray arm was the real solution to my overheating problem. A clogged filter makes the pump work harder, which generates heat, which pops that fuse. It is a domino effect that you can stop with basic maintenance.Most homeowners believe that swinging a wrench and following a YouTube video is all it takes to handle an installation. I used to be a staunch DIY advocate until I realized that manufacturers are getting incredibly strict about who actually touches the machine. You need to carefully weigh the risks of skipping the professional installation receipt against the few dollars you save on labor. If a leak occurs six months from now and damages your kitchen flooring, the first thing an insurance adjuster or manufacturer will ask for is that certified receipt. Without it, you are often on your own.
Is Your Warranty Actually Just a Fancy Sticker?
You have probably seen that shiny 10-year warranty sticker on the door and felt a sense of security. Here is the nuance most people miss: that coverage usually only applies to the motor itself, not the labor to replace it or the sensors that actually tell the motor when to run. It is vital to uncover the truth about those 10-year motor stickers on the door before you assume your wallet is protected. According to data from the Association of Home Appliance Manufacturers (AHAM), a significant percentage of warranty claims are denied specifically due to improper installation or the use of non-certified components.  The biggest trap I see involves the temptation of cheap, third-party parts. When a pump fails, grabbing a thirty-dollar knockoff might seem smart, but there is a technical reason why OEM pumps outlast cheap alternatives every time. A generic pump might have a slightly different electrical draw, which eventually stresses the control board and fries the very thermal fuse we discussed earlier. This is exactly the mistake that voids your lifetime tub warranty. If you want to keep your protection active, you must learn how to get your warranty claim approved on the first try by using only approved serial-matched components. Finally, never overlook the physical geometry of your setup. Many DIYers ignore the drain hose height, which is why your installer insists on a high loop drain to prevent dirty water from siphoning back into your clean dishes. Have you ever fallen into this trap and realized too late that a simple installation error voided your coverage? Let me know in the comments below.To really scale your DIY game, you need more than just a screwdriver. My go-to is the Torx T15 driver because manufacturers love these tamper-resistant heads to keep casual users out. If you are serious, grab a roll of high-quality thread seal tape—not the cheap stuff—to ensure those water connections are airtight. This is where common dishwasher parts and their role in proper installation become your best friends. I personally use a non-contact voltage tester as a secondary safety check, because even if the breaker is off, I have seen old houses with crossed wires that will give you a nasty surprise.
How do I maintain my dishwasher’s performance over time?
Consistency is the name of the game here. You should be performing a deep dive every six months. Start by understanding dishwasher parts a key to effective maintenance and how they interact. For instance, if your water is even slightly hard, the easiest way to clean calcium from your heating element is a task you cannot afford to skip. According to technical data from RepairClinic, nearly 30% of heating element failures are directly linked to mineral crusting that acts as an insulator, causing the coil to overheat and eventually snap under the thermal stress.  Beyond the heater, you need to be proactive about the intake system. If you notice a slow fill or inconsistent water levels, you should learn how to test your water inlet valve for failure using that multimeter we discussed. This $20 part is often the secret reason people think they need a brand-new machine. It is also wise to inspect parts to check when installing a dishwasher for long-term performance like the drain hose and the mounting brackets. If the unit shifts over time, the door seal will not seat correctly, leading to a slow drip you might not notice until your subfloor is soft.
Stop the Leak Before the Floor Rot Sets In
One of the best investments I ever made was a five-dollar leak sensor that sits under the kickplate. It is a low-tech way to protect a high-tech appliance. You are effectively maximizing your dishwashers warranty through proper parts selection by ensuring external factors do not cause a failure that a technician could blame on ‘owner neglect.’ I also suggest keeping a digital log of when you clean the filters; it sounds like overkill, but when you are trying to figure out when to replace dishwasher parts for optimal performance, having a history makes the diagnosis instant. Looking ahead, I predict we are moving toward a ‘predictive maintenance’ era. Within five years, most mid-range units will include vibration sensors that can detect a failing bearing before you even hear it. We are already seeing this with how to update the firmware on your kitchen wi-fi module becoming a standard maintenance task. If your machine supports it, I highly recommend you how to set up automated detergent reordering on your smart app—not just for the convenience, but because these apps now track cycle counts and can alert you to deep-clean your filters exactly when the machine needs it. For your next move, try this: download your machine’s specific service manual—the hidden one usually tucked behind the kickplate or available online—and run the onboard diagnostic mode. It is like giving your dishwasher a professional physical exam without the service fee.
The Hard Lessons I Learned Under My Kitchen Sink
After years of fixing my own machines, I realized that most “broken” dishwashers are actually just “misunderstood.” One major lightbulb moment for me was realizing how much non-OEM parts actually cost in the long run. I once tried to save fifteen dollars on a generic pump, only to have it fry a perfectly good control board within a month. Another realization was that the drain line height is non-negotiable; skipping that high loop is a recipe for foul smells and repeated clogs. If you are feeling stuck, looking at a guide to dishwasher parts warranty what you need to know can clarify whether a failure is your fault or a factory defect.
My Go-To Resources for Stress-Free Repairs
For those ready to move past basic troubleshooting, I highly recommend keeping a dedicated Torx T15 and T20 driver specifically for your appliances. Most modern units won’t even open without them. I also swear by a digital multimeter with a loud beep for continuity—it saves you from squinting at a screen in dark cabinets under the counter. Lastly, keep a digital copy of the complete list of dishwasher parts covered by warranty bookmarked on your phone. These simple tools turn a potential eight hundred dollar disaster into a twenty dollar Saturday afternoon fix.
#IMAGE_PLACEHOLDER_E#
Take the Reins of Your Appliance Maintenance
Stepping into the world of DIY repair can be intimidating, but remember that every expert was once a novice with a screwdriver and a dream of clean dishes. By staying proactive and using expert advice on dishwasher installation troubleshooting, you aren’t just saving money—you are gaining mastery over your own home. Your dishwasher parts are designed to be maintained, so do not be afraid to get your hands a little dirty to keep them running smooth for years. Check out top tips for seamless dishwasher installation in 2025 to stay ahead of the curve. Have you ever been surprised by a simple fuse being the culprit for a dead machine? Let me know in the comments below!
Related Posts

Why Reusing an Old Water Supply Line Is a Disaster Waiting to Happen
I vividly remember the day I clicked the disconnect valve…
How to Use a Multimeter to Test Your Dishwasher’s Thermal Fuse
Have you ever experienced that sinking feeling when your dishwasher…

How to test your water inlet valve for failure
I remember the exact moment it hit me—my dishwasher suddenly…