
I remember the smell of damp particle board—the unmistakable scent of a kitchen cabinet slowly rotting from a silent leak. It was three months after my ‘perfect’ DIY installation. I was proud of my work until I stepped into a cold puddle in my socks. I had focused so much on finding the right parts for dishwasher installation, but I completely ignored the simplest component: the rubber seal. That tiny oversight cost me a floor. I assumed that because the machine was new, the gasket was invincible. I was wrong. Most people treat their dishwasher like a tank, but the gasket is its Achilles’ heel. Today, I am going to show you the one maintenance habit that will save you from the headache of a soggy kitchen and a voided dishwasher warranty. We are not just talking about a quick wipe-down; we are talking about preserving the integrity of the seal so it stays supple for a decade instead of five years.
Your Gasket is Dying a Slow Death Behind Closed Doors
It is a bit of a shock, but the very things that clean your dishes—heat, detergent, and food acids—are the sworn enemies of rubber. Early in my journey as a homeowner, I made the classic mistake of letting hard water minerals and grease build up in the tracks. I thought the machine cleaned itself. I learned the hard way that when ‘gunk’ sits on that seal, it creates tiny pits and cracks. This is often why your warranty claim for a door gasket was denied because manufacturers consider it a lack of maintenance. Have you ever noticed a faint white residue or a sticky black film around your door? That is the sound of a countdown clock.
Is a Tiny Rubber Strip Really Worth the Hype?
You might be thinking that it is just a piece of rubber and it cannot really matter that much. It matters more than you think. According to experts at Energy Star, even a minor seal compromise can lead to significant water waste and efficiency drops, but more importantly, it leads to structural damage. If you do not take care of this common dishwasher part, you are looking at a slow drip that ruins your subfloor before you ever see a puddle on the tile. It is the leak prevention step most professional installers charge extra for, and I am going to give it to you for free. Have you ever had to deal with a dishwasher leak that seemed to come out of nowhere? Tell me about your kitchen nightmares in the comments! Before we get into the actual cleaning steps, you need to understand that a supple gasket is the only thing standing between your hardwood floors and a massive restoration bill.
Ditch the Harsh Chemicals and Get Hands-On
If you think a generic cleaning cycle handles the seal, you are setting yourself up for failure. Think of the gasket like the tires on your car; if the rubber is dry-rotted or coated in grime, it doesn’t matter how great the engine is—you aren’t going to have a safe ride. In your kitchen, the gasket needs to stay soft and flexible to create a vacuum-like suction. One of the most common mistakes I see is people pouring gallons of vinegar into their machine, thinking it is a miracle cure. You absolutely must stop using vinegar in your high-end smart machine because the high acidity can actually degrade specific rubber compounds over time, making them brittle. Instead, take a bowl of warm water and a few drops of mild dish soap. Wipe the entire length of the seal, including the underside that you cannot see when the door is closed. This hidden flap is where the real “sludge” lives—a nasty cocktail of old detergent and organic waste that slowly eats the rubber.
The Toothbrush Technique for Tight Corners
A flat cloth simply cannot reach the deep corners where the gasket meets the frame. This is exactly where I failed during my first year of homeownership. I used to ignore the bottom hinges until I noticed a black, moldy residue starting to peel the rubber away from the track. Now, I use a soft-bristled toothbrush to gently scrub the tracks once a month. It is the same logic as finding the best way to clean a filter that is coated in grease; you need mechanical agitation to break up the biofilm. I once spent forty minutes troubleshooting a supposed leak that turned out to be just a massive buildup of pea protein and grease preventing the door from seating properly. 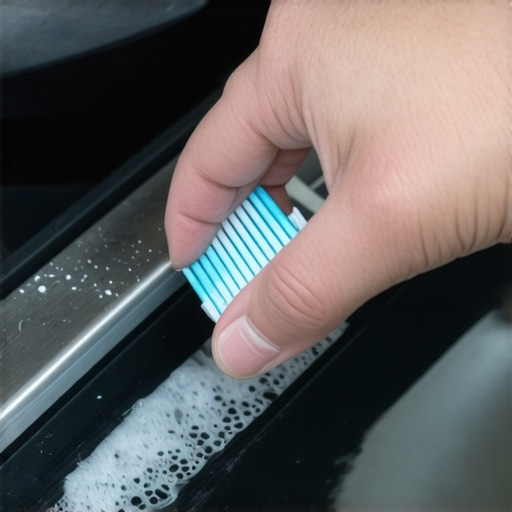
Stop the Sag by Leveling Your Unit
You can have the cleanest gasket in the world, but if your dishwasher is tilted forward or to the side, the door will never hit the seal correctly. Gravity is a relentless force in your kitchen. If the tub is leaning, the door puts uneven pressure on the rubber, causing it to flatten out on one side and gap on the other. This is why professional leveling prevents your door from leaking and it should be the first thing you check if you see water escaping. I remember a neighbor who replaced his seal three times in two years, only to realize his kitchen floor had a subtle slope toward the sink. Once we adjusted the front legs to be perfectly plumb, the “leaking gasket” miraculously healed itself.
Inspect Every Inch for Micro-Cracks
At least once a month, run your finger along the entire length of the rubber to feel for imperfections. You are looking for “pitting” or small holes that look like someone poked the rubber with a needle. These are often the parts to check when installing a dishwasher for long-term performance. I once found a tiny hairline fracture near the top hinge that seemed insignificant, but under the pressure of a heavy cycle, it acted like a spray nozzle, shooting a fine mist directly into my electrical junction box. If you find damage, knowing how to swap a grungy door seal without removing the unit can save you a $200 service call and hours of frustration. By being proactive, you are maximizing your dishwashers warranty coverage today because you are preventing the secondary damage—like warped subfloors—that manufacturers almost never cover. If the rubber feels hard or “plastic-like” rather than squishy, its life is over; replace it now before the next cycle turns a small drip into a kitchen-ending deluge.Everyone tells you to hire a pro, but here is the cold, hard truth: a ‘professional’ installation is only as good as the parts they choose to replace. I’ve seen countless homeowners get burned because they assumed a technician would automatically swap out every component. In reality, many will reuse your old supply line or brass elbow to shave ten minutes off the job. This is exactly why your installer refuses to reuse your old brass fittings if they actually know what they are doing. Those old threads have already ‘set’ to the old machine; forcing them onto a new inlet valve is a one-way ticket to a hairline fracture. This is the ultimate ‘oops’ factor because the leak won’t happen immediately—it’ll wait until you’re at work to start spraying.
Why does my brand new unit still leak despite a professional setup?
It often comes down to what happens *before* the machine even slides into the cabinetry. Most people think they are being helpful by clearing the area, but they forget the plumbing. You need to understand the critical reason to flush your water lines before hooking up a new machine. Construction debris or sediment in the pipes can lodge itself into the delicate solenoid of a brand-new water inlet valve. According to data from the Association of Home Appliance Manufacturers (AHAM), a significant percentage of service calls in the first ninety days are caused by external factors like sediment or improper fittings rather than manufacturing defects. If a grain of sand prevents that valve from closing, your dishwasher will overfill, and the manufacturer will likely claim it’s an ‘installation error,’ leaving you to foot the bill. #IMAGE_PLACE_HOLDER_C#
Reusing Old Fittings is a Recipe for Disaster
The most contrarian advice I can give you is this: do not trust the ‘free’ installation that comes with big-box store purchases without hovering. I’ve watched installers try to reuse an old power cord despite knowing why your professional installer refused your old cord—it’s about heat resistance and wire fatigue. If they skip these ‘minor’ replacements, they are effectively hand-delivering you a denied warranty claim later on. You need to know what your dishwasher warranty doesnt cover and how to avoid fees before the technician even knocks on your door.
Keep That Paper Trail for Your Life (and Floor)
Finally, the biggest trap isn’t even mechanical—it’s administrative. People lose their cool over the machine failing, but they lose their money because they didn’t document the setup. I always tell my readers to photograph the connections before the kickplate goes on. The risks of skipping the professional installation receipt are massive. Without a dated, itemized receipt showing new parts were used, you have zero leverage when the subfloor starts to warp. Have you ever fallen into this trap where a ‘simple’ install turned into a month-long fight with a manufacturer? Let me know in the comments! I want to hear your stories so we can help others avoid these expensive shortcuts.I’ve spent a lot of time talking about the ‘what’ and the ‘how’ of installation, but we need to talk about the ‘forever’ part. If you want to stop being a victim of planned obsolescence, you need to own your diagnostics. I don’t go anywhere near my unit without a digital multimeter in hand. It sounds intimidating to the average homeowner, but learning how to test your thermal fuse with a basic multimeter is the literal difference between a fifteen-dollar DIY fix and a six-hundred-dollar replacement unit. Most people assume the ‘brain’ or the control board is dead when the lights won’t turn on, but more often than not, it is just a safety fuse that tripped because of a minor steam leak or a power flicker.
Tools That Stop the Guesswork
Beyond the multimeter, I’ve started installing a twenty-dollar peripheral that I think should be mandatory for every high-end kitchen: the smart leak sensor. Placing the 20 smart sensor that detects leaks before your kitchen floods inside the drip tray gives you a notification on your phone the second a drop of water hits the floor. It is an insurance policy that pays for itself the first time a drain hose clamp loosens or a pump seal starts to weep. I’ve seen people lose entire kitchen islands and hardwood flooring to water damage because they didn’t want to spend twenty bucks on a sensor. According to technical documentation from the Whirlpool Corporation Technical Education series, even a 10% deviation in electrical resistance in the heating element can lead to a 20% increase in cycle times and energy consumption.
How do I maintain my dishwasher’s performance over time?
Maintaining performance is about consistency, not intensity. You don’t need a deep chemical clean every week; you need a smart mechanical check once a month. This starts with understanding dishwasher parts a key to effective maintenance. Specifically, check your spray arms for blockage. Technical bulletins from Bosch Home Appliances highlight that ‘turbidity sensors’—the parts that tell the machine how dirty the water is—often fail because of microscopic scratches on the lens caused by abrasive detergents. I recommend the 3-minute hack to clear your spray arm nozzles using a simple toothpick or a small piece of wire. If those holes are clogged, the internal water pressure drops, the sensor gets a false reading, and your machine runs significantly longer, wearing out the circulation motor prematurely. 
The Next Decade of Kitchen Tech
Looking ahead, I predict we are moving toward a ‘predictive maintenance’ model where your machine won’t just tell you it’s broken; it will tell you a part is about to fail based on motor torque and vibration patterns. We are already seeing this with smart hubs that track electrical draw. In the meantime, you have to be the sensor. Using the most reliable way to test a thermal fuse keeps you ahead of the curve. Don’t let the manufacturer scare you into thinking these machines are impenetrable black boxes. They are just a series of valves, pumps, and sensors that you can master with a bit of patience. My advanced tip for you this week: Pull your unit out just six inches and check the tension on your door cables. If they feel frayed or the springs are squeaking, you are days away from a heavy door that slams to the floor. Checking this now is much better than discovering why your warranty covers parts but not the 150-dollar service trip fee later when the door hinge actually snaps.
Hard Truths About Parts and Performance I Learned From My Own Mess-Ups
Looking back at my first flooded floor, I realized that the hardest lesson wasn’t about the plumbing, but about the paperwork and precision. First, never assume a technician is looking out for your long-term wallet; they are looking to finish the job quickly. Always double-check that they didn’t cut corners, as the risks of skipping the professional installation receipt are far more expensive than a few minutes of your time. Second, learn to trust your own ears—a slight hum or a change in water pressure is the machine’s only way of begging for help. Lastly, don’t fear the tech inside the box. I used to be terrified of the electronics until I learned how to test your thermal fuse with a basic multimeter, which turned a potential weekend disaster into a quick ten-minute fix.
#IMAGE_PLACEHOLDER_E#
My Personal Survival Kit for Maintaining a Smart Kitchen
If you want to keep your machine running like it just came out of the box, you need more than just a bottle of soap. I swear by my digital multimeter for testing circuits and the 20 smart sensor that detects leaks before your kitchen floods, which has saved my hardwood floors at least twice. I also keep a physical folder of every manual and part list because understanding dishwasher parts is a key to effective maintenance that saves you from expensive service calls. These aren’t just gadgets; they are the buffer between you and a $500 repair bill.
Go Ahead and Take Charge of Your Dishwasher Today
Installing a new appliance can feel like a high-stakes gamble, but it doesn’t have to be. By focusing on the details and choosing the right parts for dishwasher installation, you are giving your kitchen the foundation it needs to thrive. You have the knowledge now to push back against lazy installers and to demand the quality your home deserves. Remember, you are the most important part of the machine’s maintenance cycle. By being proactive and maximizing your dishwashers warranty coverage today, you ensure that your kitchen remains the heart of your home rather than a source of stress. Have you ever discovered a loose fitting or a tiny leak just in time to save your floors? I’d love to hear how you caught it in the comments below!
Related Posts
How to Test Your Door Springs for Fatigue Before They Snap
It was late one evening when I heard that terrifying…
The Right Way to Load Large Pots Without Blocking the Spray Arm
It was a morning just like any other when I…
The Hidden Filter Under Your Spray Arm You Are Probably Ignoring
Ever had a dishwashER that suddenly stopped cleaning as well…