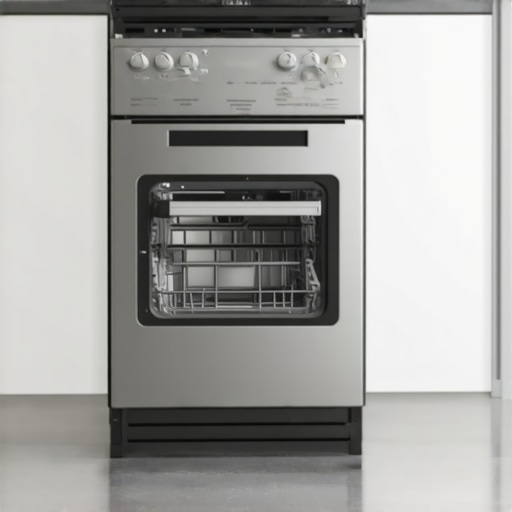
It was late one evening when I noticed a faint burning smell coming from my kitchen. Turns out, I had overlooked a critical step during my dishwasher installation—proper grounding. That tiny detail could’ve led to a costly electrical disaster, but luckily, I caught it in time. If you’ve ever felt that sinking feeling after realizing something’s not quite right with your appliances, you’re not alone. Many homeowners unknowingly skip essential grounding procedures, risking everything from appliance damage to electrical fires.
Why Proper Grounding Matters More Than You Think
Proper grounding isn’t just a technicality; it’s your first line of defense against electrical faults. When a dishwasher isn’t properly grounded, stray electrical currents can travel through the appliance’s metal parts, creating a shock hazard and potential fire risk. According to the National Fire Protection Association, faulty wiring and improper grounding are significant contributors to home electrical fires, with hundreds of incidents each year caused by overlooked grounding procedures.
Is My Dishwasher Grounded Correctly? Or Just a Myth to Ignore?
In my early days of DIY appliance setup, I made the mistake of thinking that plugging into a grounded outlet was enough. Turns out, that’s a common misconception. Proper grounding involves connecting your dishwasher to a dedicated grounding wire or terminal, ensuring any stray currents safely dissipate into the earth—rather than through your body or appliance components. Skipping this step might seem minor, but it can jeopardize your entire home’s safety.
If you’re wondering whether your setup is up to code, I’ll walk you through the essential steps to ground your dishwasher properly, so you can rest easy knowing your family is protected. Interested? Let’s dive into the practical part of ensuring your dishwasher is safely grounded and compliant with electrical standards.
Start with the Power and Water Supply
Before diving into electrical work, turn off the circuit breaker dedicated to the dishwasher to prevent shocks. Also, shut off the water supply to avoid leaks during installation. This initial step ensures safety and gives you a clear workspace.
Check Existing Grounding Points
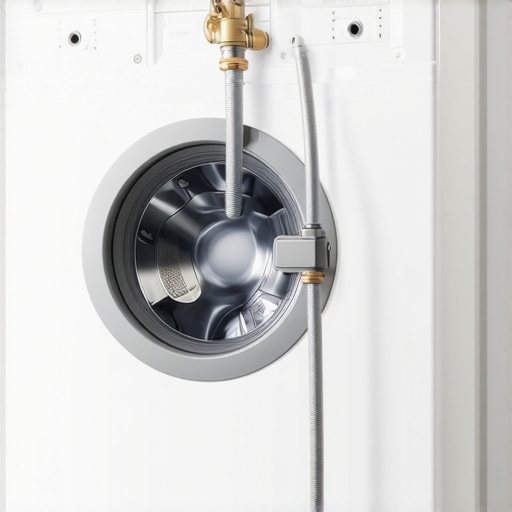
Locate the grounding wire or terminal, often found near the power cord or junction box. Use a voltage tester to verify that no power is running through the wires—this prevents accidental shocks. If the wires are not present or damaged, you’ll need to install a grounding wire.
Prepare Your Grounding Material
Use a bare copper or green insulated wire, at least 14-gauge thickness. This wire should be long enough to connect from the dishwasher’s grounding terminal to a grounded outlet or an designated grounding point on the electrical box. Ensure the wire is UL-listed for safety and durability.
Connect the Grounding Wire Correctly
Attach one end of the grounding wire to the dishwasher’s grounding terminal or screw, which is typically marked or located near the junction box. Secure it with a grounding screw, ensuring a tight connection. The other end should connect to the grounding prong of the outlet or a grounding screw on the electrical box. Use a screwdriver to tighten all connections securely.
Ensure Compliance and Safety
Double-check that all connections are tight and that the wire is without frays or damage. Verify the grounding path is continuous and free of corrosion or loose fittings. For added reliability, consider testing the grounding circuit with a multimeter—refer to this guide on parts to check during installation.
Test the Grounding System
Restore power at the breaker, then use a receptacle tester or multimeter to confirm proper grounding. A proper ground will show a correct connection, preventing electrical shocks and hazards. If any issues are detected, turn off power again and inspect your connections or consult a professional.
Document Your Work
Keep a record of your grounding process, including photos and notes. This documentation can be valuable during warranty claims or future inspections, ensuring compliance and safety. Proper grounding not only protects your family but also extends the lifespan and performance of your dishwasher. For detailed steps on installation, review this comprehensive guide.
 Many homeowners assume that understanding their dishwasher is straightforward, but there’s a complex layer of nuances that often go unnoticed. One common misconception is that warranty coverage is automatic and comprehensive, leading many to neglect proper installation procedures or parts maintenance, which can void their warranty. According to industry expert advice, proper installation, especially correct grounding and secure connections, plays a critical role in warranty validity and long-term performance. Skipping detailed steps or using incompatible parts not only risks damage but also complicates warranty claims, as detailed in this comprehensive guide. Moreover, many believe that all parts are covered under warranty; however, some often-overlooked components, like door hinges or spray arms, may not be included unless specified, which can lead to unexpected repair costs—this is clarified in this detailed breakdown. An advanced consideration is understanding the specific mechanics behind certain failures, such as how mineral buildup from hard water can prematurely wear out heating elements, despite being a less noticeable issue. Homeowners unaware of this nuance often replace parts unnecessarily, missing the chance to address underlying water quality problems. For experts, paying attention to these small but critical factors ensures slicing through myths and avoiding common pitfalls. Do you think your understanding of dishwasher maintenance is full? If not, explore our article on essential parts for long-term performance. Remember, neglecting seemingly minor details can result in costly repairs or warranty rejections. Knowing the fine print and hidden nuances can save you money and preserve your appliance’s lifespan—so keep learning, and stay vigilant. Have you ever fallen into this trap? Let me know in the comments.Maintaining your dishwasher’s performance over the long term requires more than just cleaning it once in a while. Having the right tools on hand ensures you can tackle maintenance tasks efficiently and effectively, saving you money and extending your appliance’s lifespan.
First, invest in a quality multimeter. I personally rely on a digital multimeter with auto-ranging capabilities because it simplifies testing electrical components like thermostats, switches, and the control board. This tool allows me to quickly diagnose whether parts like the heating element or sensors are functioning correctly, which is crucial for preventing costly breakdowns.
Another essential item is a set of precision screwdrivers. Dishwasher repair often involves removing panels or replacing parts, and a good screwdriver set with interchangeable bits ensures you won’t strip screws or struggle with tight spaces. I prefer a set that includes Phillips, flat-head, and Torx screwdrivers, as different brands and models use various fasteners.
For inspecting physical components, a strong LED flashlight can’t be overlooked. Detailed inspections of the sump basin, spray arms, or door seals become much easier with bright, focused light. I recommend models with adjustable brightness and magnetic bases for hands-free operation.
A durable water pressure test kit is also valuable. This allows you to verify water flow rates to ensure your dishwasher is receiving adequate supply. Inconsistent water levels can cause cleaning issues or error codes. I recommend a kit that measures pressure in PSI and is compatible with standard garden hoses for easy connection.
Regularly replacing a corrosion-resistant display cleaning brush helps maintain control panels and sensors. Over time, mineral deposits or dirt can impair functionality, leading to errors or inefficient cycles. Using a soft-bristled brush, like the one I prefer, keeps delicate components clean without risking damage.
In the realm of software, I highly suggest utilizing diagnostic apps compatible with smart dishwashers. These apps, such as manufacturer-specific ones, allow remote monitoring of cycle history, error codes, and maintenance alerts. They are invaluable for spotting issues early, especially if your appliance supports Wi-Fi connectivity.
Looking ahead, the trend points toward more integrated diagnostic tools and IoT-enabled appliances. As technology advances, future-maintenance will likely involve AI-driven diagnostic devices that can analyze internal components remotely.
How do I maintain dishwasher parts efficiently over time? The key lies in routine inspections and early replacement of worn components. For example, replacing aging spray arms or door seals before they fail can prevent water leaks and inadequate cleaning. Always refer to specific part replacement guidelines, such as those outlined in this comprehensive guide. Additionally, keeping detailed records of your maintenance schedule helps identify patterns and prioritize repairs.
Finally, I recommend trying out a maintenance checklist that incorporates these tools and routines. Regularly using a multimeter to test wiring, inspecting spray arms with a soft brush, and monitoring water flow are simple yet vital steps. They empower you to catch small issues early, preserving warranty coverage and preventing catastrophic failures. For a complete understanding of warranty policies, explore this detailed resource. Regular maintenance, combined with the right tools, keeps your dishwasher running smoothly for years to come.
The Hardest Lesson I Learned About warranty,installation,parts,dishwasher
One of the most overlooked yet impactful lessons was realizing that a simple grounding error could invalidate my warranty. It dawned on me that skipping detailed grounding procedures wasn’t just risky—it could cost me warranty coverage and lead to costly repairs. Ensuring a proper grounding path is crucial, especially since many warranties depend on installation adherence—something I learned the hard way.
Another insight was that not all parts are covered equally under warranty. I used to assume that replacing a faulty spray arm or door hinge would be automatically covered, but understanding the specifics can save headaches. The fine print reveals which components need special attention during installation, like sealing or proper fitting, to maintain warranty validity.
Finally, I discovered that hard water buildup significantly impacts components like heating elements, often leading to premature failures—not because the parts are defective but because water quality wasn’t addressed. Regular water testing and maintenance can extend part lifespan and prevent warranty issues, making maintenance more strategic rather than reactive.
My Essential Toolkit for Dishwasher Maintenance and Safety
- Reliable Multimeter: I trust a digital multimeter with auto-ranging capabilities for quick diagnostics of electrical issues, ensuring safety and accuracy.
- Precision Screwdriver Set: A versatile set helps me access tight panels and replace parts without damaging fasteners, boosting efficiency.
- Strong LED Flashlight: Good lighting reveals hidden blockages or corrosion, preventing small issues from escalating.
- Water Pressure Tester: Monitoring water flow prevents cycle failures, which could void warranties due to improper operation.
- Documentation Supplies: Keeping detailed records of inspections and repairs helps during warranty claims and future troubleshooting.
Take Charge of Your Dishwasher’s Future
The journey to a reliable, long-lasting dishwasher starts with understanding the subtle details—grounding, parts coverage, and water quality. By applying expert tips and leveraging the right tools, you’re now empowered to prevent common pitfalls and protect your investment. Remember, consistent maintenance not only safeguards your warranty but also keeps your appliance performing at its best for years to come. Now is the time to take action, stay vigilant, and enjoy the peace of mind that comes with being well-informed about your dishwasher’s health.
Related Posts
Why Your Dishwasher Door Won’t Latch After a Floor Renovation
It was a morning like any other, until I went…
Why Your Drain Hose High Loop Is Non-Negotiable for Safety
It was a frustrating Saturday when I discovered water pooling…
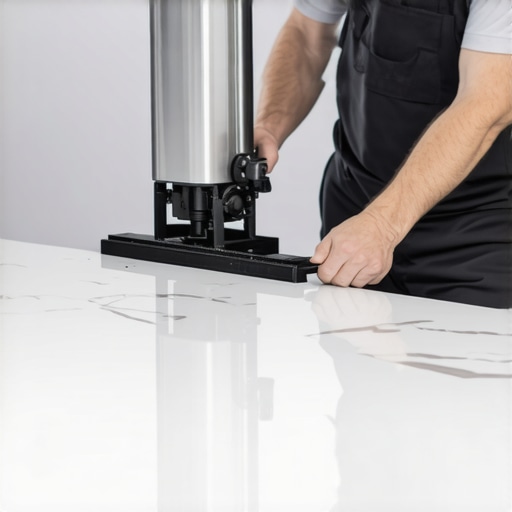
The Proper Way to Secure Your Machine to a Quartz Countertop
I remember the moment vividly—my brand-new dishwasher wobbling ominously, leaning…