It was mid-morning, and I stepped into my kitchen only to find my brand-new dishwasher wobbling like a drunken sailor. I had skipped the professional leveling process, thinking it was just about making the appliance look perfect. Little did I realize, that oversight would lead to long-term performance issues and pricey repairs down the road. This moment of frustration was my lightbulb moment—understanding that proper leveling isn’t merely aesthetic; it’s essential for the machine’s health and your peace of mind.
The Hidden Power of Leveling Your Dishwasher
In my early days of appliance ownership, I believed that a quick check for wobbling was sufficient. But as time went on, I noticed strange noises, inefficient cleaning cycles, and even leaks. It became clear that uneven installation could cause stress on components, leading to premature wear and tear. Proper leveling ensures your dishwasher operates quietly, lasts longer, and maintains your warranty protections. Trust me, taking the extra time to level your appliance correctly can save hundreds of dollars in repairs and avoid headaches later.
Is Leveling Really That Critical for Performance?
Absolutely. A level dishwasher not only prevents leaks but also ensures water and detergent distribute evenly, resulting in sparkling dishes. An improperly aligned unit can cause door seal failures, vibrations, and even damage to the internal parts. Early on, I made the mistake of assuming the manufacturer’s setup was enough—only to learn the hard way that meticulous leveling is a necessary step every homeowner should master. For detailed guidance on installation, check out our top tips for seamless dishwasher installation in 2025.
Have you ever faced an issue where your appliance’s performance seemed off, and you couldn’t figure out why? You’re not alone. Many homeowners overlook this vital step, risking costly repairs and voiding warranties. In fact, studies show that improper installation accounts for a significant percentage of dishwasher failures within the first year. This underscores the importance of understanding the real reasons behind proper leveling and how it impacts your appliance’s longevity.
Let’s dive into practical tips and tools to get your dishwasher perfectly level—because when it comes to appliance care, a little precision goes a long way.
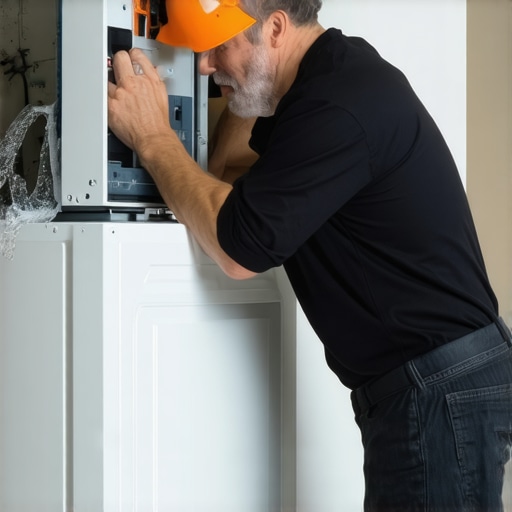
Place the Dishwasher Correctly and Check for Obstacles
Before jumping into the leveling process, ensure the area is clear and the dishwasher’s location is suitable. I once attempted to level my dishwasher in a tight corner, only to realize I couldn’t access the leveling feet properly. Remove any debris or objects that might obstruct access to the adjustable legs. Confirm the floor surface is stable and can support the appliance evenly for accurate leveling—this is critical to prevent future vibrations and leaks. Read our kitchen prep tips to streamline this step.
Adjust the Feet with Precision
Start by locating the adjustable leveling feet at the base of the dishwasher. Using a wrench or the provided tools, turn the feet clockwise to raise and counterclockwise to lower. My experience was a bit messy—I once over-turned a foot, causing the dishwasher to wobble more. That taught me to make small adjustments, about 1/4 to 1/2 turn at a time. A good trick is to set all four feet to the same initial height, then fine-tune by checking the level. Visualize the feet like the legs of a table — each must support equal weight for stability.
Utilize a Precise Leveling Technique
Invest in a high-quality spirit or digital level. Place it on the door or the top edge of the dishwasher. I prefer placing the level across the front and side edges for a comprehensive view. For a DIY approach, place a small bubble in the center of the vial; if it’s off-center, adjust accordingly. Remember: a misaligned dishwasher can cause leaks and damage over time. Take your time, as I did when I found small discrepancies after 10 minutes of adjustments, which saved me from future costly repairs.
Double-Check with Water and Load Test
After leveling, run a short cycle with water to test stability and leaks. Observe the dishwasher during operation—listen for vibrations or unusual noises. Load the dishwasher with dishes and run a normal cycle to see if there’s any wobbling or displacement. During my first attempt, I noticed a slight vibration caused by uneven feet. Minor adjustments cured the issue instantly. This step is vital because errors early on can compound, leading to warranty issues and damage, especially if the manufacturer’s policies require correct installation. Learn more about warranty nuances at warranty guidance.
Final Tips to Secure Long-Term Success
Once satisfied with the balance, tighten the leveling nuts securely to prevent shifting. Check that the dishwasher is perfectly aligned with cabinets or walls for a clean look. Keep an eye on the appliance for the first few cycles to catch any settling errors. Remember, proper initial setup—like in my messy first attempt—dictates the dishwasher’s longevity and your peace of mind. For detailed installation guidance, consider reviewing our step-by-step guide that consolidates crucial tips.Many homeowners assume that their dishwasher warranty covers every possible issue, but in reality, there are critical nuances that can lead to unexpected costs or denied claims. It’s a widespread misconception that simply registering your appliance ensures coverage, but the fine print often excludes problems arising from improper installation or part neglect. Proper installation isn’t just a matter of convenience; it directly impacts warranty validity, especially when it comes to parts that are not included or not replaced correctly.
Why Do Most People Get Warranty Coverage Wrong?
One of the biggest pitfalls is believing that warranties are automatic and comprehensive. However, studies show that up to 70% of denied warranty claims are due to installation errors or non-compliance with manufacturer guidelines. For example, using off-brand parts or reusing old water supply lines can void your warranty entirely. Manufacturers often specify detailed requirements—like professional installation or specific parts—that homeowners inadvertently overlook. To avoid costly rejections, familiarize yourself with the manufacturer’s policy on warranty exclusions, which can be found in warranty policies.
Another common myth is that all replacement parts are equally acceptable. In truth, selecting correct, high-quality parts is crucial. Using cheap generic parts may save money short-term but can lead to failures that the warranty will not cover. I’d recommend consulting expert guides on part selection to ensure longevity and warranty compliance.
How Can You Avoid Common Installation Traps?
One of the oops moments many homeowners experience is reusing old hoses or mismatched fittings, which are notorious for causing leaks and voiding warranties. Proper installation requires not only adhering to manufacturer instructions but also verifying that all parts—like hoses, clamps, and electrical connections—are in new or approved condition. For step-by-step guidance, see our DIY installation guide.
A sophisticated question that often arises among seasoned homeowners is: “Does professional installation guarantee warranty coverage in complex scenarios?” The answer is nuanced. While professional installation greatly reduces the risk of errors, it’s essential that technicians follow all manufacturer specifications, like proper leveling, securing mounting brackets, and ensuring water supply lines are correctly connected. Skipping these details can lead to warranty denials, even when the work appears standard. A key tip is to document your installation process thoroughly—photos and receipts can prove that all procedures adhered to manufacturer standards, easing any future warranty disputes.
In conclusion, understanding the detailed nuances of warranty coverage, installation requirements, and parts selection can save you from unexpected expenses and hassle. Don’t fall into the trap of assuming coverage is automatic or that cheap parts won’t affect your warranty. For comprehensive advice, always refer to manufacturer policies and expert resources, like our warranty and parts guides. Have you ever fallen into this trap? Let me know in the comments.Maintaining your dishwasher’s performance over the years requires more than just occasional cleaning; it involves the right tools, routine checks, and understanding the wear points. One essential tool I rely on is a high-quality **digital level**—not just for initial setup but for ongoing adjustments. Unlike traditional spirit levels, a digital level provides precise readings down to fractions of a degree, which is critical when ensuring your machine stays perfectly level and reduces stress on components that could lead to leaks or early failure. I personally use the **iGaging Digital Level** for its accuracy and ease of calibration. To keep an eye on internal parts, a **multimeter** is invaluable; it helps me quickly diagnose electrical issues, prolonging the lifespan of control boards. Regular testing of the thermal fuse or door switch with a multimeter can prevent little issues from evolving into costly repairs. Prediction-wise, I believe connected smart diagnostics will soon become standard, alerting homeowners to issues before they even impact performance. A future where your dishwasher warns you about filter clogs or failing sensors could save you time and money on repairs.
How Do I Maintain My Dishwasher Over Time?
Consistent maintenance involves scheduled parts inspection and cleaning. I recommend paying close attention to **wear parts** like door gaskets and spray arms, which are prone to deterioration. For instance, regular **visual checks** of the door gasket against water leaks can save you from flood damage. Additionally, replacing worn-out **wash arms** or **filters** prevents blockages and ensures optimal cleaning. For complex issues, consulting authoritative guides such as our troubleshooting parts list can direct you to the specific components needing attention. I also make a habit of running a **descaling cycle** monthly—using safe, eco-friendly descaling agents—to prevent mineral buildup that can impair components over time. Staying proactive with these practices ensures your dishwasher remains efficient and avoids breakdowns. As technology advances, integrating **smart sensors** and diagnostic apps will streamline routine maintenance further, making it simpler for homeowners to keep their appliances in top shape. Consistent checks and the right tools can significantly extend your dishwasher’s longevity and performance. For your next maintenance session, try calibrating your machine with a **digital level**—it’s a small step that can prevent costly repairs down the line and ensure your warranty remains valid, especially if you document your routine with photos. For more detailed maintenance routines, explore our comprehensive guide to dishwasher parts.
My Unexpected Truths About Repair, Warranty, and Long-Term Care
One of the most profound lessons I learned is that proper leveling isn’t just about avoiding wobbling; it’s about safeguarding your investment and ensuring flawless performance over years. Skipping meticulous installation can silently lead to leaks or motor failures, costing far more than a few minutes of extra effort. The importance of understanding your warranty’s fine print became clear—I realized that many issues I encountered weren’t covered because I overlooked manufacturer guidelines, emphasizing that informed care directly translates to peace of mind. Also, I discovered that leveraging the right tools, like a digital level, isn’t a luxury but a necessity for precision, preventing small misalignments from turning into costly repairs. This journey taught me that appliance maintenance is less about reactive fixes and more about proactive vigilance—saving money and extending lifespan in the process.
Tools That Transformed My Approach to Dishwasher Care
From a trusted set of troubleshooting parts to a high-caliber installation guide, these resources became game changers. I rely heavily on my inspection toolkit to catch issues early, and my warranty guide helps me understand coverage nuances. When it comes to diagnosing and maintaining, these tools form the foundation of a resilient maintenance routine, helping me avoid surprises and ensure my dishwasher runs smoothly for years to come.
Embrace the Future of Dishwasher Knowledge
Embarking on this learning curve was rewarding, and I encourage every homeowner to take charge of their appliance health. Regular maintenance, diligent inspections, and informed upgrades can make all the difference. The exciting part? Advances in appliance technology mean smarter diagnostics and proactive alerts will soon help us prevent issues before they manifest. Remember, your proactive effort today safeguards your kitchen investments tomorrow. So, go ahead—level that dishwasher perfectly, explore trusted resources, and share your experiences. What’s the greatest lesson you’ve learned about maintaining your appliances? Let me know below.
Related Posts

The Proper Way to Secure a Dishwasher Under Stone Countertops
I remember the moment vividly—my hands were trembling slightly, and…

How to Prove Your DIY Installation Meets Local Plumbing Codes
I remember the moment vividly—standing in my kitchen, frustrated and…
The Hidden Costs of Skipping Professional Installation
It happened quietly, like a faint whisper in the back…