
There I was, standing in three inches of lukewarm, greasy lasagna water at midnight. I had just spent an hour meticulously scrubbing the mesh filter until it gleamed, certain that my drainage woes were over. I hit the ‘Cancel/Drain’ button, expecting to hear that satisfying gurgle of success. Instead? Nothing but a pathetic hum and the smell of a motor working too hard. It was a visceral realization that sometimes, the problem isn’t the part you can see, but the maze of common dishwasher parts hiding behind the kickplate. If you are staring at a stagnant pool of gray water right now, I feel your pain. We are going to find out exactly where that blockage is hiding today, so you don’t have to call an expensive pro for a twenty-minute fix.
When Scrubbing the Filter Just Is Not Enough
I made a massive mistake early in my DIY journey: I assumed the filter was the only gatekeeper. In my desperation, I once took a metal coat hanger and tried to shove it down the drain line. I ended up puncturing the hose, which turned a simple clog into a kitchen-wide flood. Learn from my arrogance! If your unit won’t budge, the issue is likely downstream. You might be dealing with the drain pump filter you didn’t know existed, or perhaps a kinked hose that’s been pinched since the day of dishwasher installation. Modern machines are finicky. They rely on specific pressure levels, and even a tiny bit of calcified detergent can trick the sensors into thinking the tub is full. Have you ever felt that sinking feeling when the cycle ends but the water stays? It is incredibly common, and usually, it’s a sign that your drainage system needs a more holistic look than just a quick rinse of the plastic screen.
Is fixing this yourself actually worth the headache?
I know what you’re thinking. ‘Should I just pull the plug and buy a new one?’ Before you do, consider the math. According to HomeAdvisor, the average cost of an appliance repair visit ranges between $100 and $200, and that is before they even start billing for parts. Most drainage issues are actually caused by a lack of a high loop vs an air gap for drainage or a simple obstruction in the impeller. I once found a single popcorn kernel perfectly wedged in the pump. By taking thirty minutes to learn the proper way to snake a dishwasher drain, you’re not just saving money; you’re mastering your own domain. We are going to walk through the check-points that most ‘pros’ won’t tell you about, focusing on how to replace or clear parts effectively without voiding your warranty. Let’s get your kitchen back to being a place for cooking, not for indoor swimming.
Clear the Gunk Out of Your Air Gap First
The first place I always look isn’t actually inside the dishwasher at all. It is the air gap on the sink or the connection to the garbage disposal. If you have an air gap—that little chrome cylinder sitting next to your faucet—it acts as a pressure release. If it is clogged with hair, grease, or a stray bit of kale, your machine will refuse to drain. I learned this the hard way after pulling my entire unit out of the cabinetry, only to realize a single toothpick was wedged in the air gap. To fix it, just pop off the decorative cover and the plastic cap underneath. If you see debris, you need to clean the gunk out of your air gap device immediately. If you don’t have an air gap, check where the drain hose attaches to the sink or disposal. I once helped a friend who swore their brand-new machine was a lemon. They had just finished a DIY dishwasher installation but forgot one tiny thing: the knockout plug in the disposal. The pump was trying to push water against a solid plastic wall. Five minutes and a screwdriver later, I was the hero of the barbecue.
Why a Shop Vac is Better Than Any Snake
When the air gap is clear but the tub is still full, it is time to get aggressive with the drain hose. Forget those chemical cleaners; they usually just sit on top of the clog and eat away at your gaskets. Instead, grab a wet/dry vacuum. This is my ‘secret weapon’ for plumbing. By disconnecting the drain hose from under the sink and holding the vacuum nozzle tight against the end of the hose, you can often suck the blockage out in seconds. You will hear a satisfying thunk as the culprit—usually a buildup of high-efficiency detergent clogging your pipes—is pulled through. This method is far safer than using a metal snake, and why a shop vac is the best way to clear a clog becomes obvious the moment you see the gray sludge it extracts.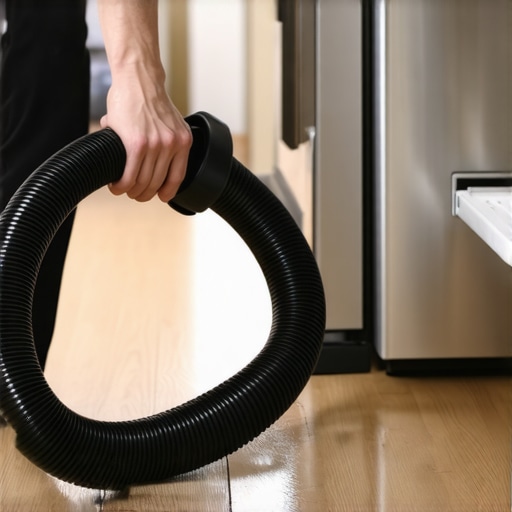
Access the Pump Without Breaking the Bank
If the vacuum trick fails, the blockage is likely at the pump impeller. You will need to remove the bottom racks and the spray arm. On most modern units, there is a small plastic cover held by a single screw or a clip that protects the impeller. This is where those broken glass shards or fruit pits love to hide. Be careful here—I once sliced my thumb open on a piece of a broken wine glass that had wedged itself into the blades. Always use a pair of needle-nose pliers to safely remove a stuck glass fragment from the pump. If the impeller doesn’t spin freely after cleaning, you might be looking at how to replace dishwasher parts effectively, as a seized motor is a much larger job.
Watch Out for Warranty Traps While You Work
Before you start unscrewing the motor housing, check your paperwork. It is incredibly easy to accidentally commit the mistake that voids your lifetime tub warranty. Many manufacturers allow you to clean the filter and the exterior hoses, but the moment you start disassembling the motor or the internal wiring, they may wash their hands of any future claims. If your machine is less than a year old, understanding dishwasher warranty policies is vital. Sometimes, it is better to let the authorized tech handle the deep internal clogs so you don’t lose that long-term protection. If you are out of warranty, however, the risk is minimal, and the reward of a dry kitchen floor is well worth the effort.
The Soft Water Trap Your Dealer Never Mentions
Most homeowners spend a fortune on salt and filtration systems, terrified of lime scale. However, there is a contrarian reality that many manufacturers keep quiet: overly soft water is often more destructive to your machine than hard water. In my experience, why soft water is ruining your dishwasher interior faster than hard water comes down to a process called etching. Without minerals in the water to react with, the detergent becomes incredibly aggressive, essentially eating into the stainless steel and glassware. It is a chemical imbalance that can lead to pinhole leaks in the tub—a death sentence for any unit. If you have a whole-house softener, you need to recalibrate your machine or you might find yourself needing to replace dishwasher parts years before their intended expiration date.
Don’t Let a Rushed Installation Kill Your New Unit
Even if you hire a professional, do not assume the job is done perfectly. One of the biggest ‘oops’ factors I see is the reuse of old components. Many installers, in an effort to save ten minutes, will skip flushing your water lines before hooking up a new machine. This mistake sends a surge of construction debris or sediment directly into your brand-new water inlet valve. Furthermore, always double-check the fittings. Reusing a slightly worn supply line is why your installer refuses to reuse your old brass fittings; the compression seals are designed for a single use. Re-tightening an old seal creates a ticking time bomb of a leak that won’t show up until you’re at work and your kitchen floor is turning into a sponge.
How Can You Prove a Part Failed Due to Manufacturing?
This is the advanced question that saves you thousands. When a technician tells you a repair isn’t covered, they are often guessing. To stay ahead, you need to learn how to get your warranty claim approved on the first try by documenting the error codes yourself. According to the Association of Home Appliance Manufacturers (AHAM), nearly a quarter of service calls are categorized as ‘no fault found’ or ‘user error’ because the environmental factors like water pressure weren’t documented. If you can show if your water pressure is too low for your unit, you can often push back on claims that a pump failure was your fault. Also, be wary of the generic vs. brand-name debate; the difference between OEM and generic water inlet valves can be the deciding factor in whether your warranty remains valid or is voided on the spot. Remember, why your warranty covers parts but not the 150 service trip fee is a standard industry ‘gotcha’—always ask for a flat rate before the van pulls into your driveway. Have you ever fallen into this trap? Let me know in the comments.If you want to move beyond just clearing clogs, you need to think like a technician. I do not go anywhere near my machine without a reliable multimeter. It is the only way to get a definitive answer on whether your heater or fuse is dead. You can learn how to test your thermal fuse with a basic multimeter in about five minutes, and it prevents you from buying parts you do not need. Another pro tip? Stop using pliers for everything. I always use a dedicated wrench because the proper tool to use when tightening your water supply line prevents those micro-cracks in the brass that lead to slow, hidden leaks.
How do I maintain my machine for the long haul?
Maintenance is not a once-a-year event; it is about the small habits. I have found that the one maintenance task that doubles the life of your gasket is simply wiping down the door seal with a damp cloth once a month. Grease buildup on the rubber is what causes it to crack and leak. While you are at it, take a moment for understanding dishwasher parts like the spray arms; if the holes are blocked, the motor works twice as hard, shortening its lifespan. If you are still under coverage, knowing how to diagnose dishwasher parts during warranty periods is your best defense against service fees. 
Why Your Next Dishwasher Will Fix Itself
I predict that within the next five years, the ‘clogged drain’ will be a thing of the past. We are already seeing the integration of AI-driven pressure sensors that can detect a blockage before the water even starts to back up. Currently, you can get ahead of the curve by installing the 20 dollar smart sensor that detects leaks before they destroy your subflooring. This shift toward preventative tech means that essential parts every dishwasher owner should know about will soon include Wi-Fi modules and digital flow meters. According to expert insights from the Association of Home Appliance Manufacturers (AHAM), the industry is moving toward ‘remote diagnostics,’ where a technician can see your machine’s health from their office. This will make it even more important to know how to replace parts effectively yourself, as the diagnostics will tell you exactly what is wrong, but the labor to swap the part will remain your biggest expense. The future is one where the dishwasher tells your phone which part to order before you even notice the dishes are dirty. Go ahead—grab a multimeter and test your thermal fuse this weekend; it is the most empowering ‘tech’ skill you can learn for your kitchen.
Lessons Learned from a Flooded Kitchen Floor
I used to think that a dishwasher was a ‘set it and forget it’ box, but my biggest takeaway from years of tinkering is that your machine talks to you through its drainage speed. If you ignore that slow gurgle, you are inviting a disaster. I have learned that humility is the best tool in the box; if a screw does not want to turn, there is a reason. Forcing it usually leads to a snapped plastic housing and a much more expensive trip to the parts replacement guide than you originally planned.
Another ‘lightbulb moment’ was realizing how often I blamed the machine for my own installation shortcuts. Skipping the simple step of checking for a level subfloor can cause the pump to strain unevenly, leading to premature failure. Finally, never underestimate the power of a clear paper trail. Knowing what your warranty specifically excludes—like damage from improper drainage loops—will save you hours of circular arguments with customer service reps.
Gear That Saved My Sanity and My Subfloor
To move from a frustrated homeowner to a confident DIYer, you need more than just a screwdriver. Here is what I keep in my dedicated appliance kit: First, a reliable multimeter is non-negotiable. I personally recommend learning the most reliable way to test a thermal fuse because it is the difference between a $10 fix and a $400 new control board. Second, keep a digital copy of your manual on your phone. You will often need to find your units hidden model number to ensure you are buying the right gaskets or valves. Lastly, I always rely on the Association of Home Appliance Manufacturers (AHAM) for their safety standards; they provide the baseline for what constitutes a safe, efficient machine.
Reclaim Your Kitchen from the Gray Water
You do not have to be a master plumber to keep your dishes clean and your floors dry. By taking the time to identify common dishwasher parts and understanding how they interact, you are not just fixing a clog; you are extending the life of one of your home’s most important investments. Don’t let a little stagnant water intimidate you. Grab your shop vac, check that air gap, and get back to the lifestyle you deserve—one without a sink full of dirty plates. #IMAGE_PLACEHOLDER_E# Have you ever found something bizarre, like a toy or a bone, wedged inside your pump impeller? Let me know in the comments below!
Related Posts
Why a Small Drip in the Back Can Rot Your Whole Floor
It was a morning like any other when I noticed…
The Muddy Residue on Your Plates: Is It Your Detergent or Your Filter?
Ever opened your dishwasher after a cycle and found your…
The Hidden Vent That Causes Your Dishes to Stay Wet
I remember the moment clearly—after a long day, I unloaded…