Ever had that sinking feeling when your dishwasher suddenly stops working right before a big dinner party? I remember the first time I faced this nightmare. The dishwasher was leaking, and I was clueless about which part was causing the trouble. That lightbulb moment led me down a rabbit hole of research, and I discovered how crucial proper installation and knowing your parts really are for keeping your dishwasher running smoothly.
Why Getting Your Dishwasher Parts Right Matters More Than You Think
When I dove into fixing my own dishwasher, I quickly realized that not all parts are created equal. Using the wrong part or installing it poorly can turn a simple repair into a costly disaster. That’s when I learned about the importance of understanding each component and how proper installation can ensure long-term reliability. Today, I want to share that knowledge with you, so you won’t have to learn the hard way like I did.
Is Rushing the Installation Process Really Worth the Risk?
One mistake I made early on was rushing through the installation, thinking I could save time and money. Turns out, that led to leaks and poor performance. Trust me, taking the time to select the right parts and following expert installation tips can save you headaches later. Want to avoid repeating my mistake? Check out this comprehensive guide to dishwasher installation parts for long-term success.
According to recent studies, improper installation and subpar parts are among the leading causes of dishwasher failures within the warranty period. Ensuring that you have the right parts and know how to install them correctly is vital for maximizing your appliance’s lifespan. Curious about how to select reliable parts that will stand the test of time? I’ll walk you through that next.
But first, let’s address a common concern I hear from DIY enthusiasts: “Is all this really worth the effort?” Well, if you’ve ever faced a dishwasher that just won’t drain or leaks every time, you know the frustration. Proper parts and installation make all the difference in avoiding those headaches and keeping your dishwasher performing at its best. Ready to take control of your dishwasher’s health? Let’s get started with the essentials.
Choose the Right Parts to Prevent Future Failures
Start by selecting high-quality, OEM (Original Equipment Manufacturer) parts to ensure compatibility and durability. When I replaced my dishwasher’s pump, I double-checked the model number and purchased an OEM part from a trusted supplier. This small step prevented potential leaks and extended my dishwasher’s lifespan. For guidance on choosing the best parts, visit this top tips for selecting the right parts.
Gather Essential Tools and Prepare Your Workspace
Before diving into installation, gather the necessary tools: screwdrivers, pliers, a level, and a bucket. Clear the area around your dishwasher to prevent accidents. I once started without a level, which led to improper alignment and poor performance. Using a level during installation ensures the dishwasher sits perfectly, preventing leaks and noise. Refer to this installation parts guide for a comprehensive list.
Disconnect Power and Water Safely
Always turn off the power at the circuit breaker and shut off the water supply. When I replaced my inlet valve, I made sure to disconnect both to avoid electrical shocks and water damage. This safety step is critical before removing any existing parts. For detailed safety procedures, see this guide to dishwasher parts and warranty.
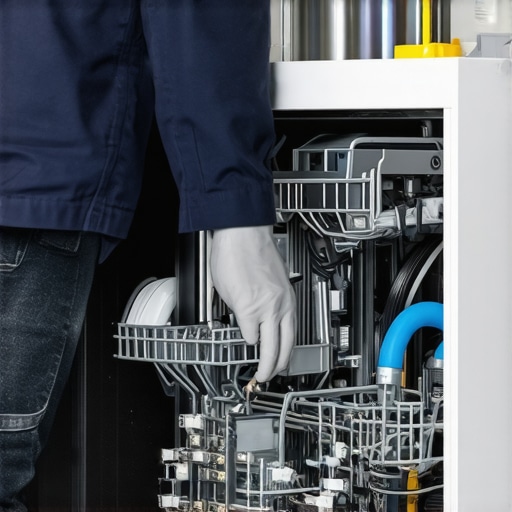
Remove Old Parts Carefully and Inspect Components
Loosen screws and disconnect hoses to remove the faulty part. While doing this, inspect surrounding components for wear or damage. I found a cracked hose clamped to my drain pump, which I replaced along with the pump itself. This proactive approach prevents future breakdowns. For a complete list of parts to check, visit troubleshooting parts list.
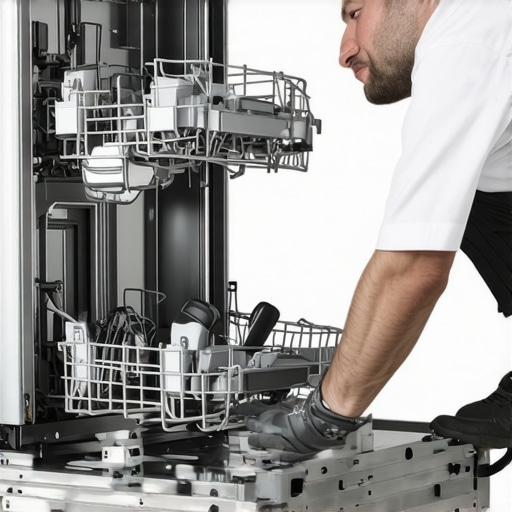
Follow Proper Installation Procedures Step by Step
Align the new part according to manufacturer instructions. Secure it tightly but avoid overtightening, which can cause damage. When installing my new spray arm, I used a torque wrench to ensure proper tightness, preventing leaks. Use the installation guide for specific torque specifications.
Reconnect Water, Power, and Test the Dishwasher
Once everything is in place, turn on the water supply and restore power. Run a short cycle to check for leaks and proper operation. I monitored my dishwasher during the first cycle after installing a new filter, noticing no leaks or issues. Regular testing and observation help catch problems early. Learn more about diagnosing issues in this diagnosis guide.
Document Your Work and Keep Records
Keep receipts, warranty information, and a record of parts replaced. This documentation proved invaluable when I needed warranty service for my dishwasher, ensuring I received prompt support. For details on warranty coverage, see this warranty guide.

Many DIY enthusiasts and even seasoned homeowners believe that selecting any compatible part or rushing through installation guarantees long-term dishwasher performance. However, this misconception can lead to costly repairs and reduced appliance lifespan. In my experience, the real nuance lies in understanding the subtle differences between OEM and aftermarket parts, and how these impact reliability. For example, some believe that generic parts are always a budget-friendly alternative, but studies show that OEM parts often outperform their generic counterparts in durability and warranty coverage. This is backed by experts who emphasize the importance of choosing trusted components, especially for critical parts like pumps and valves. Maximizing your dishwasher’s warranty hinges on selecting the right parts, which many overlook until it’s too late.
Another common myth is that installation speed is more important than precision. Rushing can result in improper seals, misaligned spray arms, or loose connections, leading to leaks or poor cleaning performance. The hidden nuance here is that proper torque specifications and alignment are essential for long-term reliability. Using a torque wrench and following detailed guides can prevent these issues. For instance, overtightening the water inlet could crack the component, causing leaks that are hard to diagnose later. Remember, even a small mistake during installation can compromise the dishwasher’s efficiency and warranty coverage. To avoid these pitfalls, consult comprehensive resources like installation parts guides that highlight critical torque values and alignment tips.
What advanced mistakes do most overlook when replacing dishwasher parts?
One advanced mistake is neglecting to inspect surrounding components during repairs. For example, replacing a worn drain pump without checking the hose or the filter can lead to recurrent failures. The nuance is that parts rarely fail in isolation; often, a worn hose or clogged filter causes undue strain on new components. Experts like those at when to replace parts advise a holistic approach—assessing all related parts during repairs to ensure longevity and warranty compliance. Skipping this inspection might save time initially, but it can void warranty claims or cause further damage, leading to even more costly repairs down the line.
So, the key takeaway is that understanding the subtle differences and avoiding common pitfalls can dramatically improve your dishwasher’s performance and lifespan. Have you ever fallen into this trap? Let me know in the comments.
Invest in Quality Tools for Reliable Maintenance
Keeping your dishwasher running smoothly over time hinges on using the right tools. Personally, I rely on a high-quality cordless drill with adjustable torque settings. This allows me to tighten or loosen screws precisely without risking damage to delicate components. A digital multimeter is indispensable for diagnosing electrical issues, helping me quickly identify faulty wiring or sensors. For hoses and clamps, I prefer a set of adjustable pliers with rubberized grips, which provide leverage while preventing scratches. These tools have become my go-to kit because they enable efficient, safe, and accurate repairs, saving me time and money in the long run.
Why Proper Maintenance Requires Consistent Checks
Regular inspection of key parts like filters, spray arms, and inlet valves is essential for longevity. I schedule monthly checks, during which I remove and clean filters with a soft brush, ensuring smooth water flow. Inspecting spray arms for clogs or damage prevents cleaning issues before they escalate. When I notice a slight decrease in performance, I use my multimeter to test the wiring connections and sensors, confirming whether electrical components are functioning correctly. This proactive approach helps me catch problems early, often avoiding costly repairs or replacements later. Remember, consistent maintenance is the best way to keep your dishwasher performing at its peak.
Future Trends in Dishwasher Care
As smart appliances become more prevalent, I predict a rise in IoT-enabled maintenance tools. Devices that can diagnose issues remotely and send alerts to your smartphone will simplify upkeep. Already, some models include self-cleaning functions and diagnostic reports, reducing manual checks. Embracing these innovations will make dishwasher maintenance more efficient and less time-consuming, especially for busy households. Staying ahead means investing in smart diagnostics and understanding how to interpret their data for timely intervention.
How do I maintain my dishwasher over time?
The key is establishing a routine of regular inspections, using precise tools like multimeters and quality screwdrivers. Keep detailed records of maintenance activities and parts replaced, which can help during warranty claims and future repairs. Don’t forget to follow manufacturer guidelines closely, especially when replacing critical components such as pumps or valves. For comprehensive maintenance strategies, check out this guide on maximizing your dishwasher’s warranty. Taking these steps ensures your appliance remains reliable and efficient for years to come.
To make your maintenance even more effective, I recommend trying a diagnostic routine once every few months. Use your multimeter to verify electrical connections and ensure sensors are functioning correctly. This proactive step can prevent unexpected breakdowns and extend your dishwasher’s lifespan. Remember, investing time now saves significant repair costs later, and staying informed about new diagnostic tools will keep you ahead in appliance care.
By integrating these specific tools and maintenance habits into your routine, you’ll ensure your dishwasher remains a dependable part of your household. Don’t wait for a breakdown—start your proactive maintenance today and enjoy peace of mind knowing your appliance is well cared for.
The Hardest Lesson I Learned About Dishwasher Parts
One of the toughest lessons I faced was realizing that not all replacement parts are created equal. Using generic, low-cost components might seem tempting, but they often lead to quicker failures and void warranties. I learned this the hard way when my first pump failed after just six months, prompting me to switch to OEM parts for durability and peace of mind. This taught me that investing in quality parts is crucial for long-term reliability.
Three Myths About Dishwasher Maintenance That Held Me Back
For years, I believed that rushing through installation and repairs saved time and money. But I discovered that precision and patience are what truly matter. Proper torque, alignment, and taking the time to inspect related components prevent leaks and breakdowns. These myths almost cost me dearly, and now I emphasize the importance of following detailed guides and expert advice for every repair.
What Experts Won’t Tell You About Ensuring Lasting Performance
Most technicians agree that a holistic approach is key—checking hoses, filters, and electrical connections during every repair. I learned this by inspecting my dishwasher during routine maintenance and catching a worn-out hose before it caused water damage. Regularly testing with tools like multimeters and keeping records of parts replaced can extend your dishwasher’s lifespan significantly. It’s these small, often overlooked steps that make all the difference.
My Essential Toolkit for Dishwasher Maintenance
I rely on a few trusted tools to keep my dishwasher in top shape. A quality cordless drill helps me tighten screws evenly, while a digital multimeter diagnoses electrical issues quickly. For hoses and clamps, I prefer adjustable pliers with rubber grips to prevent damage. These tools empower me to perform reliable repairs efficiently and confidently, saving money and avoiding unnecessary calls to professionals.
Why Regular Checks Are the Secret to Long-Term Success
Scheduling monthly inspections of filters, spray arms, and inlet valves has become my routine. Cleaning filters and unclogging spray arms prevent performance drops, while electrical tests ensure sensors and wiring remain functional. I’ve found that proactive maintenance catches issues early, often avoiding costly repairs or replacements. Consistency in care turns my dishwasher into a dependable household workhorse.
The Future of Dishwasher Care Is Smarter Than Ever
Smart appliances with IoT capabilities are revolutionizing maintenance. Devices that diagnose issues remotely and send alerts help me stay ahead of problems. I believe embracing these innovations will soon make dishwasher upkeep more effortless, especially for busy households. Staying informed about new diagnostic tools and features will ensure your appliance remains reliable for years to come.
Your Turn to Try
Now that you know the importance of quality parts, proper installation, and proactive maintenance, it’s time to take action. Investing in the right tools and following expert advice can save you money and frustration down the line. Remember, a well-maintained dishwasher is just a few smart choices away from lasting performance. What’s the first step you’ll take today to improve your dishwasher’s reliability?
Related Posts
Expert Guide to Dishwasher Parts & Installation for Trusted Performance
My First Encounter with Dishwasher Troubles: A Learning MomentI'll never…
Smart Dishwasher Parts & Installation Guide: Enhance Reliability & Trust
I remember the exact moment when my dishwasher broke down…
Ditch the Plastic: 3 Brass Fittings for 2026 Installs
It was a frustrating weekend when my brand-new dishwasher started…