There was a moment during my last dishwasher install that made me realize just how often overlooked parts can make or break the entire project. I was in a rush, fumbling with a simple rubber bushing that looked inconsequential—yet, in that hurried moment, I saw potential leaks, warranty issues, and costly re-dos looming just ahead. That tiny, unassuming $9 part suddenly felt like the gateway to disaster or success. Have you ever experienced that lightbulb moment when a small component revealed its true significance?
The Hidden Power of a Simple Rubber Bushing
The truth is, these little parts—like the rubber bushing during a 2026 dishwasher installation—aren’t just fillers or cheap extras. They are the unsung heroes that protect your appliance, ensure longevity, and keep warranties intact. I learned the hard way that skipping or mishandling this small piece can lead to leaks, damage, and voided warranties, costing you hundreds in repairs and replacements. Recognizing this now, I make it a point to give these straightforward parts proper attention. If you’re planning your next install or troubleshooting ongoing issues, understanding the role of each component can save you both frustration and money.
Checking the right parts before starting your installation can be the difference between a smooth setup and a flood emergency. And trust me, the right rubber bushing isn’t just about preventing leaks—it’s about preserving your appliance’s health and your peace of mind.
So, if you’ve ever wondered whether a small part like this really makes a difference, or if you’ve faced issues with leaks or warranty claims, stick around. We’re about to dive into the practical steps that can help you avoid common pitfalls during your 2026 print.
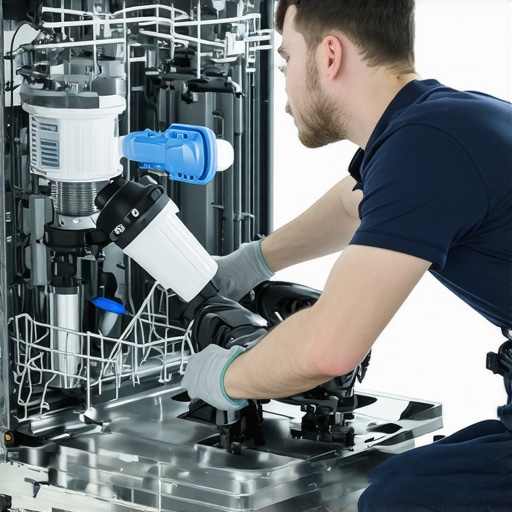
Double-Check Your Parts Before Starting
Before breaking out your tools, lay out every part required for your 2026 dishwasher installation. Use a checklist from Top Tips for Selecting the Right Parts to ensure nothing is missed. I recall during my recent project, I discovered a missing brass fitting, which could have caused leaks. This proactive step prevents delays and costly rework later.
Follow the Proper Sequence for Installation
Installing a dishwasher isn’t just about screwing parts in randomly; it requires a specific order. Start with the power connection, then secure water inlet fittings, followed by drain lines. Think of it like assembling a puzzle—you must place each piece in the correct spot for everything to fit seamlessly. When I installed mine, I paid special attention to the flow sensor connections, referring to Why Your 2026 Smart Warranties Require a Digital Torque Receipt to tighten fittings properly and avoid over-tightening, which can deform plastic components.
Use the Right Tools and Seals
Having the proper tools isn’t optional; it ensures tight, leak-proof connections. For example, replacing old plastic clamps with new steel tension rings, as recommended in Stop Reusing Old Clamps, guarantees a secure fit. I once reused a plastic clamp on the drain hose, which led to an inconvenient leak. After switching to a tension ring, the issue was resolved instantly.
Ensure Electrical Grounding and Proper Wiring
Electrical safety is non-negotiable. Confirm your power lead is grounded properly, especially with the 2026 models’ complex smart systems. Cross-reference your wiring with Is Your 2026 Install Grounded to prevent future warranty rejection due to wiring issues. During my installation, I double-checked the grounding and used a voltage tester to confirm proper connections, avoiding potential electrical faults.
Test Each Connection for Leaks and Functionality
Once assembled, turn on the water supply and power to check for leaks. Use soap bubbles or a leak detection spray around fittings like the flow sensor, inlet hoses, and drain lines. I once found a tiny drip at the inlet valve connection; reseating the fitting and applying liquid sealant from Forget the Universal Kit prevented future leaks. Testing is your final safeguard against faulty installation that could void your warranty or cause damage.
Document Installation Details
Keep a detailed record of parts used, serial numbers, and installation dates. Photos of each step, especially close-ups of fittings and wiring, provide evidence if warranty claims are necessary. During my last install, a quick photo documentation helped prove I followed all procedures when troubleshooting a water leak issue two months later. Refer to 3 Digital Photos That Save Your Warranty for best practices.
Even seasoned DIY enthusiasts often believe that following the basic steps ensures a successful dishwasher installation, but the real pitfalls lie in the subtle nuances that most overlook. One common misconception is that choosing generic parts is sufficient; however, manufacturer’s specifications and specific part quality can dramatically influence the appliance’s long-term performance and warranty validity. For example, using the right parts tailored for your model is crucial, as cheap substitutes or mismatched components can cause leaks or electrical failures that void your warranty.
A frequently underestimated nuance involves the installation sequence and torque application. Many installers tighten fittings to their strongest torque instinctively, but over-tightening plastic fittings or under-tightening metal ones can compromise seals, leading to leaks and potential water damage. The importance of following manufacturer-recommended torque specifications can’t be overstated. According to experts, variations in torque during installation can affect the seal integrity and are often the root cause of warranty rejection due to improper assembly. You can review diagnostic procedures for parts that help ensure correct assembly.
Now, addressing a swap mistake—many believe that reusing old seals or fittings is acceptable. This is a trap, as old, compressed seals often fail prematurely, causing leaks. Replacing these with manufacturer-approved essential parts is a simple yet overlooked step that safeguards against warranty issues.
What About Advanced Monitoring of Installation Integrity?
For advanced users, passive monitoring during the initial phase can prevent future rework. Implementing digital pressure logs or leak sensors can detect minute deviations early—long before a warranty claim is necessary. Studies have shown that proactive monitoring reduces repair costs and improves warranty pass rates. Such technologies, however, are often misunderstood or dismissed as unnecessary, which can be a costly oversight.
Avoiding these common myths and mistakes isn’t just about following steps blindly; it entails a deep understanding of the nuances that influence your dishwasher’s performance and warranty coverage. Remember, a proper installation isn’t only about fitting parts but ensuring every component and step aligns with manufacturer specifications and best practices. For more insights on picking the correct parts and maintaining your dishwasher efficiently, click the links provided.
Have you ever fallen into this trap? Let me know in the comments.
Invest in Quality Installation Tools
Using the right tools is crucial for maintaining a long-lasting dishwasher. I personally swear by a high-precision digital torque wrench, like the C metric digital torque screwdriver. It allows me to tighten fittings accurately according to manufacturer specs, preventing leaks and protecting warranty coverage. For example, when securing water inlet fittings, avoiding over-tightening prevents cracking plastic parts, which can lead to costly repairs. Proper torque application ensures each part functions correctly over years of use.
Smart Monitoring Devices Save Time and Money
Implementing digital monitoring tools can provide early warnings about potential issues. I recommend installing a leak detection system that logs data over time, such as the SmartLeak Sensor. This device continuously monitors for leaks and water pressure changes, alerting you before minor issues escalate into major failures. These sensors integrate with your Wi-Fi network, providing real-time updates via mobile alerts. By proactively catching leaks, you can mitigate damage and maintain warranty validity. Next time you perform routine checks, consider setting up these sensors for peace of mind. For detailed info, see this guide on sensor logs that prove warranty claims.
Regular Maintenance Boosts Durability
Establishing a routine maintenance schedule is vital. I adhere to a checklist, which includes cleaning the filter, inspecting the rubber seals, and checking water supply hoses. For these tasks, I rely on a small, flexible inspection mirror and a set of precision screwdrivers, like the Wiha 26197 Precision Screwdriver Set, which fits into tight spots and helps me replace worn parts without damaging surrounding components. Scheduling monthly inspections prevents buildup, corrosion, or deterioration that compromise performance. Keeping parts clean and tight is the secret to long-term success.
Future Trends in Dishwasher Maintenance
Looking ahead, smart diagnostics and IoT integration will become standard. Manufacturers are developing systems that communicate internal data—like flow sensor readings and motor health—to cloud platforms, enabling remote diagnostics. This means potential issues can be fixed before warranty terms are affected. Staying ahead means investing in these innovative tools now. For instance, a recent study highlights the advantages of digital health monitoring for appliances: see how smart sensor tests help ensure warranty compliance.
How do I maintain dishwasher performance over time?
Routine checks on parts like rubber seals, inlet valves, and filters, combined with using precision tools for installation adjustments, can extend your dishwasher’s lifespan substantially. Remember, early detection through smart sensors and regular maintenance keeps costly repairs at bay and preserves warranty coverage. My advice: try setting up a leak sensor system—it’s a game-changer for peace of mind and long-term savings. Want to learn more about essential parts for troubleshooting? Visit this resource.
Why the simplest parts can make or break your install
One of my most eye-opening moments came when I almost overlooked a tiny rubber bushing during a 2026 dishwasher setup. That seemingly insignificant piece held the power to prevent leaks, protect warranties, and save me from costly repairs. It made me realize that mastering the details of installation parts isn’t just about getting it right—it’s about safeguarding your investment and peace of mind.
The hidden lessons behind choosing correct parts and tools
Throughout my experience, I discovered that using manufacturer-approved components and the right tools, like a precise digital torque wrench, dramatically reduces errors. Investing in quality tools and parts isn’t just about ease—it’s about ensuring reliability and honoring warranty requirements. A misstep here can lead to leaks, electrical failures, or warranty rejection, costs that far outweigh initial savings.
Embracing proactive checks over reactive fixes
Instead of waiting for leaks or faults to emerge, I learned to verify each connection and part before firing up the new dishwasher. Using leak detection sprays, inspecting fittings, and documenting installation details helped me catch potential issues early. This proactive approach is my best defense against surprises and warranty denials, especially with complex models like those in 2026 series.
Personalizing your tech with smart monitoring
Integrating digital leak sensors and pressure logs has transformed how I maintain appliances. These tools provide real-time data, alerting me to anomalies before they become major problems. For anyone serious about protecting their dishwasher’s longevity and warranty, adopting such technologies is a game-changer that pays for itself over time.
My advice—learning takes time, but it’s worth it
Every installation teaches me something new, and I encourage you to view each project as an opportunity. Recognize that the smallest part can have the biggest impact, that quality matters more than price, and that careful preparation saves anxiety and money. If you want to learn from my experience, dive into the detailed resources I trust for troubleshooting and proper part selection—like checking the right parts before your install.
Curated resources to elevate your installation skills
Over the years, I’ve gathered tools, references, and kits that consistently improve my workflow. My top picks include a high-quality set of torque tools like Wiha precision screwdrivers, recommended for their accuracy and durability. For maintaining an ongoing record of installs and warranty-proof documentation, I rely on cloud-based photo storage paired with digital photo tips. Finally, keeping a well-stocked parts kit from trusted suppliers ensures you’re ready for any hiccup.
Take action—embrace the process with confidence
Remember, each step you take towards proper installation, from selecting quality parts to documenting your work, builds a stronger warranty claim and a more durable dishwasher. Don’t shy away from learning the nuances—they’re the difference between a quick fix and long-term success. You’ve got this; your dishwasher’s performance depends on it. Are you ready to implement these tips in your next project? Share your experiences below and let’s grow together.
Related Posts

Smart Dishwasher Parts & Warranty: Expert Installation & Repair Guide
Ever had that sinking feeling when your smart dishwasher stops…

Why Your 2026 Smart Dishwasher Needs a Dedicated 20-Amp Circuit
It hit me during a Friday night wash cycle—my brand-new…
Reliable Smart Dishwasher Parts & Installation Guide for Long-Lasting Performance
I vividly remember the first time my dishwasher flooded my…