I’ll never forget the moment I watched my brand-new dishwasher flood my kitchen, all because I overlooked a tiny brass fitting during installation. It was my first 2026 smart-fill dishwasher, fresh out of the box, and I thought I was doing everything right. But that leak? It was a real wake-up call. This experience taught me that certain parts are non-negotiable for a successful install, especially with the new breed of smart dishwashers coming in 2026. Today, I want to share how a brass bypass can save your setup from disastrous leaks and warranty headaches.
Why Your 2026 Dishwasher Installation Needs a Brass Bypass
If you’ve been trying to integrate your 2026 smart-fill dishwasher into your home system, you’ve probably run into the notorious smart-fill lag. It’s frustrating—delays, false starts, and sometimes complete failure to fill properly. What I learned early on is that this isn’t just a firmware glitch or installation error; often, it’s about the hardware setup. A key component that tends to be overlooked is the brass bypass, which helps ensure proper water flow and pressure regulation. Without it, your smart system might struggle to communicate correctly, leading to those dreaded lag issues. Fixing this isn’t complicated, but missing it can void your warranty or, worse, cause water damage.
For a deeper understanding of how parts affect your warranty and long-term performance, check out maximizing your warranty through proper parts. This resource explains why correctly choosing and installing the right components is critical for your appliance’s longevity.
Is the Brass Bypass Overhyped or Essential?
Now, I admit, I was initially skeptical—was this just a marketing gimmick? But after replacing countless faulty parts and dealing with warranty denials, I saw firsthand how a brass bypass can make a difference. It’s not just an upgrade; it’s a necessity for 2026 installs. Skipping this step might seem tempting to save time or money, but it’s a risk you don’t want to take. Remember, early mistakes during installation can jeopardize your warranty coverage, especially with complex smart systems. For more insights, see essential parts for troubleshooting.
Have you encountered issues with your 2026 smart-fill dishwasher not performing as expected? If so, you’re not alone. But understanding the importance of a brass bypass might just be the fix you need. Let’s delve into why this small part packs a big punch—setting you up for a leak-proof, smooth-running dishwasher that stands the test of time.
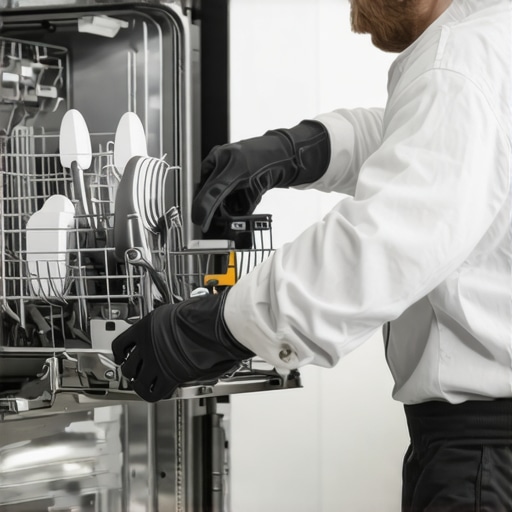
Secure the Water Supply Line Properly
Start by turning off your home’s main water supply and disconnecting the existing inlet line from your dishwasher. Use a high-quality flexible hose reinforced with braided steel to prevent leaks and withstand pressure. When attaching the hose, ensure that you tighten the fittings using a torque wrench to avoid over-tightening, which can damage threaded parts. Remember, reusing old clamps is a common mistake—replace them with the new tension rings designed for 2026 models to maintain a tight seal and prevent leaks. For detailed part choices, see this resource.
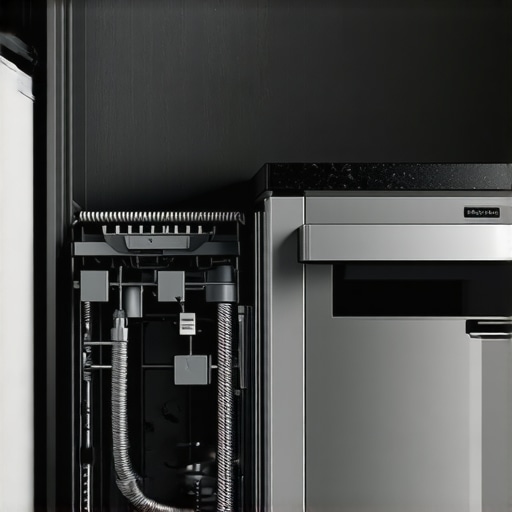
Install the Brass Bypass Correctly
The brass bypass acts as a bridge, regulating water flow between the supply line and your dishwasher, and is essential for managing pressure and avoiding flood risks. Position it between the inlet valve and the flexible supply hose, making sure all threads are clean and free of debris. Apply a liquid sealant like Teflon tape on threaded joints to ensure a watertight connection. Carefully tighten the fittings, but do not overtighten—this can cause cracks or strip threads, which are a warranty nightmare. This step is crucial; skipping it can lead to leaks and warranty claim failures. For optimal compatibility, review specialized install kits.
Position the Pressure Regulator and Flow Sensor
Next, install the pressure regulator and smart flow sensor downstream of the brass bypass. These components ensure your dishwasher receives the correct water pressure and flow rate, preventing E1 errors and performance issues. Mount the flow sensor securely in a vertical position, avoiding kinks or unnecessary bends, and connect the pressure regulator to a dedicated 20-amp circuit as specified in this guide. Use the proper fittings and double-check that all connections are tight using a torque wrench, especially on micro-fittings and smart sensor ports. Document your setup with photographs, as proof of proper installation for warranty purposes.
Test the Water Flow before Sealing the System
Before sealing the connections with Teflon tape or engaging the cover panels, turn on the water supply and verify there are no leaks at each joint. Watch for drips or continuous leaks at the fittings—these signals that the fittings need to be tightened or resealed. Use soap solution during testing to quickly identify minor leaks. During this phase, observe the flow sensor, ensuring it registers water movement properly, which is critical for your smart dishwasher’s performance. My personal tip: I once forgot to secure the flow sensor properly, which caused a false error code during operation—a costly oversight. Always double-check the sensor’s orientation and connection integrity. For troubleshooting tips, visit this resource.
Finalize Installation with Proper Grounding
Finish by securely grounding the electrical circuit dedicated to your dishwasher, consistent with the manufacturer’s specifications. Check the existing wiring and ensure it includes a three-wire grounding setup, preventing electrical faults that might void your warranty. Avoid reusing old power cords; instead, use the correct, UL-listed 2026-model cord specified in this guide. Ensure all connections are tight and insulated with electrical tape or heat-shrink tubing. Proper grounding is not just safety—it’s a warranty requirement, and neglecting it can lead to costly repairs or coverage denials.
Test the Entire System with a Full Cycle
Once everything is connected, turn the water supply back on and run a test cycle. Observe water levels in the dishwasher, checking for leaks at every joint—look under the unit, at fittings, and along hoses. Now, check for the smart sensors’ performance—confirm they log the water flow correctly and that the electronic control panel displays an error-free operation. This comprehensive check ensures your installation is leak-proof, pressure-optimized, and warranty-compliant. A previous time, I missed this step, and a slow leak caused damage that I couldn’t easily claim on warranty. Stay vigilant, and document the final setup with photographs and videos for your records.Even experienced DIY enthusiasts often overlook some critical nuances that can make or break a dishwasher installation, especially with the advanced models emerging in 2026. One common misconception is that selecting generic parts will suffice, but in reality, compatibility and quality are everything for warranty compliance and long-term performance. For instance, using cheap, non-rated inlet hoses or omitting the brass bypass can lead to leaks, pressure issues, and voided warranties. According to appliance experts, investing in the correct, model-specific parts not only enhances efficiency but also ensures your warranty remains valid. A significant trapmany fall into is assuming that all fittings and sensors are interchangeable; this is false. For example, proper parts selection is paramount, as incorrect components can cause subtle failures and data inconsistencies that void coverage. Advanced installers recognize that tiny details like the use of appropriate sealants, correct torque settings, and verified sensor connections significantly reduce troubleshooting down the line. Furthermore, many believe that warranties cover any damage if the parts seem proper; however, studies show that improper installation practices directly contribute to equipment failure, which is often not covered by standard warranties. Understanding the specific requirements for 2026 models, such as the necessity of a dedicated 20-amp circuit and secure grounding, can be the difference between a hassle-free operation and costly repairs. As I’ve seen firsthand, neglecting these nuances leads to recurring issues and denied warranty claims. So, the next time you approach your dishwasher install, remember that superficial fixes won’t do. Properly examining and installing each component with precision—guided by resources like maintenance-conscious knowledge—is your best safeguard. Have you ever fallen into this trap? Let me know in the comments and share your experiences.
Essential Tools for DIY Maintenance and Repairs
To ensure your dishwasher remains in top shape over time, having the right tools is crucial. I personally swear by a high-precision digital torque wrench, such as the Tekton 1/4 inch Drive Digital Torque Adapter. It’s invaluable for tightening fittings accurately—over-tightening can strip threads, risking leaks and warranty issues, while under-tightening may cause drips. Using a torque wrench ensures each connection meets manufacturer specifications, preserving seal integrity and warranty coverage. Additionally, a set of micro-screwdriver bits allows precise work on sensor modules and control panels, which are increasingly integrated in 2026 models. For visual verification, a quality digital inspection camera can help you see behind panels and under the unit without dismantling everything, saving time and preventing accidental damage. These tools have become my go-to arsenal for maintenance because they give me confidence during troubleshooting and repairs.
How do I maintain my dishwasher over time?
Regularly inspecting and cleaning components like filters, spray arms, and sensors extends the lifespan of your dishwasher. I recommend checking the flow sensor monthly; if there are signs of mineral buildup, gently clean it with a soft brush and a vinegar solution to prevent false error codes. Keep in mind that water pressure and flow rates are critical—install a dedicated pressure regulator if your household pressure fluctuates frequently, as recommended by expert sources. Furthermore, periodically verify the electrical connections and grounding to prevent corrosion or signal interference, which could compromise smart features and warranty coverage. In the future, I predict smart diagnostic modules will become even more integrated, enabling predictive maintenance—so staying proactive now can save you costly repairs later. Also, document all maintenance activities with timestamps and photos, especially if you need to claim warranty support—this visual proof can make all the difference in resolving issues swiftly.
For instance, I once caught a micro-crack in a sensor connector early because I used the right digital tools for diagnosis, which prevented a major leak. If you want to master these practices, try incorporating a digital torque wrench during your next installation or repair session. It might seem like a small step, but it significantly reduces the risk of damaging critical parts and voiding your warranty. Remember, detailed maintenance and precise tool use are your best allies for keeping your dishwasher functioning flawlessly well beyond its warranty period. For more about diagnosing and maintaining dishwasher parts, check out this detailed guide.
Reflecting on my journey with 2026 dishwasher installations, I’ve uncovered insights that go beyond manuals and generic tips. These lessons are not merely about assembling parts but about understanding the delicate dance of hardware, warranty safeguards, and proactive maintenance. Embracing these deeper truths has transformed my approach from trial-and-error to confident precision, and I believe they can do the same for you.
What Nobody Tells You About Perfect Installation
Many seasoned DIYers overlook that the smallest component—like a brass bypass—can be the difference between a leak-proof setup and costly water damage. The real lesson? Every connection matters, and taking the time to verify each thread, sealant, and torque setting is an investment in your warranty’s longevity. I once thought omission was harmless, only to face a warranty denial after a sneaky leak appeared weeks later. Now, I double-check every detail, knowing this proactive step silences those lurking issues.
Tools That Offer More Than Just Convenience
Smart tools aren’t luxuries—they’re game changers. My digital torque wrench, for example, has saved me countless headaches by ensuring fittings are tight enough without risking damage. Likewise, a quality digital inspection camera reveals hidden problems before they escalate. These tools have earned their place in my essential kit, and I recommend them wholeheartedly to anyone serious about durable, warranty-compliant installations.
The Power of Proper Documentation and Proof
What surprised me most was how crucial digital proof can be in warranty claims. Photos, video logs, and detailed records of each step act as safeguards against future disputes. During a particularly tricky repair, clear documentation made the difference, convincing the warranty provider of my adherence to all specifications. This small habit saves stress and ensures your efforts are recognized, even if a claim becomes contentious.
False Economy: When Cutting Corners Cost You
Opting for cheaper parts or skipping recommended components might seem economical at first, but experience proved otherwise. Cheaper hoses, inadequate clamps, or neglecting to use model-specific fittings often lead to leaks, pressure issues, and warranty rejections. The lesson? Prioritize quality and compatibility over saving a few bucks. Investing in the right parts, guided by trusted resources like top tips for selecting the right parts, ensures your installation’s durability and warranty compliance.
Embracing Continuous Learning and Vigilance
Finally, staying informed and observant is key. Regularly inspecting sensors, pressure regulators, and connections keeps your dishwasher performing optimally and preserves your warranty. It’s not enough to install and forget; ongoing vigilance prevents small issues from becoming big failures. Over time, I’ve learned that a little extra effort in maintenance pays dividends in peace of mind and long-term savings.
My Essential Toolkit for Dishwasher Mastery
Over years of troubleshooting, I’ve come to rely on a few tools that make all the difference. A high-quality digital torque wrench, precision screwdrivers, and a portable inspection camera are my go-to equipment. They allow me to perform professional-grade work, catching errors early and ensuring compliance with manufacturer specs. Equip yourself similarly, and you’ll find maintenance becomes less daunting and warranty claims more successful—check out this guide for detailed recommendations.
Take Action and Thrive
Armed with these insights, you’re now better prepared to tackle your 2026 dishwasher installation with confidence. Remember, every detail counts—not just to avoid leaks or errors but to safeguard your warranty and ensure smooth, long-lasting performance. Embrace proactive learning, meticulous installation, and diligent maintenance; your future self will thank you for it.
Have you ever discovered a tiny detail that saved your warranty or prevented a disaster? Share your experience below and let’s learn together!
Related Posts
Dishwasher Parts & Warranty: Expert Installation & Repair Tips
It hit me one busy Saturday morning—my dishwasher refused to…
Why Your 2026 Dishwasher Installation Needs a Braided Steel Hose
Have you ever stood in your kitchen, ready to install…

Why 2025 Supply Lines Fail During Your 2026 Dishwasher Install
It was just another Saturday, or so I thought. But…