Have you ever finished installing your dishwasher only to find water pooling at the bottom or, worse, leaking onto your kitchen floor? That frustrating moment when you realize something’s off—but you’re not quite sure what. I remember my own lightbulb moment early on, after a weekend spent troubleshooting a stubborn leak. It was a simple detail: the height of my drain hose loop. But that one oversight turned my shiny new appliance into a problematic mess. Since then, I’ve learned that getting this one aspect right can save you headaches, costly repairs, and maybe even your warranty.
Why Your Drain Hose Loop Height Is a Game Changer
Understanding the correct height for your drain hose loop is more than just a technicality—it’s a vital step to ensure your dishwasher functions properly and avoids water damage. When installed correctly, the loop prevents backflow and siphoning, which are common causes of leaks and drainage issues. Conversely, an improperly positioned hose can lead to water backing up or siphoning out—neither of which you want happening mid-cycle.
In fact, many installation mishaps stem from neglecting this simple yet essential detail. According to appliance experts, a properly installed drain loop ensures optimal drainage and prolongs the lifespan of your dishwasher. If you’re curious, check out this guide to essential dishwasher parts for more insights on installation essentials.
But here’s the thing: I made a mistake early on that many novices also fall for—placing the loop too low or too high. Trust me, I learned the hard way that this small misstep can lead to big problems. If you’re feeling skeptical about how critical this detail actually is, remember that proper drainage setup is grounded in basic physics and plumbing best practices. Even the best dishwasher can’t perform optimally if this element isn’t addressed correctly.
Are you facing similar frustrations with your dishwasher setup? Don’t worry—I’ll walk you through exactly how to get this right so your appliance operates smoothly and your kitchen stays dry. Keep reading, because a straightforward fix now can save you from much bigger headaches later.
Positioning the Drain Hose Correctly
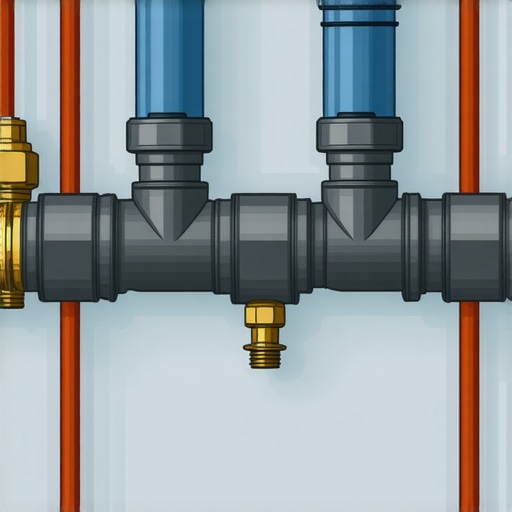
Start by turning off your dishwasher and disconnecting it from power. Remove the lower kickplate to access the area behind the unit. Gently pull out the drain hose; avoid forcing it as this can cause damage. To create the optimal high loop, first locate the designated high point in your cabinetry or countertop area—ideally about 18 inches above the bottom of your dishwasher’s drain outlet. Use a sturdy hook or clamp to secure the hose at this height, ensuring it remains elevated and stable. During my first install, I used a simple zip tie to secure the hose to an existing pipe clamp, which held firm and prevented gravity from pulling it down, maintaining the essential high loop.
Securing the Loop to Prevent Movement
Next, route the hose so that it loops upward to the secured attachment point, forming a U-shape. Use hose clamps or brackets—available at any hardware store—to anchor the hose securely. Make sure the loop’s apex is firmly attached; loose loops can sag over time and lose their effectiveness. In my experience, double-checking these clamps after a few days of operation prevents accidental dislodging, which can cause backflow or siphoning issues. Remember, this step is crucial; a loose or improperly secured loop can mimic the water pooling problems you’re trying to avoid, leading to potential leaks and warranty issues. For more detailed guidance, consider reviewing this DIY installation guide.
Managing Length and Path of the Hose
Ensure the drain hose is long enough to reach the high attachment point without being stretched or kinked. Kinks can restrict water flow and increase the risk of leaks. Avoid coiling excess hose on the floor or bending it sharply; instead, smooth out the routing. If necessary, trim the hose to an appropriate length, maintaining enough slack for movement but avoiding slack that could sag or cause loops below the high point. When I replaced my old, kinked hose, I cut a few inches, which improved drainage and prevented water from pooling, simplifying maintenance and protecting my warranty coverage. Proper hose management ensures consistent drainage performance and extends your appliance’s lifespan. For advice on choosing quality replacement hoses, visit this resource about parts and replacements.
Testing the Installation
Once the hose is secured and routed correctly, reattach the kickplate and restore power. Run a short cycle to observe the operation; look for proper drainage and no signs of water pooling or leaks around the connection points. During my first test, I watched closely, ensuring the water didn’t back up or siphon out. If you detect issues, double-check the height of your loop, the securement points, and that the hose isn’t kinked. Address any problems immediately to avoid damage or warranty voids. Remember, an improperly installed drain hose can mimic the effects of other malfunctions, making troubleshooting more complex. For further troubleshooting tips, see expert advice here.
Many homeowners assume that installing a dishwasher is a straightforward task—simply connect the supply lines, secure it in place, and you’re done. However, this oversimplification can lead to costly mistakes and warranty pitfalls. A prevalent misconception is that parts are interchangeable; in reality, using generic or incompatible components can void your warranty and reduce the machine’s lifespan. For example, some believe that any hose clamp will suffice, but manufacturers often specify particular fittings to prevent leaks and ensure compliance with safety standards.
Why do so many get the seal wrong, and does it really matter?
Incorrectly installed gaskets or using the wrong sealing products can cause leaks that aren’t immediately obvious, leading to water damage and warranty claims being denied. Proper sealing involves selecting the right gasket materials and Lubricants—something many overlook. According to industry expert advice, choosing OEM parts and following manufacturer installation instructions are critical for warranty coverage.  Another common myth is that all warranties cover every repair, but in reality, many exclude issues stemming from user errors or improper installation. Understanding your warranty policy can save you from unexpected expenses. For instance, some warranties won’t cover damages caused by non-certified parts or modified setups. To maximize your warranty, always keep receipts, document your installation process, and use recommended parts—these simple steps can make a difference. Are you aware of the nuances that could invalidate your coverage? Learning these details can save you money and frustration down the line.
What Advanced homeowners should watch out for during installation
One often overlooked aspect is the importance of proper electrical grounding and circuit integrity, which directly impacts appliance safety and warranty validity. A substandard connection might not cause immediate issues but can lead to long-term damage or void your warranty if an electrical fault occurs. Additionally, securing the dishwasher to prevent movement during operation isn’t just aesthetic; it reduces strain on supply lines and prevents leaks. Skipping this step can cause micro-movements that loosen connections over time. For in-depth details on protecting your investment, check out ways to maximize your dishwasher warranty. Remember, meticulous installation, using compatible, high-quality parts, and understanding the warranty’s fine print are crucial. Don’t fall into the trap of assuming corners can be cut—your warranty and your home are worth the extra effort. Have you ever fallen into this trap? Let me know in the comments.
Keep It Running Smoothly with Dedicated Tools
Maintaining your dishwasher isn’t just about the occasional cleaning; it requires precision tools that ensure each component functions optimally over time. One indispensable tool I rely on is a high-quality multimeter. I use mine not only to check electrical connections but also to test thermal fuses and control boards, which are critical for safety and performance. A good multimeter helps identify hidden issues before they become costly repairs, saving you money and preserving your warranty coverage. Additionally, a set of precision screwdrivers and a nut driver kit allows me to disassemble panels and access parts accurately, avoiding damage and ensuring proper reassembly.
For routine maintenance, I recommend a digital inspection mirror. It enables you to peek behind panels or into tight spaces without unnecessary disassembly. This saves time and prevents accidental damage. I also keep a portable, organized parts tray to hold small components during repairs or cleaning, minimizing lost pieces and streamlining the process—especially beneficial when replacing parts like seals or hoses. Investing in these tools has made my maintenance routines more efficient and helped maintain optimal drainage, which is crucial for preventing leaks and protecting your warranty.
Why Regular Upkeep Matters
Consistent inspection and cleaning of components like spray arms, filters, and door seals extend their lifespan and ensure your dishwasher operates at peak efficiency. Familiarity with key parts—such as the tub gasket or water inlet valve—lets you spot early signs of wear. Scheduling bi-annual checks and using diagnostic tools can identify emerging issues before they escalate. This proactive approach not only prevents breakdowns but also preserves your warranty rights, especially when authorized parts are used and documented throughout the process.
Trends point toward integrating smart sensors and Wi-Fi diagnostics in future models, which will simplify maintenance even further. These advancements will allow homeowners to monitor performance remotely and get alerts about potential problems—think of it as having a digital technician at your fingertips. Until then, sticking with proven manual tools and routine inspection remains essential. For detailed guidance on selecting quality replacement parts that align with warranty terms, visit this resource on warranty-appropriate parts.
How do I maintain my dishwasher over time?
To keep your dishwasher performing reliably, incorporate regular cleaning of filters and spray arms, scheduled inspections of door gaskets for wear, and utilize diagnostic tools like multimeters for electrical checks. Use reputable replacement parts to ensure compatibility and protect your warranty. Document all repairs and maintenance activities with photos or receipts, especially when dealing with warranty claims—many manufacturers require this evidence to approve service. Consistent maintenance not only extends the lifespan of your appliance but also ensures it remains covered by warranties when issues arise. Remember, implementing specialized tools and following a proactive maintenance schedule are your best defenses against unexpected breakdowns and costly repairs. For more about preserving your investment, check out this guide on warranty policies.
The Hardest Lesson I Learned About Installation,Parts,Dishwasher,Warranty
One of the most valuable lessons I uncovered was realizing that small overlooked details—like the precise height of the drain hose loop—can have a monumental impact on your dishwasher’s performance and warranty validity. Early on, I thought I had it all figured out, only to discover that a millimeter misalignment or an unsecured hose could cause leaks and void my warranty. This taught me to pay close attention to seemingly minor steps, which ultimately saved me time, money, and frustration.
The Surprising Truth About Installing Without Proper Tools
Initially, I believed that installing a dishwasher was straightforward enough to do with basic household tools. However, I quickly learned that specialized equipment like a multimeter, adjustable wrenches, and high-quality clamps are essential to ensure secure, leak-proof connections. Using the right tools not only simplifies the process but also significantly reduces the risk of damaging components or compromising your warranty coverage.
The Costly Myth of DIY Shortcuts
Like many homeowners, I was tempted to cut corners by skipping proper securement or choosing generic replacement parts. This approach can have serious repercussions, from unexpected leaks to warranty exclusions. Understanding that genuine parts and meticulous installation are worth the investment was a pivotal realization. It’s a lesson that can save you a considerable headache when service issues arise, making compliance with manufacturer standards truly worthwhile.
My Best Advice for Moving Forward
Now, I always approach dishwasher installation with thorough research, respecting the importance of routing the drain hose correctly, securing it firmly, and choosing OEM parts. Documenting every step with photos and receipts is a simple yet powerful move that can protect your warranty rights should any disputes occur. Remember, paying attention to these details transforms a routine setup into a reliable, warranty-compliant installation—giving you peace of mind knowing your dishwasher is built to last.
Where to Dig Deeper and Arm Yourself
For anyone looking to deepen their knowledge, I recommend consulting this comprehensive guide to essential dishwasher parts and tips on maximizing your warranty coverage. Investing in quality tools, OEM components, and thorough documentation will empower you to handle installations confidently, preventing costly repairs and ensuring your warranty stands firm.
Take Charge of Your Dishwasher Setup Now
Installing a dishwasher might seem intimidating at first, but with the right knowledge and tools, you can master the process and enjoy its benefits for years to come. Your careful attention to details like drain hose height, secure connections, and proper routing makes all the difference. Ready to elevate your installation skills? Share your experiences or ask questions below—let’s get started on your journey to a leak-free, warranty-fulfilling setup!
Related Posts

The Mounting Bracket Mistake That Makes New Dishwashers Shake
Ever turned on your brand-new dishwasher only to be met…
Stop the Banging: Installing a Water Hammer Arrestor
It was a quiet Saturday morning when I suddenly heard…

5 Mistakes Professional Installers See DIYers Make Weekly
I still remember the first time I installed a dishwasher…