It was a frustrating Saturday morning after yet another leaky connection ruined my weekend plans. I had just finished installing a new dishwasher, feeling pretty confident—until I noticed water pooling beneath it. Turns out, my attempt to seal a compression fitting with Teflon tape was the culprit. That lightbulb moment made me realize I wasn’t alone in this mistake, and I vowed to figure out why Teflon tape is a terrible idea for compression fittings.
Save Yourself the Hassle: Skip the Teflon Tape
When I first started tinkering with plumbing, I blindly followed what I thought was good advice—wrap Teflon tape around every fitting, regardless of type. But I quickly learned that compression fittings are designed to seal without it. Using Teflon tape not only complicates the process but can actually cause leaks and damage over time. Today, I want to guide you through why this common practice is a bad habit and how you can avoid it, saving yourself headaches and potentially costly repairs.
Is Teflon Tape Actually Worth the Hype?
Let’s be honest—many of us have been conditioned to think Teflon tape is a universal solution. I made this mistake early on, believing that adding tape would ensure a snug seal. But as I learned from experience—and from experts—it can create more problems than it solves, especially on compression fittings. If you’re worried about leaks, know that proper tightening and correct fitting type are far more effective. Curious about the best way to ensure a leak-proof connection? Check out this guide on [essential parts for troubleshooting dishwasher installation issues](https://appliancedoctorz.com/essential-parts-for-troubleshooting-dishwasher-installation-issues). It delves into the key components that prevent leaks and improve installation success.
By the end of this article, you’ll understand exactly why Teflon tape is a pitfall and what alternatives you should consider. Don’t let a simple mistake turn into a leak that ruins your kitchen or damages your appliance. Let’s get started with how to properly approach compression fittings—and how to avoid that rookie mistake I made early on.
Secure the Fitting Correctly
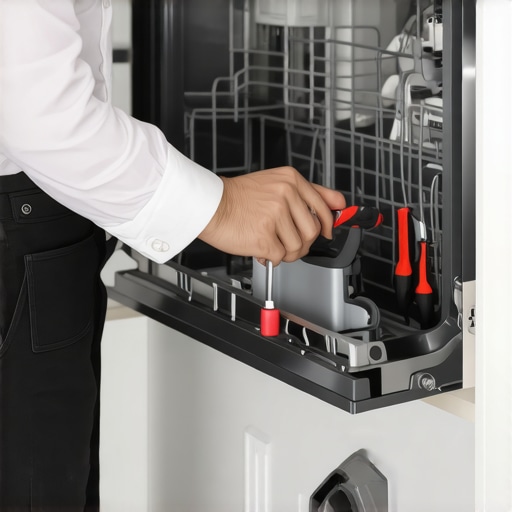
Start by choosing the right size compression fitting for your water supply pipe. Ensure the pipe’s end is clean, free of debris, and cut straight using a pipe cutter. Insert the pipe into the fitting until it seats fully, then tighten the nut by hand. Use a wrench to tighten it further, but avoid over-tightening, which can deform the fitting and cause leaks. Think of it like screwing in a lightbulb—firm but not excessive.
Use The Proper Tool and Technique
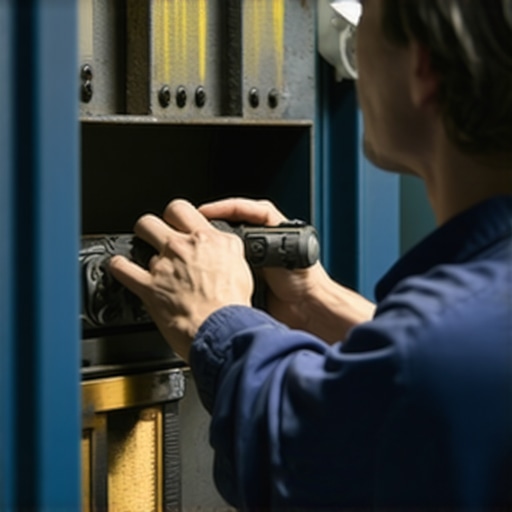
Equip yourself with a goal-specific wrench. When tightening compression nuts, turn them clockwise, ensuring even pressure across the joint. An analogy I found helpful: think of the fitting as a clamp—a steady, uniform tightening compresses the seal against the pipe, eliminating gaps. I once missed a step here and ended up with a small leak that took days to diagnose. Remember: gentle, consistent torque beats brute force.
Avoid Teflon Tape and Sealants
Unlike thread fittings, compression fittings are designed to seal without Teflon tape. Applying tape can increase the chances of misalignment or over-tightening, leading to leaks or damage. I once wrapped tape around a compression fitting, which made it impossible to tighten properly, resulting in a slow, sneaky leak. Instead, focus on proper assembly and tightening techniques—this guarantees a long-lasting connection.
Check Fit and Tightness
After assembling, turn on the water supply gradually while checking for leaks. Gentle pressure prevents sudden ruptures. Use a paper towel or paper towel to wipe around the joint; if moisture appears, tighten slightly until sealed. Think of it like tightening a water hose fitting—you’d check for drips after each turn. During my last install, a quick observation caught a tiny leak early, saving me from a flooded kitchen.
Test the Connection Under Pressure
Operate the dishwasher’s water inlet valve and observe the joint for at least 15 minutes. If no drips appear, you’ve achieved a secure connection. If leaks develop, tighten further, but stop before overtightening causes deformation. Remember, gradually increasing pressure mimics real-world usage, ensuring the joint’s reliability. I once forgot to double-check and discovered a leak after the dishwasher had been running for an hour—disaster avoided by a simple pressure test.
Consult Reliable Resources and Verify Parts
Always verify that your parts are compatible with your dishwasher model. Use trusted resources like parts to check when installing a dishwasher for long-term performance. Properly matched parts reduce stress on the connections and improve warranty coverage. During a recent repair, I double-checked the part specifications, which prevented the need for reinstallation due to incompatibility issues—saving time and money.
 Many DIY enthusiasts and homeowners often believe they understand all the ins and outs of dishwasher installation, but there are subtle nuances that can make or break your setup—and your warranty. One prevalent misconception is that using generic parts, like cheap hoses or magnets, won’t affect long-term performance. In reality, choosing subpar or incompatible parts can void warranties and cause premature failure, as explained in [this detailed guide on selecting the right dishwasher parts](https://appliancedoctorz.com/top-tips-for-selecting-the-right-parts-for-dishwasher-installation). Another overlooked aspect is the importance of proper tightenings and pressure testing. Even a slight over-tightening of fittings or skipping pressure checks can lead to leaks that falsely appear as appliance defects, which risk warranty denial. Advanced technicians emphasize that understanding what components are covered under warranty and how to document your installation can save you from denied claims during troubleshooting or repairs. According to industry experts, many warranty disputes arise from improper installation practices or using non-compliant parts, as outlined in [this article on warranty documentation](https://appliancedoctorz.com/guide-to-dishwasher-parts-warranty-what-you-need-to-know). Have you ever fallen into this trap? Let me know in the comments. Recognizing these hidden nuances—like correct pipe alignment, avoiding silicone sealants, or inspecting the float switch—can be the difference between a trouble-free operation and costly repairs. Remember, meticulous attention to detail not only ensures optimal performance but also strengthens your warranty claims, especially when combined with proper documentation and adherence to manufacturer guidelines. For example, ensuring your drain hose is high-looped properly and avoiding reused supply lines prevents issues that often lead to warranty disputes, as discussed in [this troubleshooting resource](https://appliancedoctorz.com/how-to-diagnose-dishwasher-parts-during-warranty-periods). Mastering these critical yet often overlooked details elevates your DIY game from basic to expert—saving you time, money, and the frustration of warranty denials.Maintaining your dishwasher for reliable long-term performance requires more than just occasional cleaning. Investing in the right tools ensures precise work and helps you catch issues early, saving time and money. One essential item I personally swear by is a high-quality digital multimeter. With it, I can quickly test electrical components like heating elements and float switches to confirm they’re functioning correctly, preventing minor issues from turning into costly repairs. For plumbing tasks, a professional-grade basin wrench is invaluable. It allows tight access to fittings in cramped spaces, ensuring a proper seal without over-torquing, which can damage parts. When tightening compression fittings, I always use a torque wrench set to manufacturer-recommended values—this prevents over-tightening and potential leaks, as discussed in [this guide on fitting torque](https://appliancedoctorz.com/the-proper-tool-for-tightening-compression-fittings). Troubleshooting dishwasher problems also benefits from a USB inspection camera. I use mine to peek behind panels without dismantling everything, quickly spotting issues like clogged drain filters or cracked hoses. As technology advances, I predict smart diagnostic tools will become more prevalent, providing real-time data to homeowners and technicians alike. This evolution will make maintenance less reactive and more proactive.
**How do I keep my dishwasher performing over time?** Regularly inspecting and cleaning key parts such as filters, spray arms, and seals is essential. Incorporate tools like the inspection camera to identify early signs of wear and tear. Also, investing in a multimeter allows you to diagnose electrical issues before they escalate, ensuring your appliance’s warranty remains valid. Remember, staying ahead with proper tools and routine checks extends your dishwasher’s lifespan and preserves warranty coverage. For instance, verifying the integrity of your float switch using a multimeter and visual inspection can prevent unexpected overflows, which could otherwise cause water damage and void your warranty. Don’t wait for a leak or failure—try out this method today to see how small proactive steps make a significant difference. For more comprehensive guidance, check out [this resource on diagnosing dishwasher parts during warranty periods](https://appliancedoctorz.com/how-to-diagnose-dishwasher-parts-during-warranty-periods). Properly equipped and vigilant maintenance ensures your dishwasher stays efficient, effective, and covered under warranty for years to come.
What I Wish I Knew About Proper Sealing Techniques
My journey taught me that trust in simple fixes like Teflon tape can backfire, especially when dealing with compression fittings. The lightbulb moment was realizing that following manufacturer guidelines and focusing on correct tightening made all the difference in preventing leaks.
One key lesson was that the most durable seals come from understanding your parts and their design specifics, rather than relying on generic solutions. This insight encouraged me to dig deeper into the roles each component plays, which you can explore more at Understanding Dishwasher Parts.
Another realization was that patience and proper tools trump shortcuts. Using a torque wrench and applying gradual pressure ensured long-term seals—saving time and avoiding water damage down the line. Remember, quality and technique go hand in hand, and your toolset can significantly affect your success.
Finally, I learned the value of pressure testing before full operation. It’s a simple step that can catch small issues early, preventing disasters later. Especially with dishwasher connections, a quick check ensures peace of mind, and you can see these tips in practice at Diagnose Dishwasher Parts During Warranty.
Related Posts
How to Manually Open a Dishwasher Door When the Latch Jams
Ever had that sinking feeling when your dishwasher won't open…
How to Check Your Inlet Valve for Small Debris Without Tools
I remember the first time my dishwasher started acting up…
The Fix for a Dishwasher Door That Won’t Stay Latched
I remember the frustration vividly—grabbing a quick dinner, loading the…