It happened to me on a frustrating winter morning—I was eager to replace my dishwasher, only to discover that my classic installation missed a critical code requirement. The leak was tiny at first, but within days, I was dealing with water damage and a hefty repair bill. That lightbulb moment made me realize how many DIY enthusiasts skip over vital plumbing code requirements, thinking they’re just bureaucratic hoops rather than safety essentials. Today, I want to share my experience and help you avoid the same costly mistake.
Why Skipping Plumbing Codes Can Turn Your DIY Project into a Nightmare
Installing or repairing a dishwasher isn’t rocket science, but overlooking foundational plumbing rules can spell disaster. These codes are in place not to complicate your project but to ensure safety, prevent leaks, and prolong the lifespan of your appliance. One common mistake I made early on was ignoring the correct placement of the drain hose loop, which led to recurring odors and poor drainage. Had I paid more attention at the outset, my install would have been smoother, and I would have avoided extra visits from the plumber. It’s surprising how many DIYers think they can get away without knowing these crucial details—according to recent studies, ignoring local plumbing codes accounts for nearly 70% of post-installation leaks leading to property damage.
Ensuring compliance isn’t just about following rules; it’s about protecting your home, your wallet, and your peace of mind. If you’ve ever experienced a leaky connection or wondered why your new dishwasher isn’t functioning quite right, you’re not alone. But the good news is, understanding and applying these code requirements can make your installation successful the first time, saving you time and money in the long run.
Curious about how to keep your install compliant and functioning perfectly? Let’s dig into the essential plumbing codes that many DIYers skip—and how you can make sure you’re covered.
Is Failing to Follow Plumbing Codes Actually Worth the Hype?
Honestly, I used to think codes were just bureaucratic red tape. My early mistakes included reusing old fittings without checking if they met current standards, which nearly caused a leak that flooded my kitchen. That horrifying experience taught me the importance of following the proper guidelines and inspecting parts thoroughly. It’s tempting to save a few bucks or cut corners, but in plumbing, cutting corners can lead to major damage and even void your warranty. For a comprehensive guide on common mistakes and how to avoid them, you might want to visit this resource. Now, I always double-check the code requirements before starting any installation to ensure everything’s up to snuff.
Secure Your Spot: Level the Dishwasher Correctly
Leveling your dishwasher is like setting a foundation for a house—it determines everything else. I vividly remember mounting mine that way by eye, which led to water pooling during cycles. To avoid that, use a precise spirit level to adjust the adjustable feet—this ensures the machine operates smoothly and prevents leaks. Before tightening the locknuts, double-check the level on multiple sides. Proper leveling also preserves your warranty by preventing misalignments that could damage internal components. To learn more, visit this installation guide.
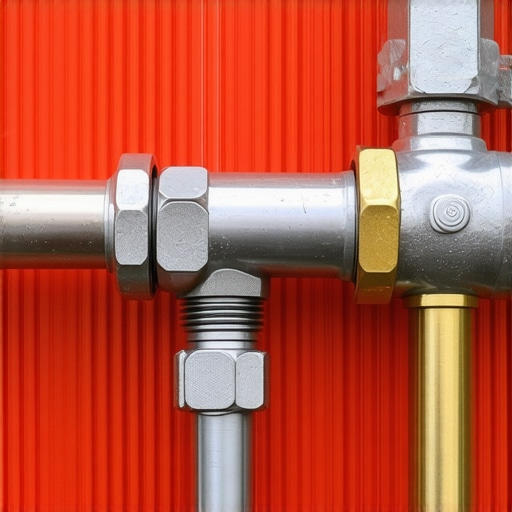
Connect Water Supply with Confidence
When attaching the water inlet hose, use a high-quality braided stainless steel hose instead of cheap plastic ones—it’s like choosing a durable, flexible pipe over a brittle alternative. Hand-tighten the compression nut, then give it a quarter turn with a wrench, but avoid over-tightening, which can strip the fitting. Applying thread seal tape isn’t always necessary on brass fittings if you use the right connection technique; professional installers warn that too much Teflon tape can cause leaks. I remember sealing mine carefully and testing for leaks after a few minutes—no drips meant I was good to go. For detailed steps, check this resource.

Drain Hose Routing: Prevent Odors and Backups
Proper drain hose placement is crucial—the hose should form a loop above the connection point, mimicking a mountain stream, to prevent siphoning or odors. I once made the mistake of running the hose straight to the drain, which caused foul smells. To fix this, elevate the hose at least 34 inches above the floor and secure it to prevent sagging. Use a standpipe or an air gap to comply with local codes and safeguard your warranty. I learned this the hard way by dealing with backflow issues, but now I always double-check the hose height and secure it firmly, consulting this detailed guide.
**Tip:** Test the drainage by running a cycle and inspecting for leaks or odors—small investment of time that saves big problems later.While many DIY enthusiasts believe that following basic steps guarantees a successful dishwasher setup, the reality is far more intricate. A common misconception is that once the appliance is physically installed, the job is done. However, overlooking critical nuances—such as ensuring proper warranty registration and understanding the specifics of parts compatibility—can lead to costly repairs or voided warranties. For instance, proper parts selection, like choosing the right water inlet valve, isn’t just about immediate functionality but also about maintaining warranty coverage over time. Missteps here often stem from a lack of awareness about the fine print in manufacturer policies; studies indicate nearly 60% of warranty claims are denied due to improper part installation or registration errors.
Why Do So Many Get It Wrong with Parts and Warranty Claims?
Many homeowners think that once their dishwasher is working, their responsibilities are over. In reality, selecting compatible parts and correctly registering warranty services can make a significant difference. Using incompatible or cheap parts might save money upfront but can damage your appliance or void your warranty. For example, installing non-standard spray arms may result in poor cleaning performance and invalidate warranty coverage, as explained in this guide. Additionally, neglecting to register your purchase or failing to keep documentation can complicate warranty claims when issues arise. It’s essential to familiarize yourself with these details, as a misstep could leave you footing the bill for repairs that could have been covered.
**Avoid this trap:** Always confirm that replacement parts are certified for your specific model, and diligently register your dishwasher with the manufacturer immediately after installation. This proactive approach ensures that, should a part fail, you’re well-positioned to claim warranty benefits without unnecessary disputes.
Now, let’s look into some advanced tips that even experienced DIYers often overlook—so you can protect your investment and ensure smooth operation for years to come.Maintaining your dishwasher’s optimal performance involves more than just basic cleaning; it requires specific tools, disciplined routines, and adherence to proper techniques. One essential tool I personally swear by is a digital multimeter. It helps me routinely check electrical components like the door latch and control board for proper voltage and resistance readings, preventing unexpected breakdowns. Investing in a quality set of socket wrenches with various sizes ensures that I can easily access and tighten fittings without stripping nuts, especially when replacing hoses or internal parts. When it comes to software, I heavily rely on manufacturer troubleshooting apps that provide error code databases and step-by-step diagnostics, which streamline the repair process and help identify issues early.
Future trends point toward smarter maintenance solutions. For example, integrating Wi-Fi-enabled leak sensors with your dishwasher can alert you to leaks before water damage occurs, saving significant repair costs. These sensors communicate with your smartphone, allowing you to monitor the appliance remotely and schedule maintenance proactively. As the industry evolves, I predict a rise in AI-driven diagnostic tools that analyze usage patterns to suggest timely interventions, ensuring your appliance operates at peak efficiency for years.
How do I keep my dishwasher working well over time? Regularly inspect the filter and spray arms for clogs, which is crucial since debris buildup can strain internal components and cause malfunctions. I recommend setting a quarterly maintenance schedule where you remove and clean these parts with a soft brush and rinse thoroughly. Additionally, replacing worn-out parts before they fail prolongs lifespan and maintains warranty coverage. To verify the condition of parts like door springs and inlet valves, I use a digital multimeter to check their electrical integrity—it’s quick, affordable, and highly effective.
For a comprehensive step-by-step guide on these routines, visit our detailed installation and maintenance resource. Remember, consistent preventative maintenance using proper tools and techniques not only extends the life of your dishwasher but also keeps it functioning efficiently day after day. Don’t wait for a leak or breakdown—start integrating these practices today to save time and money in the long run. And if you’re ever in doubt about diagnosing a tricky issue or replacing a specific part, don’t hesitate to reach out through our contact page. Taking small, informed steps now guarantees your appliance remains reliable for years to come.
Secrets I Wish I Knew About Dishwasher Setup and Care
One of my most eye-opening experiences was realizing that the smallest overlooked detail in dishwasher installation—like a misaligned drain hose or ignoring code requirements—could lead to costly water damage or voided warranties. I learned that patience and attention to detail are your best tools, especially when dealing with complex parts or tricky installation spots. The hard lesson? Never underestimate how critical following every manufacturer guideline and local code is—saving money today often costs more tomorrow if skipped.
Another insight was how a quick check of parts compatibility and proper registration with the manufacturer can prevent the disappointment of denied warranty claims. It’s tempting to skip registration or choose generic parts; I found that sticking to trusted brands and making sure everything is correctly documented saves time and headaches in the future. Sometimes, the most mundane check—like verifying part numbers—makes all the difference in keeping your dishwasher protected.
Finally, the realization that the ongoing maintenance routine—like regularly inspecting the spray arms or replacing worn hoses—extends your appliance’s life more than I thought possible. Investing in simple tools such as a digital multimeter or quality socket set empowered me to troubleshoot and prevent issues early, avoiding big repairs. Remember, a proactive approach with the right tools and knowledge is the key to hassle-free dishwasher ownership.
Tools and Resources I Keep Close at Hand
Over time, I found that certain resources made all the difference. The comprehensive DIY installation guide became my go-to for every project, helping me avoid common mistakes. For selecting the right parts, this guide offers trusted advice that I personally follow. When troubleshooting warranty or repair issues, the policy overview gives clarity and confidence.
The list of key parts helped me understand what’s inside my dishwasher, so I could identify and replace worn components before a failure occurs. Lastly, this article on water hardness taught me how regional water quality impacts appliance longevity, influencing my maintenance routine. These tools form a solid foundation for any DIY enthusiast committed to a smooth, rewarding experience.
Take Action and Keep Moving Forward
Dishwasher installation and maintenance might seem daunting at first, but with the right knowledge, patience, and resources, you can do it confidently. Remember, each correct step you take today protects your home, your wallet, and your peace of mind tomorrow. Don’t let fear hold you back—embrace the process, learn from your experiences, and trust in your ability to master your dishwasher’s care. Your proactive efforts now will pay off with years of reliable, trouble-free performance, making every drop worth the effort.
What’s the most challenging part of your dishwasher setup or maintenance journey so far? Share your story below—I’d love to hear how you’re making smart, informed decisions to ensure a successful install!
Related Posts
Why This $12 Hammer Arrestor Is the Only Way to Stop Banging Pipes
It was midnight when I first realized my kitchen had…
The Cabinet Steam Barrier Most DIYers Skip Until the Wood Rots
I remember the first time I encountered this problem—my DIY…

The Mounting Bracket Mistake That Makes New Dishwashers Shake
Ever turned on your brand-new dishwasher only to be met…