
I remember standing in my kitchen, sweat dripping down my neck, staring at a $900 stainless steel dishwasher that refused to budge. I had done the math. I had watched the videos. But my 1970s cabinets had other plans. The opening was 24 inches at the bottom but tapered to 23 and a half at the top. In my frustration, I tried to force it, nearly scratching the tub and definitely making a mess of the mounting screws. That was the moment I realized that in the real world, ‘standard’ is more of a polite suggestion than a rule. If you are currently looking at a gap that is too wide, too narrow, or just plain crooked, take a deep breath. You are not alone, and you do not need a sledgehammer. Today, I am going to show you exactly how the pros handle these ‘square peg, round hole’ nightmares so you can get your kitchen back in order. We will look at everything from side-mounting secrets to custom trim tricks that keep your unit stable and looking like it was built for the space. Before you start hacking away at your wood, you need to prepare your kitchen for dishwasher installation by checking for hidden obstacles like floor height changes.
Is a professional installer even necessary for a tiny half-inch gap?
It is tempting to think you can just shave off a bit of wood and call it a day, but that is where I made my biggest mistake early on. I ignored the fact that my floor was not level, which led to a unit that leaked from the bottom because the pump was strained. Many people fear that calling a pro is an admission of defeat or a waste of money. However, a seasoned installer has seen it all and knows how to maintain your dishwasher parts warranty while making custom adjustments. Have you ever tried to slide a new unit in only to realize your flooring is now too high to let the legs clear the opening? Drop a comment and let me know, because that is a classic ‘non-standard’ headache.
Why Your Cabinet Opening Is Lying to You
Most people assume a standard dishwasher needs a 24-inch opening, and on paper, that is true. But house settling and multiple layers of flooring can turn a perfect rectangle into a trapezoid. According to the National Kitchen & Bath Association (NKBA), nearly 40% of kitchen remodels encounter structural ‘surprises’ once old appliances are removed. When I was starting out, I did not account for the ‘ears’ of the dishwasher—those little metal tabs—and I ended up with a unit that sat crooked for three years. To avoid this, you need expert advice on dishwasher installation troubleshooting before you even unbox the machine. Professionals do not just push the machine in; they use specialized mounting bracket tricks to secure the unit to the sides of the cabinets when the top is out of reach. This ensures you stop your machine from tipping forward when you pull out a heavy bottom rack. It is all about stability and using the space you have, not the space you wish you had. In the next section, we will dive into the specific tools and shims that make these ‘impossible’ fits look seamless.
Measure the Back of the Cabinet Too
Think of your cabinet opening like a pair of jeans that fits perfectly in the store but shrinks the moment they hit the dryer. Just because the front of your opening measures 24 inches doesn’t mean the back isn’t being choked by a stray copper pipe or a bulging piece of drywall that was poorly finished in 1985. Before you even think about sliding the unit in, grab a high-quality flashlight and map out the entire cavity for obstructions. You should also take a moment to find your units hidden model number for replacement parts while the machine is still in the middle of the kitchen floor. Trust me, trying to squint at a tiny silver sticker with a mirror and a phone camera once the machine is wedged into a 23-inch hole is a special kind of hell that no one deserves.
Side Mounting Beats a Shaky Countertop
In many modern kitchens featuring quartz or granite surfaces, you cannot simply screw the dishwasher into the underside of the counter. If you try to force a standard installation here, you will either crack the expensive stone or find that the screws simply spin in place, providing zero stability. I remember a job where I ignored this and the whole unit tipped forward when the homeowner pulled out a fully loaded bottom rack; it nearly took out the cabinet door and the toddler standing next to it. To prevent this, you must use the mounting bracket trick for shaky granite countertops. This involves bending the provided metal tabs outward and securing them into the wooden side cabinets instead. However, you must stop using standard wood screws for metal-lined cabinets or hybrid materials, as they will strip the hole or fail to bite properly, leaving your machine rattling every time the pump kicks on.
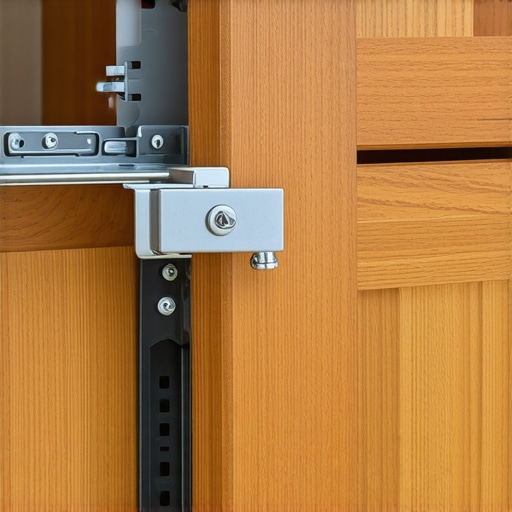
Stop Fighting Your Uneven Floor
Leveling is the hill where most DIY installation dreams go to die. If the unit is not perfectly level, the door will not seal, and water will eventually find its way onto your expensive flooring. I once spent an entire Saturday afternoon trying to balance a dishwasher on unfinished subflooring in an old Victorian home where the floor sloped so aggressively the machine looked like it was trying to slide into the basement. I tried using scraps of cardboard as shims, which is a rookie mistake because cardboard eventually gets wet, compresses, and rots. Use proper plastic shims and take advantage of the leveling legs. Most modern high-end units actually allow you to adjust the rear legs via a screw located at the bottom front of the machine. This is one of the most critical parts to check when installing a dishwasher for long-term performance because a tilted machine puts uneven stress on the motor bearings.
Fresh Parts Save the Warranty
It is incredibly tempting to reuse your old braided water line to save twenty bucks, but it is a gamble that you will almost certainly lose. Old rubber gaskets inside those lines become brittle over time and will crack the moment you disturb their seated position. There is a very specific reason why your professional installer insists on a new water valve and a fresh supply line; it is cheap insurance against a $5,000 flood claim later. While you are tightening things down, be hyper-aware of the mounting screw mistake that blocks your top rack from closing. If the screw head protrudes just a fraction of an inch too far into the tub space, it will snag the plastic rack assembly every single time you try to wash your glasses. It starts as a tiny ‘scritch’ sound and ends with a ruined rack and a voided warranty.
Your Warranty Won’t Cover Your Own Mistakes
Most people believe that if they buy a brand-new machine, they are bulletproof for the first year. Common wisdom suggests that as long as you have a box and a receipt, the manufacturer will fix anything that goes wrong. In my experience, that is a dangerous half-truth. Manufacturers are actively looking for ‘improper installation’ to deny your claim. According to the Association of Home Appliance Manufacturers (AHAM), nearly 25% of service calls for new appliances are linked to installation errors rather than mechanical failure. If you didn’t use the right brackets or if your machine is slightly tilted, you might find that your warranty claim fails without an authorized receipt from a certified pro who can vouch for the setup. It is a tough pill to swallow, but ‘doing it yourself’ can sometimes be the most expensive way to save money.
How can I protect my hardwood floors from a slow installation leak?
The biggest ‘trap’ for advanced DIYers isn’t a massive flood—it’s the slow, silent drip. I once saw a homeowner who perfectly installed their unit but forgot to check the tension on the drain hose. Over six months, a tiny vibration caused a pinhole leak that rotted out $4,000 worth of custom oak flooring. This is why you need to know how to claim compensation for flooring damage and why you should never skip the pressure test. A seasoned installer will often use a specialized moisture sensor under the kickplate, which is one of the smart sensors that detect leaks before they become disasters. Have you ever finished a project only to find a ‘mystery puddle’ the next morning? Let me know in the comments, because we have all been there.
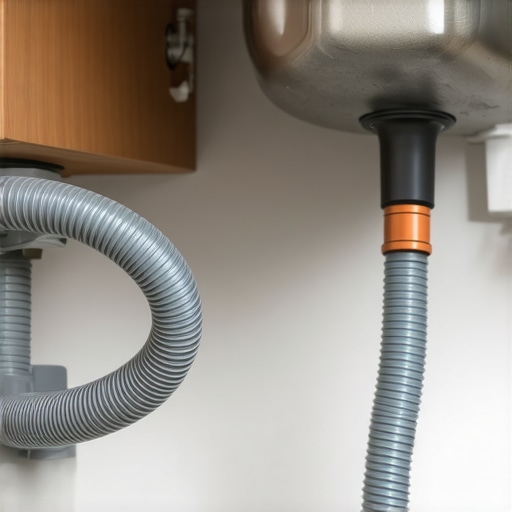
The drain hose loop that stops the stink
Many people think the air gap (that little chrome cylinder on your sink) is just an eyesore they can bypass. While some modern codes allow for a ‘high loop’ instead, skipping both is a recipe for a stinky machine and a burned-out motor. Without a proper break in the line, dirty sink water can siphoned back into your clean dishwasher. It’s a nuance that separates the pros from the amateurs. Understanding the benefit of using a high loop vs an air gap is critical for long-term health. If you get this wrong, you’re not just dealing with dirty dishes; you’re creating the mistake that voids your lifetime tub warranty because of the corrosive nature of stagnant greywater.
Hidden fees in the fine print
Even if you do get a repair approved, there is a nuance most homeowners miss: the service fee. You might be thrilled to hear the $300 control board is covered, but then the technician hits you with a bill for the ‘trip charge.’ This is why your warranty covers parts but not the service fee, and it’s a standard industry practice. To avoid these surprises, you must learn how to get your warranty claim approved on the first try by documenting every step of your install. Proper documentation is your only shield when a manufacturer tries to blame your floor leveling for a faulty pump. It’s about being more prepared than the person on the other end of the claims line.
If you want to move from ‘clueless homeowner’ to the ‘neighborhood appliance guru,’ you have to stop using the wrong tools. I see it all the time: people trying to tighten a delicate brass compression fitting with a pair of rusty, oversized pliers. You are going to round off the nut and end up with a slow, weeping leak that rots your subfloor. Personally, I never walk onto a job site without a dedicated 15/16-inch open-ended wrench. It is the proper tool to use when tightening your water supply line because it provides the exact leverage needed without marring the metal or over-torquing the valve.
Why I Always Keep a Multimeter in My Kitchen Drawer
Another secret weapon in my arsenal is the humble Shop-Vac. Most people think it is just for sucking up sawdust in the garage, but when your machine refuses to drain and you are looking at two inches of stinky, stagnant water, why a shop vac is the best way to clear a clog becomes incredibly clear. You can create a makeshift seal over the drain hose and literally suck the obstruction out of the pump impeller without having to disassemble the entire unit. It turns a two-hour nightmare into a five-minute fix.

How do I maintain my dishwasher’s performance over several years?
The answer isn’t a bank-breaking annual service call; it is about small, consistent habits. First, you must perform the one maintenance task that doubles the life of your gasket: simply wiping down the rubber door seal with a damp microfiber cloth once a month. This removes the acidic food residue and detergent buildup that causes the rubber to crack. Second, stop being afraid of the high-heat settings. Surprisingly, why the heavy cycle is actually better for your machine health is because the sustained higher temperatures fully melt away residual animal fats that eventually clog the internal spray arm plumbing.
The Truth About Electrical Diagnostics
If your machine suddenly refuses to light up or start, do not panic and assume you need a $900 replacement. Before you call a pro, use a basic electrical tester. Learning how to test your thermal fuse with a basic multimeter has saved my clients thousands of dollars over the years. This fuse is a safety device that often blows during a minor power surge or a particularly long sanitize cycle. It is a $15 part that takes ten minutes to swap, yet it is the primary reason perfectly good machines end up in landfills. Knowing when to replace dishwasher parts for optimal performance often means identifying these small fail-safes before they trigger a system-wide shutdown.
The Future of AI in Your Kitchen
Looking toward the next decade, I suspect we are moving into an era of ‘self-diagnosing’ appliances. We are already seeing high-end units that can connect your dishwasher to a smart home hub to alert you via your phone if the motor’s vibration frequency changes, indicating a failing bearing. According to the Appliance Standards Awareness Project (ASAP), future energy regulations are likely to mandate better consumer access to these internal diagnostic codes, fueling the ‘Right to Repair’ movement. My challenge to you: tonight, try the 3-minute hack to clear your spray arm nozzles. You will be shocked at how much debris a simple toothpick and some white vinegar can remove, and your glassware will finally lose that annoying cloudy film.
What 500 Installations Taught Me About Standard Sizes
I’ve learned the hard way that the biggest lie in home renovation is the word ‘standard.’ When you are tackling a tricky fit, remember that the smallest details determine if your machine lasts ten years or ten months. One major lightbulb moment for me was realizing that understanding dishwasher warranty policies is just as important as the wrench in your hand. If you cut corners on the mounting because the gap is tight, you aren’t just risking a rattle; you are risking a denied claim later.
- The ‘Just Tight Enough’ Rule: Brass fittings are soft. If you overtighten, you’ve already failed. Use the right parts for dishwasher installation and trust the gaskets to do their job.
- Leveling is Non-Negotiable: A machine that is even 1/8th of an inch off-center can lead to internal leaks that no one sees until the floorboards warp.
- Documentation is Power: Take a photo of your water and electrical connections before you slide the unit in. This is the way to protect your warranty during a kitchen remodel if a manufacturer ever questions your craftsmanship.
#IMAGE_PLACEHOLDER_E#
The Gear That Makes the Magic Happen
You don’t need a truck full of specialized tools, but you do need the ‘right’ ones for a seamless fit. Beyond the standard screwdrivers, I highly recommend keeping a set of essential parts every dishwasher owner should know about, like spare plastic shims and a fresh roll of high-grade Teflon tape. For the actual work, my ‘holy trinity’ includes a dedicated 15/16-inch wrench for supply lines, a non-contact voltage tester to keep you safe, and a sturdy Shop-Vac to handle the inevitable spills when you disconnect the old drain hose. These tools turn a frustrating afternoon into a professional-grade victory.
Stop Staring at the Box and Get Started
Installing a dishwasher in a non-standard space feels like a high-stakes puzzle, but it is one you are fully capable of solving. By following a diy dishwasher installation step-by-step guide and respecting the quirks of your specific kitchen, you are doing more than just saving money—you are ensuring your home stays dry and your dishes stay clean for years to come. You’ve got the knowledge, the tools, and the plan. Now, it’s time to get that machine into the wall and reclaim your kitchen. Have you ever encountered a cabinet opening that was surprisingly crooked or too small? Let me know in the comments how you handled the gap!
Related Posts
The Proper Way to Secure a Dishwasher Under Stone Countertops
I remember the moment vividly—my hands were trembling slightly, and…

Why You Should Document Your Professional Install Immediately
Ever had that sinking feeling when your brand-new dishwasher refuses…

How to Document Your Professional Install for Future Insurance Claims
I vividly remember the sinking feeling when my brand-new dishwasher…