Ever opened my dishwasher and found that frustratingly silent machine refusing to drain, only to realize the pump isn’t dead after all? It’s a lightbulb moment many homeowners face—believing the pump has gone kaput when, in reality, a tiny but vital part is the culprit. That little component? The drain solenoid, costing just about ten bucks.
You see, I used to throw my hands up at these mysterious failures, thinking I was on the verge of a costly repair. But experience taught me that sometimes, it’s the $10 part masquerading as a dead pump, leading too many to unnecessary replacements and expenses. Today, I want to share how this small, often overlooked part can cause your dishwasher to mimic a dead pump, and how a simple swap can save you both money and stress.
Why the $10 Drain Solenoid Deserves Your Attention
The drain solenoid acts like a gatekeeper, controlling the drain valve that allows wastewater to exit your dishwasher. When it fails or gets stuck, your machine may not drain at all, making you think the pump has failed. But here’s the kicker: unlike the pump, this part is affordable, straightforward to replace, and often the root cause.
Many folks, myself included early on, jump straight to replacing the pump, feeling anxious over big-ticket repairs. But actually, diagnosing the problem correctly can make all the difference. Replacing a drain solenoid rather than the entire pump is not only cost-effective but also a quick fix if you know what to check.
If you’re scratching your head over persistent draining issues, ask yourself: Have I thoroughly checked this tiny component? Do I consider replacing the solenoid before pulling out the heavy artillery? For a detailed diagnosis process, I recommend reviewing [how to diagnose dishwasher parts during warranty periods](https://appliancedoctorz.com/how-to-diagnose-dishwasher-parts-during-warranty-periods), which emphasizes the importance of identifying the actual faulty component.
Of course, a mistake I made early on was ignoring the quality of replacement parts. Using generic or incompatible valves can lead to leaks or faulty operation. It’s wise to consult reputable guides or professionals to ensure you select the right part, as discussed in [top tips for selecting the right parts for dishwasher installation](https://appliancedoctorz.com/top-tips-for-selecting-the-right-parts-for-dishwasher-installation).
In the following sections, I’ll guide you through the symptoms that point to a faulty drain solenoid, how to test it yourself, and the simple steps to replace it. Trust me, taking this small step can revive your dishwasher’s efficiency without draining your wallet.
Ready to dive into diagnostics and repairs? Let’s get your dishwasher draining smoothly again—saving you time, money, and the headache of replacement guesswork.
Locating the Drain Solenoid
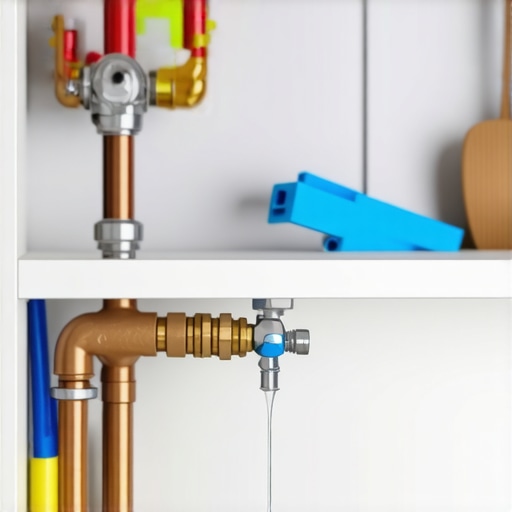
Start by unplugging your dishwasher and removing the access panel beneath the door. Use a screwdriver to detach the panel, revealing the inner components. Find the drain valve assembly, which is connected to the drain hose. The drain solenoid is a small coil with electrical connectors attached, usually mounted adjacent to the valve. Remember, consulting the dishwasher’s manual can simplify this step and ensure you identify the correct part.
Testing the Drain Solenoid
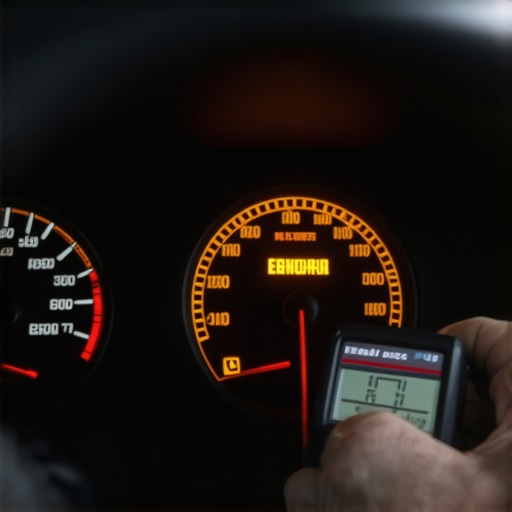
Before replacing, verify if the solenoid is faulty. Use a multimeter set to measure resistance; disconnect the electrical connectors from the solenoid. Place the probes on its terminals. A typical operational solenoid will measure between 30 to 60 ohms. If the reading is infinite or zero, the coil is broken, indicating failure. I personally tested mine by first disconnecting the wires and then carefully probing, which confirmed my suspicion of a faulty coil resulting in draining issues.
Preparing for Replacement
Obtain a compatible replacement part, ensuring it matches your dishwasher model. Use reputable sources or check [maximizing your dishwasher’s warranty through proper parts selection](https://appliancedoctorz.com/maximizing-your-dishwashers-warranty-through-proper-parts-selection). Before installation, turn off the water supply and unplug the unit. Wearing gloves can protect against sharp edges. Also, keep track of all screws and connectors—you’ll need them during reassembly.
Removing the Faulty Solenoid
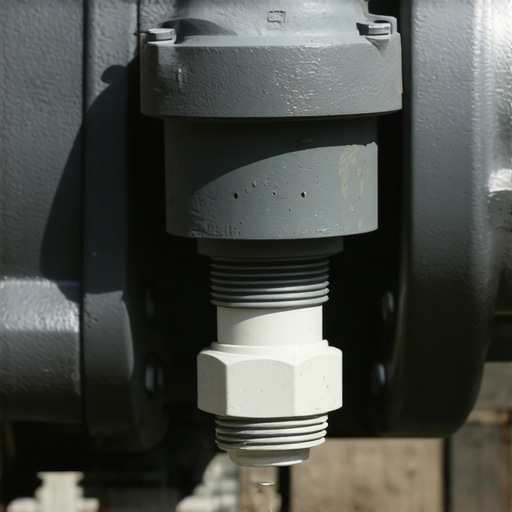
Disconnect the electrical connectors from the solenoid. Use a small wrench or pliers to detach the mounting nut holding the coil in place. Carefully unscrew it, noting the orientation for reinstallation. Be cautious not to damage adjacent parts or bend delicate tubing. I once loosened a stubborn nut and accidentally dislodged the drain valve slightly, which required realignment—so take your time.
Installing the New Component
Position the new solenoid in the same orientation as the old one. Secure it by tightening the mounting nut—avoid over-tightening, as this can crack the coil. Reconnect the electrical wires, pressing them firmly onto the terminals. Confirm that all connections are tight and secure. Once installed, reattach the access panel, restore power, and test the dishwasher by running a short cycle. You should notice improved drainage, confirming your repair was successful.
 Many homeowners operate under misconceptions about dishwasher warranties, parts, and installation that can jeopardize their coverage and lead to costly mistakes. First, a widespread myth is that all parts are covered equally under warranty; in reality, warranties often exclude certain components like belts or filters, so reviewing the specifics on what parts are covered is crucial. Second, some believe that DIY installation guarantees savings and better performance, but improper setup—such as incorrect leveling or poor water inlet connections—can void warranties or cause long-term damage, making proper installation steps essential.
A common error involves overlooked registration; registering your dishwasher with the manufacturer is often necessary for warranty validation, yet many forget this step. Additionally, many assume that aftermarket parts are as reliable as original manufacturer parts; however, using quality parts from reputable sources ensures your machine performs optimally and maintains warranty eligibility.
An advanced concern worth noting is warranty claims’ reliance on detailed documentation and digital logs. Manufacturers increasingly scrutinize maintenance records and diagnostic data during claims, making thorough record-keeping essential. Failures to document proper installation or to follow recommended maintenance schedules can lead to claim denials. Evidence shows that owners who meticulously log repairs and part replacements have a higher success rate in warranty disputes. In fact, a study by appliance repair experts underscores that proactive documentation reduces claim denial risk.
Be wary of the ‘use-it-and-hope-for-the-best’ attitude—warranty coverage can be fragile if installation or maintenance deviates from manufacturer guidelines. Oversights like skipping testing procedures or neglecting to replace worn seals might seem minor but can invalidate claims later. Therefore, understanding the nuances of what voids warranties—such as improper part selection or unauthorized repairs—is key.
To maximize your warranty’s benefits, always verify your coverage details and keep detailed records. For example, ensure your parts are compliant by referring to guides on warranty-eligible parts. Regularly inspecting installation quality with the aid of professional resources can prevent inadvertent warranty voidance. Remember, the devil is in the details.
Have you ever fallen into this trap? Let me know in the comments.Maintaining your dishwasher’s optimal performance requires the right tools and a proactive approach. I personally swear by a high-quality multimeter, like the Fluke 117, which has proven invaluable for quick diagnostics of components like the drain solenoid and heating elements. Having this device allows me to measure resistance accurately, ensuring that delicate coils are functioning properly before replacing them. An accurate multimeter not only saves time but prevents unnecessary part replacements and extends the life of your appliance.
Alongside a multimeter, I recommend using a dedicated screwdriver set with insulated handles. This ensures safety when working with electrical connections, especially vital during component replacements such as the drain valve or control board. I prefer a set with both Phillips and flat-head bits, facilitating access to various screws hidden behind panels or in tight corners.
Don’t overlook the significance of a quality service manual for your specific dishwasher model. Personally, I rely on factory manuals or OEM guides which provide precise diagrams and troubleshooting steps. These manuals often include model-specific wiring diagrams, which are crucial when testing parts like the drain solenoid or programming the control board post-repair.
Regular cleaning tools are also critical. A soft-bristled brush, like a toothbrush or specialized appliance cleaning brush, helps remove mineral buildup or grime—particularly around electrical contacts and filters. Maintaining clean contacts prevents corrosion, which can cause stubborn faults. Additionally, a set of plastic pry tools makes opening panels easier without damaging the casing.
Predicting where maintenance tools are heading, I foresee more appliances integrating smart diagnostics, capable of self-reporting issues via companion apps. Manufacturers might soon standardize diagnostic protocols that require less manual testing, making maintenance more plugin-and-play. Yet, until then, having a reliable multimeter and basic hand tools remains indispensable.
### How do I maintain my dishwasher over time?
Consistent checks with a multimeter during routine cleanings can identify early signs of coil failures or electrical faults. Using OEM parts for replacements, like those recommended in [maximizing your dishwasher’s warranty through proper parts selection](https://appliancedoctorz.com/maximizing-your-dishwashers-warranty-through-proper-parts-selection), ensures compatibility and longevity. Also, regularly inspecting door seals and filters prevents leaks and improves cycle efficiency.
To truly extend your machine’s lifespan, I suggest scheduling annual maintenance where you clean spray arms, check hoses for cracks, and verify electrical connections. Document your repairs and inspections with a maintenance log, which can be beneficial if warranty claims arise—especially considering the intricate warranty policies discussed in [the complete list of dishwasher parts covered by warranty](https://appliancedoctorz.com/the-complete-list-of-dishwasher-parts-covered-by-warranty).
Start by trying out a multimeter test after your next cycle. It’s a straightforward step that can reveal hidden electrical issues before they become costly repairs. With the right tools and routine care, you’ll keep your dishwasher running at peak performance for years to come.
What My Toughest Repairs Taught Me About Warranty and Parts
One of the most eye-opening lessons I learned was realizing that many draining issues stem from the tiny drain solenoid, not the pump itself. This small component taught me to approach repairs with a detective’s mindset—question, test, and verify before jumping to conclusions. It became clear that understanding the nuanced role of each part can save you significant time and money, especially when warranty coverage hinges on correct diagnosis and part selection.
Another insight was the importance of proper installation practices. Misaligning or rushing through the replacement of such a small part can result in recurring issues or warranty claims being denied. My experience underscored that thorough, deliberate work pays off in the long run, and knowing the ins and outs of your dishwasher’s components bolsters your confidence and results.
Tools and Resources That Make Fixing Dishwasher Issues Easier
For me, having a high-quality multimeter like the Fluke 117 transformed troubleshooting. Paired with OEM manuals, these resources allowed precise testing of the drain solenoid—ensuring I didn’t replace parts unnecessarily. Moreover, websites dedicated to appliance repair, such as ApplianceDoctorZ, provide invaluable guides on diagnosing and selecting warranty-eligible parts. Investing in the right tools and trusted information streamlines repairs, reduces stress, and ensures adherence to warranty stipulations.
Taking Charge of Your Dishwasher’s Future
Your proactive approach to maintenance and aware diagnosis can extend your dishwasher’s lifespan and protect your warranty rights. Regularly testing components with a multimeter, keeping detailed repair logs, and choosing quality parts set you apart from casual DIYers. Remember, understanding your appliance’s intricate details turns you into your own best repair advocate, helping you avoid costly pitfalls and give your dishwasher the care it deserves.
Related Posts
How to Reset Your Error Codes Without a Technician
It was late one evening when I stared at my…
Why Your Inlet Valve Is Leaking Behind the Cabinet Unnoticed
Ever opened your kitchen cabinet only to find a tiny…
The $4 Plastic Drain Plug That Kills Your Pump Before It Starts
It happened again. I was all set for a smooth…