
There I was, flat on my back on the kitchen floor, feeling like a DIY king because I had just hooked up our new dishwasher in record time. I remember tightening that little plastic 90-degree elbow—the one that came free in the box—and thinking that if the manufacturer included it, it must be good enough for my home. I was wrong. Three days later, I woke up to the squelch of soaked laminate and a repair bill that made my eyes water. That tiny piece of plastic had hairline-fractured under the constant pressure of our home’s water system. It is a mistake I see rookies make every single day, and frankly, it is the reason why the guys who do this for a living will not touch plastic supply parts with a ten-foot pole. [image_placeholder_1]
Why Your Pro Tosses the Included Plastic Elbow in the Bin
The simple truth is that professional installers do not avoid these parts because they are snobby or trying to upcharge you; they avoid them because they do not want to get a frantic call about a flooded kitchen at 2:00 AM. When I first started messing with appliances, I thought following top tips for selecting the right parts for dishwasher installation was more of a suggestion than a rule. I learned the hard way that plastic is a ticking time bomb. Unlike metal, plastic is highly susceptible to cross-threading during the initial hookup. If you are not using the proper tool to use when tightening your water supply line, you can easily hairline-fracture the fitting without even knowing it until it is too late. Professional installers see the value in durability, which is why your professional installer insists on a new water valve and brass fittings rather than relying on the cheap components thrown into the packaging to save the manufacturer a few cents. According to the Insurance Institute for Business & Home Safety (IBHS), plumbing supply system failures are among the most frequent and costly causes of residential water damage, often totaling over $5,000 per incident. This is why pros prioritize metal over polymers every single time. It is about peace of mind, not just aesthetics.
Does a tiny piece of metal actually make that much difference?
You might be looking at a $5 brass elbow and a free plastic one and wondering if the upgrade is just hype. I promise you, it is not. Plastic degrades over time, especially when exposed to the heat of a dishwasher’s motor and the hot water flowing through the line. Metal can handle those temperature swings without becoming brittle. If you are currently in the middle of a project, checking the parts to check when installing a dishwasher for long-term performance should be your first priority. Skipping this step is how people end up searching for how to salvage a flooded kitchen after a supply line failure. Have you ever had a quick fix turn into a major home repair project? Let me know in the comments below, because I have certainly been there. Next, we are going to look at exactly which brass fittings you should be buying instead.
Get the Right Brass Elbow from the Start
When you open that box, you will likely find a plastic 90-degree elbow tucked into a bag of spare parts. Do yourself a favor and leave it there. To ensure a leak-free connection, you need a high-quality 3/4-inch GHT to 3/8-inch compression brass elbow. This specific fitting is the bridge between your home’s water supply and the machine’s inlet valve. Unlike the plastic alternative, brass resists the constant expansion and contraction caused by the dishwasher’s heating element. Realizing the importance of common dishwasher parts and their role in proper installation is the first step toward a job that lasts a decade rather than a week.
#IMAGE_PLACE_HOLDER_B#
Why the Stainless Steel Braid is Your Best Friend
If you are still using rigid copper tubing or, heaven forbid, a poly-plastic line, you are living on the edge. A braided stainless steel supply line is essentially a rubber hose wrapped in a metal armor. It offers the flexibility required when you are sliding the unit into a cramped cabinet space. This flexibility prevents the line from kinking—a common issue that leads to low water pressure and poor cleaning performance. When you are following a top tips for seamless dishwasher installation in 2025 guide, you will notice that pros never compromise on the supply line. It is the artery of your appliance.
Stop Overtightening Everything
One of the biggest mistakes DIYers make is thinking that “tighter is better.” I learned this lesson the hard way during a renovation in a tight galley kitchen. I used a massive pipe wrench on a small compression nut, worried that a loose fit would flood the place. I tightened it until I heard a faint tink. I ignored it, thinking it was just the metal settling. Ten minutes after the hot water cycle started, that “tink” turned into a geyser because I had crushed the brass sleeve inside the fitting. Now, I strictly follow the finger-tight plus a quarter turn rule. Using the proper tool to use when tightening your water supply line, like a small adjustable wrench or specialized pliers, gives you the tactile feedback you need to avoid stripping threads.
Keep Your Warranty Intact
Many homeowners do not realize that using sub-standard parts can actually jeopardize their protection plan. Manufacturers are looking for any reason to deny a claim, and an “unauthorized” plastic fitting is a perfect excuse. By maximizing your dishwashers warranty through proper parts selection, you ensure that if the motor fails in year two, the technician cannot blame your “shoddy” plumbing. This is especially critical when dealing with the installation checklist for installing an integrated cabinet panel, where access to the plumbing is even more restricted and leaks can go unnoticed for longer. Always cross-reference your manual with maximizing your dishwashers warranty coverage today strategies to keep your investment safe.
The High Loop is Non-Negotiable
Even with the best fittings in the world, your dishwasher will fail if the drain line is not installed correctly. You must create a high loop—fastening the drain hose as high as possible under the sink before it connects to the disposal. This prevents “backflow,” which is just a fancy way of saying dirty sink water draining into your clean dishwasher. Think of it like a trap for your sink; it uses gravity to keep the gross stuff out. Skipping this simple step is a leading cause of the dreaded “my dishwasher smells like a swamp” complaint.
Now, here is the part where most DIY guides fail you: they treat the warranty like a blanket of total protection. Most homeowners assume that if a part fails, the manufacturer just fixes it. In my years of troubleshooting, I have seen that why your warranty covers parts but not the 150-service-trip-fee is the most common shock for owners. You might get a $10 pump for free, but you will pay $200 for the tech to drive to your house. This is a nuance often missed when comparing the difference between factory warranties and store protection plans. Have you ever fallen into this trap? Let me know in the comments, because I have certainly seen people lose hundreds thinking they were fully covered.
Don’t Let the Warranty Safety Net Fool You
People often think that if they use the highest-end parts, they are automatically safe from liability. But if those parts are not ‘authorized’ or if the installation does not perfectly match the manual’s diagram, you are handing the manufacturer a reason to deny your claim. According to the Association of Home Appliance Manufacturers (AHAM), improper installation is a leading factor in denied service coverage. This is why the way to protect your warranty during a kitchen remodel involves keeping every single receipt and taking photos of the connections before you slide the unit into the cabinetry.

Why does my brand-new machine need a software update?
It sounds ridiculous to need a firmware patch for a machine that washes plates, yet why your new machine requires a firmware update before the first wash is a common hurdle with modern high-efficiency units. These sensors are calibrated at the factory, but local variables like water hardness can trigger errors. If you skip the digital setup, the sensors might give you ‘dirty’ readings from day one, leading to poor performance that no amount of scrubbing will fix. This is a level of complexity that traditional manuals often gloss over.
Your Kitchen Floor is Quietly Killing Your Motor
Another subtle mistake is ignoring the subfloor. I once spent three hours trying to figure out a vibration noise, only to realize the unit was sitting on uneven flooring that caused the frame to slightly twist. Learning how to balance a dishwasher on unfinished subflooring is an advanced skill that prevents your motor from wearing out prematurely due to torque stress. When the unit is not perfectly level, the pump has to work harder to circulate water, leading to a burnt-out capacitor long before its time. Always ensure your unit is rock solid before you call the job finished.
I used to think my ears were my best diagnostic tool. If the machine sounded slightly off, I would start swapping parts blindly. That is a recipe for a very thin wallet and a lot of frustration. Now, I do not even touch a screwdriver until I have my basic digital multimeter in hand. If your unit suddenly refuses to start after a power surge or a particularly heavy cycle, learning how to test your thermal fuse with a basic multimeter is the single most valuable skill you can acquire. It takes thirty seconds and prevents you from buying a costly control board when a fifteen-dollar fuse was the only culprit. Most homeowners treat their appliances like mysterious black boxes, but understanding dishwasher parts a key to effective maintenance means you stop being a victim of expensive ‘parts-cannon’ repair tactics. 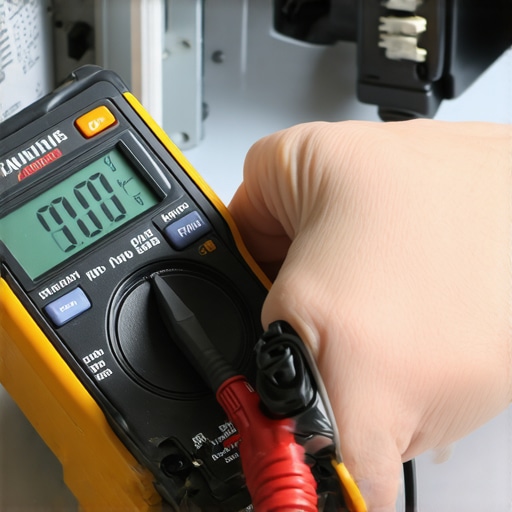
Keep Your Gasket from Drying Out
While you are looking at the internal components, do not ignore the rubber seals. The door gasket is the only thing keeping your expensive hardwood floors from rotting. I have found through years of trial and error that the one maintenance task that doubles the life of your gasket is simply wiping it down with a soft, damp cloth once a month to remove food acids and detergent residue. According to technical documentation from the repair experts at iFixit, environmental factors like grease buildup and chemical erosion are the primary causes of premature seal failure. If the rubber starts to feel brittle or you notice a slight moisture bead at the bottom corners, it is time to check when to replace dishwasher parts for optimal performance before a tiny drip turns into a catastrophic kitchen flood.
Why the Future is Flooding-Proof
Looking ahead to the next few years, I see the appliance industry moving away from manual checks toward fully integrated digital monitoring. We are entering an era of predictive maintenance where your machine will literally ping your smartphone before a leak even begins. Right now, I am personally obsessed with the 20-smart sensor that detects leaks before your kitchen floods. It is a minor investment that acts as a definitive fail-safe for even the highest-quality brass fittings. In the near future, these will likely be standard in every home, but you can get ahead of the curve today by installing a standalone sensor in the ‘low point’ of your dishwasher pan.
How do I maintain my machine’s efficiency over the long haul?
The secret to a long-lived appliance is not just the hardware; it is the water chemistry. I always suggest investigating the benefits of installing a dedicated water softener for appliances if you live in a region with high mineral content. Hard water is the silent killer of internal impellers and heating elements. If you start seeing a white film on your glassware, it is rarely the fault of the detergent—it is usually the water quality. Try the vinegar-bowl trick once a month: place a dishwasher-safe bowl filled with white vinegar on the top rack and run a full sanitize cycle. It is an old-school method, but it works wonders for clearing scale from the spray arms. I challenge you to go out and test that thermal fuse this weekend; it is the best way to get comfortable with the ‘guts’ of your machine before a real emergency happens.
What the Instruction Manual Won’t Tell You About Long-Term Success
Over the years, I have discovered that the most critical part of any dishwasher setup isn’t just following the steps; it is about anticipating where the system will fail. One of the biggest traps is the ‘good enough’ mindset. When you are looking at common dishwasher parts and how to replace them effectively, remember that the components included in the box are often selected by the manufacturer to minimize weight and shipping costs, not to provide the highest level of durability for your home. I have also learned that a quick ‘dry run’ is never enough—you need to run at least two full cycles while watching the connections with a flashlight to catch those slow, pressurized drips that only happen when the water is at its hottest.
Another hard-earned lesson: never trust the factory-tightened screws on the mounting brackets. Always give them a firm extra turn to ensure they are seated properly. Vibration is the enemy of any plumbing joint, and a unit that shifts even a millimeter every time the motor kicks in will eventually pull on the supply line, leading to a fatigue failure that you might not notice until the subfloor is ruined.
My Personal Dishwasher Survival Kit for DIYers
To really succeed and avoid a 2:00 AM emergency, you need a few items that do not come in the standard installation kit. I always keep the 20-smart sensor that detects leaks before your kitchen floods tucked right under the kickplate; it is the best insurance policy money can buy. Additionally, keep a basic digital multimeter in your drawer so you can how to test your thermal fuse with a basic multimeter if your machine suddenly goes dark. For ongoing maintenance, skip the harsh chemicals and use the trick to removing hard water scale without chemical descalers to keep your spray arms spinning freely. These tools turn a nervous homeowner into a confident DIYer who is prepared for anything.
Master Your Kitchen Without the Fear of Leaks
Taking the time to do this right does more than just save you a repair bill; it gives you the confidence to maintain your home’s most hard-working appliance. Once you have a firm understanding dishwasher warranty policies for peace of mind, you can proceed with the knowledge that your investment is secure. You have the tools, the right brass parts, and the insider knowledge to ensure a seamless dishwasher installation that will last for years to come. Do not be afraid to get your hands a little dirty—the reward is a quiet, efficient, and dry kitchen. Did you find a plastic elbow in your installation kit, or did you decide to upgrade to brass right away? Let me know in the comments below!
Related Posts

Why You Should Inspect Your Installation Every Six Months
I remember a time not too long ago when I…

How to Verify Your Professional Installation Receipt for Insurance
It was a moment of quiet panic that finally made…

Why a 24-Inch Opening Isn’t Always Exactly 24 Inches
It was a frustrating weekend in my kitchen. I had…